FBII Security System OMNI®400/OMNI®600 OMNI®624/OMNI®848 User Guide N9939V5 4/04 Rev.
Table Of Contents QUICK REFERENCE .................................................................................................................... 3 INTRODUCTION ........................................................................................................................... 6 SYSTEM REFERENCE ................................................................................................................ 7 ARMING THE SYSTEM.......................................................................
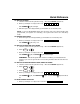
Quick Reference TO ARM THE SYSTEM 1. Check to make sure the system is ready. (The Green READY light is lit.) 2. Enter your 4-digit (or 6-digit) user code. The ARMED/ light will light. 3. Exit through a door designated by your installer as an exit/entry door. NOTE: If you DO NOT EXIT during the exit time and your system installer has programmed your system for Auto-Stay, the system will arm in the Auto-Stay mode. TO DISARM THE SYSTEM 1.
Quick Reference (cont) The following table lists the “Quick Commands” available with this control. Key # 1 # 2 BYPASS Keypads Comments Quick Arm – if system is ready Description All keypads Force Arm – bypasses faulted zones All keypads Quick Bypass All keypads Allows you to arm the system without requiring your user code. User code is always needed to disarm the system. Allows you to arm the system even if some zones are faulted. These zones will be automatically bypassed and will be unprotected.
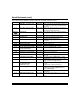
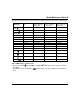
Quick Reference (Cont’d) The following table provides a summary listing of LED indications when using a LED keypad. ON SLOW PULSE (approx. 600mS ON – 600mS OFF) FAST BLINK (approx. 150mS ON – 150mS OFF) SLOW BLINK (approx. 100mS ON – 900mS OFF) Armed Comm.
Introduction Congratulations on your decision to protect your home or business with the OMNI® security system. You have chosen a reliable, state-of-the-art security system that is remarkably easy to operate. Your system has been professionally installed by your local Security Company whose representative can explain the specifics of your system. The keypad is the input and display device for your security system.
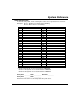
System Reference ZONE DESCRIPTIONS In the following table, enter a description of the area of protection for each zone. Example: Zone 1 Windows on North side of building. Zone 4 Main entrance to building. Zone 1 2 3 4 5 6 7 8 9* 10* 11* 12* 13* 14* 15* 16* 17* 18* 19* 20* 21* 22* 23* 24* Description Zone 25* 26* 27* 28* 29* 30* 31* 32* 33* 34* 35* 36* 37* 38* 39* 40* 41* 42* 43* 44* 45* 46* 47* 48* Description * Zones 9 through 48 are not used with the OMNI400.
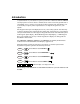
System Reference (cont) SEND-HELP ALERT All keypads are equipped with emergency-pair keys. In order to activate the alert, both keys must be pressed at the same time. The type of keypad you have installed dictates which keys you press. Your installer will show you how to activate these emergency keys. The emergency keys used for all keypads are shown below.
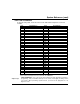
System Reference (cont) USER CODE ASSIGNMENTS In the following table, enter the names of the individuals assigned to each user number. User Assigned To… User Assigned To… 1 33* 2 34* 3 35* 4 36* 5 37* 6 38* 7 39* 8 40* 9 41* 10 42* 11 43* 12 44* 13 45* 14 46* 15 47* 16* 48* 17* 49* 18* 50* 19* 51* 20* 52* 21* 53* 22* 54* 23* 55* 24* 56* 25* 57* 26* 58* 27* 59* 28* 60* 29* 61* 30* 62* 31* 63* 32* 64* * User Codes 16 through 64 are not used with the OMNI400 or OMNI600.
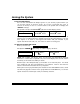
Arming the System IS THE SYSTEM READY? You can arm and disarm the burglar portion of your security system. Before you can arm the system, it must be “ready.” If you have a protected door open, or someone is moving in view of a motion detector, the system will not display the “READY” message.
Arming the System (cont) WHEN THE SYSTEM IS NOT READY If the system is not ready to be armed, the READY/ ✔ light will be off and the display will show which zone or zones are not ready. The following conditions will be indicated by the zone lights (LED keypad) or described on the display: Fast Blink ............................... Alarm or tamper condition Slow Blink/Low Intensity ... Bypass Slow Pulse .............................. Trouble, problem with RF receiver, or low battery Solid On ..............
Arming the System (cont) TO ARM THE SYSTEM IN INSTANT MODE In INSTANT mode, all alarm sensors, including doors that normally have a delay to allow you to disarm the system, will report an alarm immediately if activated. Check to make sure the system is READY/ . When it is ready, press: ✔ INSTANT / followed by your user code.
Arming the System (cont) TO BYPASS A ZONE The Bypass function excludes a zone of protection from the security system until it is unbypassed (either by using the unbypass procedure or when you disarm the system). Bypassing can only be done while the system is disarmed. NOTE: 24-hour zones may be bypassed, but can only be unbypassed if the zone is not faulted (condition has been cleared). button.
Disarming the System When you disarm the system, you disarm only the burglar portion of your system; any smoke or heat detectors and panic keys will remain armed. You must enter through a designated entry door and disarm the system within the time allowed. You can have different amounts of time for different entry points. See your system reference sheet (page 7) for the times established for your system. To disarm your system: Enter your user code.
User Codes TO ADD OR CHANGE A USER CODE Users can be added or changed directly at the keypad. Your system can have up to 15 (OMNI400 and OMNI600), 32 (OMNI624), or 64 (OMNI848) different user codes, with each assigned to one of four authority levels and to a primary partition (OMNI624 and OMNI848 only). The authority level determines the functions that user can perform. In addition, your system can be set up for 4-digit or 6-digit user codes.
Miscellaneous Commands TO DELETE A USER CODE To delete a user, press the CODE/ button followed by the 4-digit (or 6-digit) master user code. Enter the user number, then press [#] to delete. For example, to delete user 3, do the following: Master User Code CODE / User ID # to delete 03 [#] NOTE: User no. 1, the master user, cannot be deleted but it can be changed using the ADD OR CHANGE A USER CODE procedure.
Miscellaneous Commands (cont) QUICK BYPASS If you have Quick Bypass programmed for your system, you can bypass zones without entering your user code. The Quick Bypass procedure is: BYPASS / 2-digit Zone No. (e.g., 01 for zone 1) NOTE: Bypassed zones are not protected when the system is armed. After the bypass command has been accepted, the keypad sounds one long beep.
Miscellaneous Commands (cont) CHANGE PARTITION (OMNI624 and OMNI848 ONLY) To arm or disarm other partitions from your keypad, enter the following: # 0 [1-3, 0, 9] where: 1-3* = the desired partition you wish to change to When you enter a partition number (1-3*), the system displays the current armed state for that partition. You can then arm or disarm the partition by entering the arming/disarming command. 0 = arms all partitions 9 = disarms all partitions * Partition 3 is available on the OMNI848 ONLY.
Miscellaneous Commands (cont) VIEW QUICK COMMAND LIST (LCD Keypads on OMNI624 and OMNI848 ONLY) To view a display of available quick commands, press: # + 5 + 0 . # To step through the available quick commands, press T To exit the quick command list, press . . VIEW TIME (LCD KEYPADS ONLY) To view the system time, press: # 5 + + 1 .
Miscellaneous Commands (cont) DISPLAY ZONE DIRECTORY (LCD KEYPADS ONLY) To view a list of the zones in the current partition, press # 4 + . The zones will automatically scroll. USER LOG VIEW (LCD KEYPADS ONLY) # To view the system log, press: + 5 ,+ 3 + user code.* (*The user code is not required if so programmed by installer.) When the command is accepted, the display will show the most recent event. Pressing either STAY T or / exits this mode.
Miscellaneous Commands (cont) OMNI-LCD or OMNI-LCD-US: Press and hold down the CODE / INSTANT / keys at the same time for about two seconds. Press the and 1 key to toggle the display between: Backlight 120s time out …. and …. Backlight Always On Press the [✱] key to exit this Backlight menu. KEYPAD SOUNDER The sounder (or loudspeaker) housed inside the keypad emits (annunciates) sounds according to the condition of the security system.
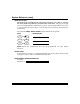
Using a Pager If so programmed, the system can send messages to a pager. The messages are displayed as follows: where: ACCT E XXX "ACCT" = the 4-digit central station No. 1 account number set by your system installer. We suggest that you obtain the number from your system installer and record it here. "ACCT" = "E" = the event code. There are 4 event types: alarms, troubles, openings, and closings.
Using a Pager (cont) The [#], [5], [8] command is accessible only while the system is disarmed and the dialer, dialer delay, and bell are not active. In pager phone number programming mode, only the LCD keypad provides visual display of the numbers already programmed or numbers that are being changed. The LED and fixed-word style keypads provide no visual keypad display of these numbers. 2. Enter your new pager phone number. Your new pager phone number may consist of up to 16 characters (1-9, 0).
Testing the System SYSTEM TEST It is recommended that you test your system once a week using the following procedure: NOTE: If your system is monitored, contact your central station before you perform this test. 1. Arm your security system. 2. Wait until your exit time is over. Then activate the system by opening a protected zone (for example: a window or door). 3. Confirm that the alarm sounding device (bell or siren) sounds.
Recommendations On Smoke Detectors With regard to the number and placement of smoke/heat detectors, we subscribe to the recommendations contained in the National Fire Protection Association’s (NFPA) Standard #72 noted below.
Emergency Evacuation Establish and regularly practice a plan of escape in the event of fire. The following steps are recommended by the National Fire Protection Association: PORCH 1. Position your detector or your interior and/or exterior sounders so that they can be heard by all occupants. M T O RO ED SE O CL B M O RO ED B M O RO ED TH BA B 2nd FLOOR M OO DR N HE BE C IT K BACK DOOR M O RO ED B 2. Determine two means of escape from each room.
Glossary AC/ : Small green power on-off light between the center buttons on the keypad. When lit, the system is running on primary power; when not lit, the system is running off the backup battery. ALARM: Sound from keypad or other horn/siren indicates a burglar alarm, fire alarm, or other condition you should be alerted to. ARMED/DISARMED: These terms refer to the burglary portion of your security system.
Glossary (cont) EXIT DELAY: The period of time allowed between arming the system and leaving through a designated exit/entry door before the system will register an alarm condition. This is determined at the time of installation. INTERIOR ZONE: An interior zone is a group of points that protect the interior of your premises.
RADIO FREQUENCY EMISSIONS STATEMENTS FEDERAL COMMUNICATIONS COMMISSION (FCC) Part 15 This device complies with part 15 of the FCC rules. Operation is subject to the following two conditions: (1) This device may not cause harmful interference, and (2) this device must accept any interference received, including interference that may cause undesired operation. INDUSTRY CANADA This Class B digital apparatus complies with Canadian ICES-003.
INDUSTRIE CANADA AVIS: L’étiquette d’Industrie Canada identifie le matériel homologué. Cette étiquette certifie que le matériel est conforme aux normes de protection, d’exploitation et de sécurité des réseaux de télécommunications, comme le prescrivent les documents concernant les exigences techniques relatives au matériel terminal. Le Ministère n’assure toutefois pas que le matériel fonctionnera à la satisfaction de l’utilisateur.
Limitations of This Alarm System While this system is an advanced design security system, it does not offer guaranteed protection against burglary, fire, or other emergency. Any alarm system, whether commercial or residential, is subject to compromise or failure to warn for a variety of reasons. For example: • Intruders may gain access through unprotected openings or have the technical sophistication to bypass an alarm sensor or disconnect an alarm warning device. • Intrusion detectors (e.g.
ONE YEAR LIMITED WARRANTY Honeywell International Inc., acting through its Security & Custom Electronics business ("Seller"), 165 Eileen Way, Syosset, New York 11791, warrants its security equipment (the "product") to be free from defects in materials and workmanship for one year from date of original purchase, under normal use and service.