
Datasheet


Honeywell Sensing and Control 3
943 Series Ultrasonic Distance Sensor
PK 104141-10
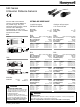
Echo P1
P2
2
3
5
4
1
Echo
P1
P2
10 V
0 V
P1 P2
10 V
0 V
P1P2
20 mA
4 mA
P1 P2
P1P2
20 mA
4 mA
Teach in procedure/Einlernvorgang/Apprentissage
943-F/T4Y943-F/T4V 0 V to 10 V (943...1C0...) 4 mA to 20 mA 943...1D0...
Analogue output adjustment
0 V...10 V/4 mA...20 mA
P1 and P2 define the analogue output slope. P1
determines the 0 V/4 mA position and P2 the
10 V/20 mA position.
Positive slope: P1 < P2
Negative slope: P2 < P1
Normal function
The Echo LED is ON when the echo is
received (this is the alignment LED confirming
that the target is properly aligned). The LED P1
is ON, when the target is between the sensor
face and P1. The LED P2 is ON when Target is
farther than P2.
Teach In of P1 position (0V/4 mA output)
Connect the Teach In line (pink/5) with GND for
8 seconds until the LEDs P1 and Echo LED
are blinking simultaneously (blinking rate will be
2 Hz). Then release the contact: the sensor is
now in Teach In mode for P1 (0 V/4 mA):
• LED P1 change the blinking to 1 Hz and the
Echo LED returns to normal function to show
if the target is properly aligned.
• There is a time window of 1 minute to teach
P1 position.
• Place target at the right distance P1.
• Contact and release Teach In line (pink/5)
with the GND, and P1 is now programmed.
The sensor returns into normal function with
the new value for P1.
Teach In of P2 position (10V/20 mA output)
Connect the Teach In line (pink/5) with GND for
13 seconds until LEDs P2 and Echo LED start
blinking simultaneously (blinking rate will be 2
Hz). It is important to note that before reaching
the P2 teach in mode, P1 LED will be blinking
for few seconds before reaching P2. After 8
seconds the LEDs P1 and Echo will be
blinking, however after an additional 5 seconds
P2 LED and Echo LED will be blinking with a 2
Hz rate. Release contact Teach in (pink/5)
contact and now the sensor is in Teach In
mode for P2:
• The P2 LED will be blinking now at 1 Hz rate
and the Echo LED will return to its normal
function (alignment LED).
• There is a time window of 1 minute to do the
programming of P2.
• Place the target to the position P2.
• Contact and release Teach In line (pink/5)
with GND.
P2 is programmed and the sensor returns into
normal function with the new value for P2 in
memory.
Analoge Kennlinie
0 V...10 V/4 mA...20 mA
Mit P1 und P2 wird der Arbeitsbereich der
analogen Kennlinie festgelegt: P1 bestimmt die
Position an der die Kennlinie den Wert
0 V/4mA annimmt, P2 bestimmt die Position
10 V/20 mA.
Positive Kennlinie: P1 < P2
Negative Kennlinie: P2 < P1
Normale Funktion
Echo LED an, wenn Echo empfangen wird
(Ausrichthilfe). LED P1 ist an, wenn Objekt
sich vor P1 befindet, LED P2 ist an, wenn sich
Objekt hinter P2 befindet.
Teach In Modus P1 (Position 0 V/4 mA)
Verbinde Teach In Ausgang mit GND ca. 8 sec.
bis LEDs P1 und Echo anfangen mit ~2 Hz zu
blinken.
Verbindung lösen: jetzt ist Sensor im Teach In
Modus für P1:
• LED P1 blinkt mit ~ 1 Hz; Echo LED
normale Funktion (Ausrichthilfe).
• Innerhalb von 1 min. muss P1 eingelernt
werden!
• Objekt an neue Position P1 bringen Teach In
Ausgang kurz mit GND verbinden und lösen:
P1 ist eingelernt.
Sensor arbeitet jetzt in normaler Funktion mit
neuem eingestellten Wert für P1.
Teach In Modus P2 (Position 10 V/20 mA)
Verbinde Teach In Ausgang mit GND ca. 13
sec. bis LED P2 und Echo LED anfangen mit
~2 Hz zu blinken.
Nach 8 sec. fangen LED P1 und Echo LED an
zu blinken, nach weiteren 5 sec. blinkt dann
LED P2 und Echo LED mit ~2 Hz. Verbindung
lösen: jetzt ist Sensor im Tech In Modus für P2:
• LED P2 blinkt mit ~1 Hz; Echo LED normale
Funktion (Ausrichthilfe).
• Innerhalb von 1 min muß jetzt P2 eingelernt
werden!
• Objekt an neue Position P2 bringen.
• Teach In Ausgang kurz mit GND verbinden
und lösen: P2 ist eingelernt.
Sensor arbeitet jetzt in normaler Funktion mit
neuem eingestellten Wert für P2.
Sortie analogique
0 V...10 V/4 mA...20 mA
P1 et P2 définissent les deux limites de la sortie
analogique du capteur. P1correspond à la limite 0
V/4 mA, et le point correspond à la limite 10 V/
20 mA.
Pour obtenir une pente positive, il faut donc que
P1 < P2
Pour obtenir une pente négative il faut donc que
P1 > P2
Fonction en situation normale
Le LED correspondant à l’ Echo reste allumé si
un écho est reçu par le capteur. Cela permet de
vérifier que le capteur est correctement aligné
avec la cible. Le LED P1 est allumé si la cible est
placée avant la position P1. Le LED P2 est
allumé si la cible est placée après la position P2.
Apprentissage de la position P1
(sortie 0 V/4 mA)
Connecter la sortie Teach In (apprentissage,
câble rosé/5) avec GND (masse) pendant 8
secondes jusqu’à ce que les LEDs P1 et Echo
clignotent à une cadence de 2 Hz. A ce moment,
déconnecter la sortie GND (masse) pour
permettre au capteur de rentrer en mode
programmation pour la limite P1:
• Le LED P1 change de clignotement et passe à
une cadence de 1 Hz; le LED Echo retrouve sa
fonction normale normale d’alignement.
• A ce moment, une séquence d’un minute
commence pour effectuer la programmation de
la position P1.
• Placer la cible à la position souhaitée.
• Connecter puis déconnecter la sortie Teach in
(apprentissage, câble rosé/5) avec GND
(masse).
La position P1 est maintenant mémorisée. Le
capteur travaille en fonction normale avec la
nouvelle valeur pour P1.
Apprentissage de la position P2
(Sortie 10 V/20 mA)
Connecter la sortie apprentissage (Teach In,
rosé/5) à la masse (GND) pendant environ
13 secondes et cela jusqu’à ce que les LEDs P2
et Echo clignotent à une cadence de 2 Hz. Après
8 secondes, les LEDs P1 et Echo commenceront
à clignoter mais il faudra attendre 5 secondes
supplementaires pour que les LEDs P2 et Echo
clignotent et atteindre l’apprentissage de la
position P2. A ce moment, il faut déconnecter la
masse (GND) et le capteur est maintenant en
mode programmation P2:
• Le LED P2 clignote maintenant à une cadence
de 1 Hz et le LED Echo retourne à sa fonction
normale de temoin d’alignement de la cible.
• A ce moment, une séquence d’un minute
commence pour effectuer la programmation de
la position P1.
• Situation la cible à la position P2 desirée.
• Connecter et déconnecter la sortie
apprentissage avec la sortie masse (GND). P2
est maintenant programmée.
Le capteur est maintenant en fonction normale
avec la nouvelle valeur pour la position P2.