
Installation Information


AM-1 SERIES™
3 62-3075EFS—03
provide mixed tempered water to connected fixtures. This
provides constant water temperature under different working
conditions.
MAINTENANCE PROCEDURES
Hard water conditions may result in scale deposits, causing
binding of internal parts in extreme cases. Cleaning the
internal parts will usually restore the valve to proper operating
conditions. In some cases, it may be necessary to replace the
lower assembly.
To clean and/or replace the lower assembly, shut off water
and:
1. With a screwdriver, remove screw and handwheel.
2. Loosen upper nut (do not remove) to allow engaging an
adjustable wrench on lower nut. Unscrew lower nut
(counterclockwise). This removes top assembly.
3. Brass top assembly will pop up. Remove lower assem-
bly, diffuser and spring.
4. Carefully remove any scaling (calcium deposit) or for-
eign particles from valve seat and other internal parts.
Use vinegar to remove calcium. Soak parts until calcium
becomes soft and can be scrubbed and washed off. Do
not use solvents or scratch metallic / Teflon
®
coated sur-
faces.
5. Replace cleaned spring, diffuser and lower assembly
following instructions below or use new replacement kit
assembly. For correct kit number, see Table 1.
Install spring, diffuser and lower assembly:
A. Insert spring onto diffuser.
B. Insert diffuser with spring end first into body.
C. Fit valve top assembly into lower assembly and insert into valve.
D. Tighten lower nut.
E. Reposition handwheel and insert screw. Turn handwheel to
desired temperature setting.
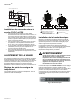
Fig. 3. AM-1 Series valves assembly.
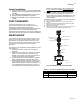
Fig. 4. Dimensions in in. (mm).
M23941
LOWER ASSEMBLY
HANDWHEEL
DIFFUSER
SPRING
VALVE BODY
TOP ASSEMBLY
LOWER NUT
UPPER NUT
O RING
RETAINING RING
C
H
MIX
H
Table 1. AM-1 Series Replacement Kits
Model Temperature Range Part No.
C 70°–120° F (21°–49°C) AM-1-020 RP
STD 70°–145° F (21°–63° C) AM-1-025 RP
M23938
MIX
H
C
B
C
2-1/4
(57)
A
Ø 1-51/64
(46)