
Install Instructions
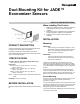
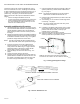
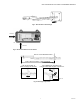
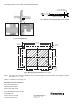
Table Of Contents

INSTALLATION INSTRUCTIONS
62-0334-01
Duct Mounting Kit for JADE™
Economizer Sensors
PRODUCT DESCRIPTION
The duct mounting kit is used for mounting temperature and
humidity sensors inside sheet metal ductwork.
A separate controller such as the JADE™ Economizer
System (Model W7220) provides power and communications
for the duct mounted sensors.
SPECIFICATIONS
Operating, Storage, and Shipping Temperature range:
-40 to 150 °F (-40 to 65 °C)
Dimensions:
Rod: H 0.58 in. (14.73 mm), W 0.45 in. (11.4 mm),
L 9.84 in. (250 mm)
Gasket: H 2.36 in. (60 mm), W 3.15 in. (80 mm),
L 0.06 in. (1.57 mm)
Flange: H 2.36 in. (60 mm), W 3.15 in. (80 mm),
L 0.89 in. (22.5 mm)
NOTE: See Fig. 8 on page 4 for an exact size mounting tem-
plate.
Kit Weight: 0.097 lb. (0.044 kg)
BEFORE INSTALLATION
Review the “Specifications” before installing the duct mounting
kit.
When Installing This Product
1. Read these instructions carefully. Failure to follow them
could damage the product or cause a hazardous
condition.
2. Check ratings given in instructions and on the product to
ensure the product is suitable for your application.
3. Installer must be a trained, experienced service
technician.
INSTALLATION
Mounting
IMPORTANT
Avoid mounting in areas where acid fumes or other
deteriorating vapors can attack the metal parts of the
sensor, or in areas where escaping gas or other
explosive vapors are present.
IMPORTANT
The duct mounting must be must be located in a
position that allows clearance for wiring, servicing,
and removal of the sensor.
The sensor is mounted in the air stream using the duct
mounting kit. Use #6 or #8 screws (screws are not provided
and must be obtained separately). Use the dimensions listed
in the “Specifications” and the template in Fig. 8 on page 4 as
a guide.
The sensor must be mounted to allow air flow through the
sensor housing vent slots on the end or side of the sensor.
Refer to the airflow direction arrow on the flange and Fig. 4 on
page 3 for the recommended orientation to the air stream.
Sensor Mounting
The sensor can be mounted directly onto the mounting rod in
the duct mounting kit. See “Assembly and Mounting
Procedure” on page 2.
The duct mounting kit contains a rod to hold the sensor in the
duct airway, a flange to secure the sensor rod to the duct wall
and to fill the access hole, and a gasket to prevent air from
leaking through the duct wall and seal wires.
The rod has channels for threading the wire to prevent loose
or hanging wire in the duct.
ROD - 1 PIECE
FLANGE - 1 PIECE
GASKET - 1 PIECE
M32281