ScanPal EDA70 Enterprise Tablet with Android™ 7.
Disclaimer Honeywell International Inc. (abbr. HII) reserves the rights to modify the specifications and other information mentioned in this User Guide without prior notification. In any case, users should confirm with HII whether any changes were made. This publication does not represent any commitments of HII. HII is not responsible for any technical or editing errors or omissions contained in this manual, nor for any incidents or indirect damages caused by providing, implementing or using this material.
Table of Contents Table of Contents 1 Product Features of ScanPal Series EDA70-X Terminal.............................................................................. 1 About EDA70-X Terminal................................................................................................................................. 2 Battery ............................................................................................................................................................... 6 Charging .......
Table of Contents GMS ................................................................................................................................................................ 35 3 Scan Function................................................................................................................................................. 36 Scan Function ..................................................................................................................................................
Table of Contents Upgrading system software ............................................................................................................................. 69 Upgrading AutoInstall application........................................................................................................... 69 Upgrading composite key ........................................................................................................................ 69 Manually upgrading Recovery Menu ..............
Technical Support If you need installation or troubleshooting help, please contact us via: Knowledge base: www.hsmknowledgebase.com Honeywell knowledge base provides thousands of turnkey solutions. If the knowledge base can't help you solve your problems, you can submit your questions or ask question on Honeywell technical support website. Technical support website: www.hsmsupportportal.
Chapter 1: Product Features of ScanPal Series EDA70-X Terminal 1 Product Features of ScanPal Series EDA70-X Terminal This chapter is about ScanPal series EDA70-X (X refers to 0 and 3, as in all other cases below) terminal (hereinafter called “EDA70-X” or “terminal”) equipped with Android 7.1 OS. Information will be given on the terminal’s basic features, functions and accessories.
Chapter 1: Product Features of ScanPal Series EDA70-X Terminal About EDA70-X Terminal Honeywell EDA70-X tablet is an enterprise-focused tablet that uses the Android operating system to provide reliable and secure management of coporate data and wireless communication. The main features of EDA70-X are: large-screen display, high-capacity battery, bar code imager and Rugged durability. 2 • Android™ 7.1 OS. • 2 GB dynamic RAM, 16GB flash memory. • Large display with sensitive multi-touch screen.
Chapter 1: Product Features of ScanPal Series EDA70-X Terminal Front view of the EDA70-X User Guide for ScanPal Series Terminal 3
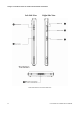
Chapter 1: Product Features of ScanPal Series EDA70-X Terminal Left Side View Right Side View Side and bottom views of the EDA70-X 4 User Guide for ScanPal Series Terminal
Chapter 1: Product Features of ScanPal Series EDA70-X Terminal Back view of the EDA70-X User Guide for ScanPal Series Terminal 5
Chapter 1: Product Features of ScanPal Series EDA70-X Terminal Battery EDA70-X uses 3.8V rechargeable lithium ion battery as its main power supply. The battery capacity is watt hour. Battery life is influenced by many factors, such as: screen brightness, the length of time before the screen automatically go to sleep, input configurations, extreme temperature and using behaviors, etc. Honeywell suggests you to keep the battery charged to avoid data loss.
Chapter 1: Product Features of ScanPal Series EDA70-X Terminal Replacing batteries When the battery power is low, you can charge it together with the terminal, or replace it with a fully-charged battery. 1. Save all the files and close all running Apps. 2. Long press the power key. Until the follow interface pop up: 3. Tap Power off. 4. EDA70-X will power off directly.
Chapter 1: Product Features of ScanPal Series EDA70-X Terminal After it's turned off, do as the following instructions manually: 8 1. Press down the battery cover safety button to move the lock to the unlock position at right; 2.
Chapter 1: Product Features of ScanPal Series EDA70-X Terminal 3. Insert the battery (Insert the non-connector side first, then press the battery down to establish connection between the battery and the phone). Press down the battery cover. 4.
Chapter 1: Product Features of ScanPal Series EDA70-X Terminal 5. Press down the battery cover safety button to move the battery cover safety lock to the lock position at left Battery icon Battery icon on the status bar shows the power status of the battery. The following table only contains several of the icons. For detailed information about battery life and power remained, please go to Settings > Battery.
Chapter 1: Product Features of ScanPal Series EDA70-X Terminal Power indicator on the upper left corner of the terminal shows the battery charging status. It can also be used as system message indicator. For detailed setting methods, please refer to http://developer.android.com/guide/topics/ui/notifiers/notifications.html.
Chapter 1: Product Features of ScanPal Series EDA70-X Terminal Changing power indicators If the default indicators for battery charging (flashing green) is inappropriate for your environment, you can change the indicator. In addition to changing the default power indicator, you can also select: • Default Battery LED • No Battery LED If you prefer the indicator to be solid amber and to change to solid green when in charging, you need to perform Default Battery LED settings.
Chapter 1: Product Features of ScanPal Series EDA70-X Terminal Checking the remaining battery capacity Except for the battery icon and power indicator, you can also get the battery capacity information from Settings. 1. Tap Settings 2. Tap Battery. The current percentage of remaining battery capacity and the remaining time will be displayed. The list will present the power consumed by each application and service.
Chapter 1: Product Features of ScanPal Series EDA70-X Terminal Battery maintenance recommendations and safety protection measures 14 • Fully charge the battery before using it. The battery is only partly charged when get packed. • Refer to the chapter "charging" to get the right process for battery charging. Using the battery for other devices may cause damages on the device or the battery. • Avoid battery or terminal drops.
Chapter 1: Product Features of ScanPal Series EDA70-X Terminal Enabling Airplane mode If you don't need to connect to any wireless network, you can enable the airplane mode to turn off all wireless receivers to save power. 1. Tap Settings. 2. In the Wireless & Networks section, tap More. 3. Tap the toggle box to enable Airplane Mode.
Chapter 1: Product Features of ScanPal Series EDA70-X Terminal Powering on After the battery is fully charged and installed into ScanPal EDA70-X, turn on it for the first time: Press down and then release the power key. Please note: after complete the installation instructions, the welcome interface will not appear again. The interface appears as locked screen interface after each time you turn on the terminal. Unlocking the screen Every time you turn on the terminal, you need to unlock the screen.
Chapter 1: Product Features of ScanPal Series EDA70-X Terminal Scanning Indicator The scanning indicator indicates the status of the scanner. For barcode scanning method, please refer to the chapter "Scanning barcodes".
Chapter 1: Product Features of ScanPal Series EDA70-X Terminal Setting screen backlight The terminal's screen is equipped with background light sensor which can automatically adjust backlight intensity to save power and ensure the display readability. You may set the backlight intensity based on the environment. 1. Tap Settings. 2. Tap Display>Brightness level 3. Tap Adaptive brightness to automatically adjust the backlight intensity, or slide adjustment bar to set the backlight intensity.
Chapter 1: Product Features of ScanPal Series EDA70-X Terminal 1. Press the button on the right side of the terminal (∆or∇). Volume bar will show on the screen. 2. Adjust the volume by pressing volume button or slide volume bar. 3. Hold down the volume button or pull the volume indicator to the extreme left to activate vibration mode.
Chapter 1: Product Features of ScanPal Series EDA70-X Terminal Enabling vibration mode You can set the terminal to vibration/silence mode in the office. Method 1: Long press the volume button or drag the volume indicator to the extreme left to activate vibration mode. Method 2: 20 1. Long press the power button. Power options will be displayed on the screen: 2. Tap Enabling vibration mode.
Chapter 1: Product Features of ScanPal Series EDA70-X Terminal Audio settings This chapter will describe about audio and sound settings. To change audio setting, go to Settings > Sound. Audio and sound settings Settings Description Use the volume adjustment bar to set the volume for: Media Volume Alarm Volume Music, videos, games and other medias.
Chapter 1: Product Features of ScanPal Series EDA70-X Terminal Inserting SD card You can use a SD card to expand the memory or to install software. Honeywell recommend the using of Single Level Cell (SLC) graded SD memory card or SDHC memory card in order to achieve optimum performance and durability. Note: format the memory card when you use it for the first time. 1. Turn off the terminal. 2. Press down the battery cover safety button to move the lock to the unlock position at right; 3.
Chapter 1: Product Features of ScanPal Series EDA70-X Terminal File transfer Files can be transferred between the terminal and a computer by using USB CUP. By connecting the terminal to a computer with USB CUP, you can view the files in the terminal, or transfer the files to the computer, or transfer files from the computer to the terminal. If you transfer files with a Mac computer, you need to use Android File Transfer app (it can be download via www.android.
Chapter 1: Product Features of ScanPal Series EDA70-X Terminal EDA70-X Accessories EDA70-X terminal is equipped with original battery. All other accessories require separate order and shipment. If necessary, please contact your local sales representatives.
Chapter 2: User interface and applications 2 User interface and applications This chapter introduces the Android system user interface, and how to interact with the screen. Users can also learn about a variety of Honeywell applications on the terminal through this chapter.
Chapter 2: User interface and applications User interface Android 7.1 operating system user interface provides users with a perfect touch and easy navigation experience. The main interface After turning on the terminal and setting up your preferred language, the main interface will be displayed on the screen first.
Chapter 2: User interface and applications Search bar User Guide for ScanPal Series Terminal Use Google Search to search on the web or the terminal.
Chapter 2: User interface and applications Navigation and function keys There are navigation and function keys below the common applications in the main interface of EDA70-X; other function keys are on the two sides of the terminal.
Chapter 2: User interface and applications New text messages or multimedia information Battery power is 100% full Text messages or multimedia information transmission failed Being in charge with external power supply New mails Airplane mode is enabled The terminal is connected to the computer via USB cable EDA70-X is syncing with a Bluetooth-enabled device ADB has been enabled (USB troubleshooting has been enabled) Bluetooth has been enabled Data Sync Wi-Fi signal is adequate Sync or account lo
Chapter 2: User interface and applications Viewing system messages Users can view EDA70-X's system messages in the notification page. • Open the notification page: swipe down from the top of the screen. • Close the notification page: swipe up from the bottom of the screen or tap Return key or Home key. Managing system messages When the applications send system messages to EDA70-X, users can manage them quickly. 30 1. When the system message icon appears, swipe down the screen. 2.
Chapter 2: User interface and applications Personalizing the main interface You can add application icons to either one of the main interface to open these applications more quickly. . To display All applications. 1. Tap or pull upward 2. To move the application icon to the main interface: long press the icons to be added to the main interface, then slide your finger to place it on either one of the main interface.
Chapter 2: User interface and applications Touch screen gestures Use your finger can operate applications, menus, on-screen keyboard and other functions on the interface. • Tap a function or application to select or start it. • To enter a name or password, touch the place to enter and on-screen keyboard will appear for input. Other touch screen gestures include: • Long press: press an icon and hold until the system reacts.
Chapter 2: User interface and applications Honeywell applications Honeywell helps users troubleshoot and connect the terminals to other devices and networks. Tap or pull upward to show the applications below. For more details, please visit: www.honeywellaidc.com. Honeywell software applications available on EDA70-X Icons User Guide for ScanPal Series Terminal Applications Descriptions Demos Demo and more included, allows testing and using functions like scanning.
Chapter 2: User interface and applications 34 Route View routing information Wi-Fi info View Wi-Fi information Wi-Fi Radio Settings It’s mainly to set Wi-Fi low power dissipation and Wi-Fi roaming switch threshold User Guide for ScanPal Series Terminal
Chapter 2: User interface and applications Download Enterprise Application Lock (Applock) Applock is an Android application which allows you to configure the apps that may or may not be allowed. The User Guide and installation procedure for Applock may be downloaded via: www.honeywellaidc.com Unlocking developer options If you are a developer for EDA70-X, you can easily unlock developer options. Developer options can help you test and troubleshoot during the process of developing EDA70-X.
Chapter 3: Scanning Function 3 Scan Function This chapter describes how to scan barcodes and set scan functions.
Chapter 3: Scanning Function Scan Function Integrated scanner enables reading for 1D and 2D barcode, composite code and postcode. It supports comprehensive, highly flexible scanning in real applications. Imaging Engine can capture black and white images, such as signatures and damaged inventory lists. How to transfer data via Android keyboard input Scan wedge feature enables transferring scanned barcode data to active applications via Android keyboard input.
Chapter 3: Scanning Function Add a prefix and suffix to make the data string in the following order: • Prefix • Sign prefix • Barcode data • Suffix Prefix Data processing settings Sign prefix Suffix Parsing the replacement for prefix and suffix string Activate Total Freedom plug-in Data processing settings Data editing plug in Input the final data as Android Key Events Data processing settings wedge Prefix and suffix will be replaced within the string value.
Chapter 3: Scanning Function Restoring default scan settings Users can easily cancel all the changes made to default folder and restore the factory defaults. Note: Restore factory defaults for a certain setting, all the settings under this folder will be restored to factory defaults. 1. Tap the icon on the upright of any Scan Settings interface. 2. Tap Restore all defaults.
Chapter 3: Scanning Function Prefix Define the character to be added in front of the decoding barcodes No Suffix Define the character to be added at the end of the decoding barcodes No Data editing plugin Specify a free plug-in for data editing No Specify a character prefix to decode the barcode data Character prefix Start your browser • • • None Honeywell AIM No To open or close URL barcode, if the barcode start with http:// or https://, the browser will open the respective URL Enabled The
Chapter 3: Scanning Function Symbology settings Enable or disable a barcode symbology with Symbology Settings. Tap on a symbol to view and modify the configuration parameters of the symbol.
Chapter 3: Scanning Function 42 Composite Disabled Han Xin Disabled IATA 2 of 5 Disabled Interleaved 2 of 5 Enabled Korean Post Disabled Matrix 2 of 5 Disabled Maxicode Disabled Micro PDF 417 Disabled MSI Disabled PDF 417 Disabled QR Code Enabled RSS (GS1) Disabled Standard 2 of 5 Disabled Telepen Disabled TLC 39 Disabled Trioptic Disabled 2D Postal Settings Disabled OCR Disabled User Guide for ScanPal Series Terminal
Chapter 3: Scanning Function Image settings There should be no need for users to change image color rendering. Covering the recommended value is disabled by default. Recommended image settings can be applied in many environments; only the users who have more in-depth understanding on the image can change the settings. Trigger settings Trigger settings can set up the using patterns for scan key.
Chapter 3: Scanning Function Notification settings You can set up the responses during scanning process for EDA70-X in the notification settings. Notification settings 44 Settings Description Default Good Read Notification Enable or disable Good Read Notification. Notification includes green indicator, short beep and optional short vibration Enabled Bad Read Notification Enable or disable Fail to Read notification.
Chapter 3: Scanning Function Scanning barcodes Scan engine will emit scanning beams for accurate barcode aiming. It will also support a full range of 360° scanning, which will make barcode scanning more convenient. Note: Before scanning a barcode, you only need to enable the desired barcode symbology in the settings. 1. Tap or pull upward 2. Align the scanning window with the barcode and stably place the terminal a few inches away from the barcode. 3.
Chapter 4: Using Telecommunication Function 4 Using Telecommunication Function You can use the phone function of the terminal (Only for EDA70-3 WWAN version) to make and receive calls, and to transmit data via wireless network as well.
Chapter 4: Using Telecommunication Function Telecommunication Function The phone function of the terminal is realized with a speaker and a microphone. The phone function also supports a Bluetooth headset or hands-free device. The EDA70 will use loudspeaker mode without connecting bluetooth headsets or other external audio devices. The phone function is enabled by default.
Chapter 4: Using Telecommunication Function Making a call After the phone is successfully activated, you can make calls. 1. Click on the main screen or display screen. If the screen shows numbers list and not telephone keyboard, lightly press return to the keyboard; 2. Enter the numbers and lightly press 3. To end the call, press to below to make the call; . Answering a call When a user receives an incoming call, the screen will be illuminated with the caller's number displayed.
Chapter 4: Using Telecommunication Function Making an emergency call If SIM card has been misplaced, or if the user does not have valid SIM card, the user can still make emergency calls. Under both circumstances the device will show no service access, but calls to emergency numbers (e.g. 112, 911, 000, 08, 118, 119 or 999) will still be connected.
Chapter 5: Using Camera 5 Using Camera This chapter describes how to use a color camera to take photos and videos.
Chapter 5: Using Camera Color camera EDA70-X is equipped with 5 megapixels color camera which can be used to take photos and videos. The camera and flash light are located on the back of the terminal. Tap Photos Gallery app to view all the photos and videos stored on the terminal. Adjusting camera and video settings Adjust the camera and video settings in the Camera apps. Zooming Focus adjustment is realized by zooming actions of the fingers on the screen.
Chapter 5: Using Camera 2. Take the screen as a viewfinder and move the terminal until you get the images you want to capture. 3. Tap the screen to focus. By default, the camera automatically senses the ambient light, and the flashlight will be opened if necessary. 4. Press the camera key to take photos Shooting videos This section describes how to use the camera function to shoot videos. . 1. Tap All Applications and then tap Camera 2. Tap Camera Shooting Options on the bottom right 3.
Chapter 6: Configuring Terminal 6 Configuring Terminal This Chapter deals with configuration of EDA70-X. The user can also learn how to configure network communication and wireless security.
Chapter 6: Configuring Terminal Terminal configurations Users can configure many parameters for the terminal, such as barcode symbologies to be decoded or network settings. These parameters set by the user decide how the terminal works. Users can configure the terminal in Application Settings. Setting launch applications Set the applications using the application menu. Tap Settings.
Chapter 6: Configuring Terminal Suggestions Automatically recommend quick access through intelligent pre-judgment of user’s needs. Wireless & networks Settings Introductions Wi-Fi To enable or disable Wi-Fi radios. When Wi-Fi is enabled, available Wi-Fi networks can be viewed by taping this bar. Mobile data (only supported by RDA70-3 WWAN) (This menu will be displayed after inserting SIM card) Enable or disable mobile data. When it is enabled, tap the bar to view available mobile network).
Chapter 6: Configuring Terminal Device Settings Introductions Sound Set sound for calls and notifications, including the tone and volume. Display Set screen brightness, wallpaper, screen timeout, font size and screen rotation. Notifications Set whether the app allows notifications to be sent Storage Shows the remaining memory space. Battery Shows battery usage data and the current battery status. Apps Shows applications downloaded and on the run.
Chapter 6: Configuring Terminal Honeywell Settings Settings Introductions Key Remap Redefines left scan button, right scan button, middle scan button and P1, P2 buttons. For more information please refer to Mapping Button. Honeywell Battery LED Configuring battery LED lighting modes. Scan Settings Configure ScanPal EDA70-X imager. For more help, please refer to changing scan settings.
Chapter 6: Configuring Terminal Network communication Users can connect the terminal to wireless and wired networks. Users can get the terminal connected via the following ways: • 802.11 radios • Bluetooth • USB Connecting to Wi-Fi networks When communicating through wireless networks, GEDA70-X transfer data through 802.11 radios. Before connecting to a Wi-Fi network, users need to know the Security Protocol of the network and the certificates it required. Usually, 802.
Chapter 6: Configuring Terminal If the network is secure, a form will pop up asking you to fill in the necessary information (for example: certificate name, password or other credentials). To connect to a secure network, enter the required information, and then tap Connect. • To leave the network that has been connected, tap Forget. For example, users can choose to forget a network that they won't use again. • To close the network information screen, tap Cancel.
Chapter 6: Configuring Terminal 5. Enter the network proxy server settings. 6. Tap Save. Disable Wi-Fi notifications Wi-Fi is enabled by default. Users will receive notifications in the Status Bar when the terminal finds wireless networks. Users can disable these notifications. 60 1. Enter Application Settings screen. 2. Tap WLAN bar. 3. Tap the Settings icon on the top right. 4. Tap Advanced to display Wi-Fi Advanced Menu. 5. Uncheck the Network notification to disable Wi-Fi Notifications.
Chapter 6: Configuring Terminal Connecting to a virtual private network The terminal supports connection to virtual private networks (VPN). This section describes how to add and connect to VPN. To configure a VPN, users must consult your network administrator. Users can view and change VPN settings in the Application Settings. Note: Before accessing VPN, users need to set a lock screen password. Add VPN Before connecting to a VPN, users must first add the relevant information of the VPN. 1.
Chapter 6: Configuring Terminal Wireless Security The terminal provides the following security solutions for users' wireless network. • WPA2™ • WPA • 802.1x • WEP Before setting up security program, you must first enable the radio and set the date and SSID on the terminal. To use 802.1x program, users must download a root certificate to the terminal. To use Transport Layer Security protocol (TLS) together with 802.1x , users also need to download a user certificate first.
Chapter 6: Configuring Terminal Disable or delete certificates If the certificate is a stolen one or the organization selected by the user does not trust the certificate, the user can disable or delete the certificate. 1. Enter Application Settings, tap Safety > Trusted Credentials. There are two tabs in the Trusted Certificate screen: • System tab displays CA certificates installed in ROM. • User tab displays CA certificates installed by users. 2.
Chapter 6: Configuring Terminal Bluetooth communication EDA70-X supports Bluetooth communication, allowing users to get connected with other Bluetooth-enabled devices. Before searching for and connecting to other Bluetooth-enabled devices, users must enable the Bluetooth radio. By default, Bluetooth radio is disabled. Bluetooth radio can be restored to its current state by system resetting. If users have reset the system data, they must re-establish the paired devices.
Chapter 6: Configuring Terminal 4. (Optional) If the desired device is not listed, please check if the Bluetooth of that device has been enabled and is detectable, and then tap Scan Device. 5. Select the device to pair with. After Pairing Dialog Box is displayed, enter the device PIN code, and tap OK. When the device and the terminal s have been successfully paired, the device name will appear in the list of paired devices at the top. 6.
Chapter 6: Configuring Terminal Configuring Bluetooth settings Users can configure for Bluetooth in Application Settings. 1. Enter Application Settings screen, and tap Bluetooth. 2. Tap Menu icon to select one for setting: • Refresh. • Tap Rename phone to change the name of the terminal. Enter a new name and then tap Rename. • • Tap Show received files to view data in the received files. Searching for EDA70-X By default, the device can be searched during Bluetooth is turned on.
Chapter 6: Configuring Terminal Communication via USB By communication via USB, users can transfer data to other devices or receive data from other devices with the following accessories. • USB CUP cable For more information about accessories, please contact local resellers. Near Field Communication NFC technology provides short-range wireless data transmission between ScanPal EDA70-X with NFC tags or other NFC-enabled devices near its back.
Chapter 7: Management and Maintenance 7 Management and Maintenance This Chapter deals with software upgrade, resetting terminal and maintenance of EDA70-X.
Chapter 7: Management and Maintenance Upgrading system software The other system softwares of EDA70-X can be upgraded by downloading ".zip" files from the Technical Support Website. Website: www.hsmcontactsupport.com or www.honeywellaidc.com. Upgrading AutoInstall application 1. Copy the upgrade file "EDA70-ota-xxx.zip" to the following EDA70-X's system folder: • File Explorer\External Memory Card\Honeywell\Autoinstall • IPSM\Honeywell\Autoinstall 2. Tap All Applications > AutoInstall Settings. 3.
Chapter 7: Management and Maintenance Restarting the Terminal If the terminal or an application is locked or doesn't respond when pressing the power key, you need to restart the terminal. When restarting, the terminal will use the current configuration saved in the flash memory.
Chapter 7: Management and Maintenance Restore factory settings If the terminal appears to be locked, try a cold boot. If resetting is invalid, try to restore factory settings, restart the terminal to make it work again and do troubleshooting later. Warning: This action will clear all data in the terminal, including all applications and data, but excluding data stored in flash memory or external storage device. 1. Tap Settings. 2. Tap Backup & Reset. 3. Tap Factory Data Reset. 4. Tap Reset Phone.
Chapter 8: Specifications 8 Specifications Mechanical and environmental specifications This Chapter provids the physical and environment specifications of EDA70-X Product dimensions Length 214 mm Width 118 mm Thickness 21 mm Weight (with battery) 550 g (with battery) Tumble and drop standards Tumble 200 impacts within 0.5m Drop Multiple 1.2 m drops to concrete Power and electrical specifications Battery Rechargeable Li-ion battery, 3.8 V, 4000mAh Charging power 5 V, 1.
Chapter 8: Specifications Display specifications 7.0-inch color LCD/HD1280 x 720 pixel/full-perspective/capacitive touch screen Language Support Language Support and not limited to WW English, French, German, Italian, Spanish, Simplified Chinese, Traditional Chinese.
Chapter 8: Specifications • RSS Limited • RSS Expanded • Telepen • Trioptic Code • UPC-A • UPC-E 2D codes: • Aztec Code • Codablock A • Codablock F • DataMatrix • HanXin • Maxicode • Micro PDF 417 • MicroQr • PDF 417 • QR Code • TLC39 • OCR-A • OCR-B Postal codes: • Australian Postcode • Canadian Postcode • KIX (Dutch) Postcode • Japanese Postcode • UK Postcode • Planet Code • Postnet • UsIntelligent • Info mail • UPU(ID-tag) 74 User Guide for ScanPal Series Terminal
Chapter 8: Specifications Scan Depth of Field (DOF) DOF performance of the product was measured under the following conditions: • DOF is the distance from the top of scan engine to the barcode • 23 °C (73 °F), 0 ~ 10K lux • Clear, high quality barcodes Note: If the barcode is not aligned well with the scan engine, reading time and depth of field (DOF) will be affected and the device performance will be decreased. Short range (in/cm) Long range (in/cm) 5mil code39/128 2.5 (6.3) 4.3 (10.9) 1.
Honeywell Scanning & Mobility 9680 Old Bailes Road Fort Mill, SC 29707 www.honeywellaidc.com ScanPal 70 Series terminal for Android User Guide P/N EDA70-SC-UG Rev.