
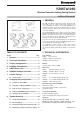
Installation Instructions


7
1
z1 z2
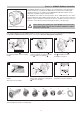
8.1 Parameters of the CM67z Room Unit
Installers Set Up Mode allows changing the controllers parameters to meet specific application requirements or customers needs.
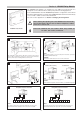
See fig 1 to 7 how to enter the Installer set-up.
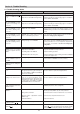
Parameter list
Move the CM67z
slider into the OFF
position.
Press and hold the
z1 z2
and PROG 3
& 4 buttons together.
Press TEMP or to
change factory setting.
The display will flash
indicating that a change
has been made.
Press the
z1 z2
button to
confirm the change is ok.
The display will stop flash-
ing indicating that the new
value has been stored.
Adjust other settings using the Installer Parameter List
below.
To exit the Installers Set-Up Mode move the CM67z
slider to the AUTO position.
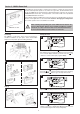
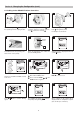
Installer Set-Up Number
(Press + or
-
to change)
e.g. 1 = AM/PM
Abbreviated Set-Up Description
e.g. CL = Clock Display
Factory Setting or New Choice
(Press TEMP or to change)
e.g. 0 = 24hr
e.g. 1 = 12hr AM/PM
Installer Set-Up
Mode Selected
Category 1 Installer Set-Ups
Press
+ or
-
to go to
the next parameter and
follow steps 3 & 4 to
make changes.
1 2
3 4
5 6
7
Parameter
AM-PM/24h select
Reset time/temp program
Minimum ON time
CM67 Room Unit Internal Temperature
Sensor Enable
Pump exercise feature enable
Cycle Rate
System Timing Master
Upper Setpoint Limit
Lower Setpoint Limit
Temperature Offset
Proportional Band Width
Optimisation enable
Loss of Communications Instruction
CM67z built-in temperature sensor use
HR80UK Window-Open Function
HR80UK Local Override Function
Automatic Summer/Winter Time Changeover
Reset Installer Mode Parameters to Defaults
Identifier
1:CL
2:rP
3:Cl
3:Ot
6:tS
7:PE
8:Cr
9:Sn
10:UL
11:LL
12:tO
14:Pb
15:OP
16:LC
17:SU
18:Ho
19:HL
20:tC
21:FS
Range
0 (24h) / 1(12h)
0 (user prog) / 1 (factory prog)
1 (1) 5
0 (disabled)
1 (enabled for display only)
2 (enabled for display and control)
0 (disabled) / 1 (enabled)
{3,6,9} cph
0 (disabled) / 1 (enabled)
21 (1) 30
5 (1) 20
-3.0 (0.5) 3.0
1.5 (0.5) 3.0
0 (disabled) / 1 (enabled)
0 (relay OFF) / 1 (relay ON 20%)
0 (HR80UK enabled) / 1 (HC60NG enabled) /
2 (both HR80UK and HC60NG enabled)
0 (disabled z1 & z2) / 1 (enabled z1only) /
2 (enabled z2 only) / 3 (enabled z1 & z2)
0 (disabled z1 & z2) / 1 (enabled z1only) /
2 (enabled z2 only) / 3 (enabled z1 & z2)
0 (disabled) / 1 (enabled)
0 (modified) / 1 (factory)
Default
0 (12h)
0 (user prog)
1 min
0 (disabled)
0 (disabled)
6 cph
0 (disabled)
30°C
5°C
0 K
1.5K
1 (enabled)
0 (relay OFF)
0 (HR80UK enabled)
0 (disabled z1 & z2)
3 (enabled z1 & z2)
1 (enabled)
1 (factory)
Category
1
1
1
2
2
2
2
2
2
2
2
2
2
2
2
2
2
2
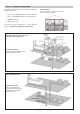
You must now press the PROG 2 key to enter the next section
TEMP
DATE/
PROG
PROG
AUTO
OFF
AM PM
AUTO MAN OFF
z1
AUTO MAN OFF
z2
z1
z2
MAN
z1
MAN
z2
1 2 3 4 5 6
PROG
COPY
DAY
DAY 1...7
z1 z2
MON TUE WED THU FRI SAT SUN
Section
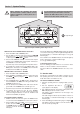
8: Changing the Configuration
1
z1 z2
1
z1 z2
1
z1 z2