
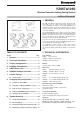
Installation Instructions


8
TEMP
DATE/
PROG
PROG
AUTO
OFF
z1
z2
MAN
z1
MAN
z2
1 2 3 4 5 6
PROG
COPY
DAY
DAY 1...7
z1 z2
MON TUE WED THU FRI SAT SUN
z
1
z
2
TEMP
DATE/
PROG
PROG
AUTO
OFF
z1
z2
MAN
z1
MAN
z2
1 2 3 4 5 6
PROG
COPY
DAY
DAY 1...7
z1 z2
MON TUE WED THU FRI SAT SUN
z
1
z
2
TEMP
DATE/
PROG
PROG
AUTO
OFF
AM PM
AUTO MAN OFF
z1
AUTO MAN OFF
z2
z1
z2
MAN
z1
MAN
z2
1 2 3 4 5 6
PROG
COPY
DAY
DAY 1...7
z1 z2
MON TUE WED THU FRI SAT SUN
Section
8: Changing the Configuration (cont.)
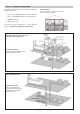
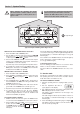
8.2 Adding further HR80UK Radiator Controllers
Turn the locking knob
a
and separate
the operating unit and
coupling module.
a
1
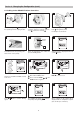
Turn the coupling module wheel
a
anti-
clockwise (approx. 3 rotations) until the
nose
b
reaches the end stop
c
.
a
c
b
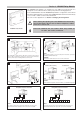
Attach the appropriate Zone Label and
press the Binding Button.
Software version is displayed and the RF
symbol flashes.
(Example Zone 1)
Repete for all additional HR80’s to bind
to this zone.
Install batteries into the operating unit.
Note: Check correct polarity.
Fit the coupling module
a
to the TRV
body
b
and tighten by hand.
For Adaptors see Section 6.
a
b
1 2 3
4 5 6
7
Binding
Button
z1
z1
z1
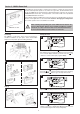
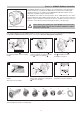
Enter CM67z Binding Mode
1
Move slider to OFF position.
2
Press and hold TEMP , and
PROG 1 buttons together.
8
Press MAN
z1
button to select zone 1 or
MAN
z2
to select zone 2.
9
Press
z1 z2
button to send the binding
signal.
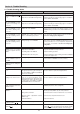
10
The HR80UK will display (with no
RF symbol) during binding.
11
When complete the RF symbol will be
displayed with the temperature setpoint
(this can take up to 4 minutes).
12