
Installation Instructions


9
8.3 Built -in sensor configuration
The CM67z Room Unit features a built-in temperature sensor
used for specific applications. Sensor operation is defined by
parameter 6:tS in Installer mode:
6:tS = 0 (Factory default. The built-in sensor is idle - not
used for control nor measurement).
6:tS = 1 (The built-in sensor is used only for measuring
the room temperature)
The symbol displayed next to the room temperature value indi-
cates that the sensor is used for measurement only and the
temperature in the room is controlled by the HR80UK Radiator
Controller. Due to different locations of the CM67z Room Unit
and HR80UK Radiator Controller
there may be a difference between
the setpoint displayed by the CM67z
Room Unit and the measured tem-
perature value.
6:tS =2 (The built-in sensor is used to
measure and control the room temper-
ature in zone 1 or when a zone valve
is used in zone 1) The CM67z Room
Unit must be located in zone 1.
To complete the configuration you must set the 17:SU param-
eter to decide which system components will use the tempera-
ture value from the CM67z Room Unit:
17:SU = 0 - HR80UK’s only (factory default)
17:SU = 1 - HC60NG (zone valve controller) only,
HR80UK’s will use their own built-in sensor.
17:SU = 2 - both HR80UK’s and HC60NG.
AUTO MAN OFF
z1
AUTO MAN OFF
z2
AUTO MAN OFF
z1
AUTO MAN OFF
z2
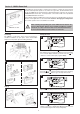
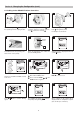
Activating HC60NG Relay Module binding procedure
Press and hold the push button of the HC60NG Relay Module
for 5 sec to enter the binding mode. The red LED will flash at
0.5 sec on/0.5 sec off.
Activate the binding procedure at the CM67z Room Unit as
described in section 8.2 for zone 1. When binding information
is received correctly the red LED of the zone valve controller
will be switched off.
NOTE:
Install in accordance with local wiring regulations
CAUTION:
Observe ambient temperature and current limits (see HC60NG wiring label)
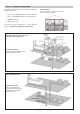
a. Thermal actuator b. Zone valve c. Zone valve
8.4 Adding a HC60NG Zone valve controller
The HC60NG relay module can also be configured for control-
ling a zone valve. This is restricted to zone 1 only.
Before the binding procedure is started the following CM67z
Room Unit parameters need to be set in order to control the
zone 1 temperatures via the HC60NG as zone valve controller:
Enter the installer mode of the CM67z Room Unit and set the
installer parameters: 6:tS =1, 9:Sn =1, 17:SU =1 or 2 (see
Built-in sensor configuration).
Section
8: Changing the Configuration (cont.)
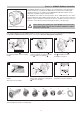
8.5 Resetting a Bound HR80UK
Press and hold the Binding Button while
reinserting the battery.
Now follow steps
5
to
12
on page 8.
3
B i n di n g
Button
Lift battery cover and remove one of the
batteries.
2
Turn the locking knob
a
and seperate
the operating unit and
coupling module.
a
1
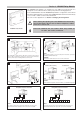
8.2a Binding HR80UK Radiator Controllers to the HC60NG Boiler Module
1
Press the Holiday Button to
select Boiler Teach-in Mode.
2
Press
z1 z2
to send Binding Signal.
With a successful teach-in the red LED
will remain off (no longer flash).
15
Bind HR80UK Radiator Controllers to
the Boiler Module :-
1
Move slider to OFF Position.
2
Press and hold Temp , and
Prog 1 buttons together.
14
To put the HC60NG in the listening
mode press the button on the HC60NG
for 5 seconds (Red LED flashes 0.5 sec
on/off).
13
TEMP
DATE/
PROG
PROG
AUTO
OFF
AM PM
AUTO MAN OFF
z1
AUTO MAN OFF
z2
z1
z2
MAN
z1
MAN
z2
1 2 3 4 5 6
PROG
COPY
DAY
DAY 1...7
z1 z2
MON TUE WED THU FRI SAT SUN
5 secs.
TEMP
DATE/
PROG
PROG
AUTO
OFF
AM PM
AUTO MAN OFF
z1
AUTO MAN OFF
z2
z1
z2
MAN
z1
MAN
z2
1 2 3 4 5 6
PROG
COPY
DAY
DAY 1...7
z1 z2
MON TUE WED THU FRI SAT SUN