
Operation Manual


10
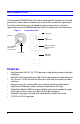
Installation
The HCD92534 camera is designed for installation on a wall or ceiling. The
HCD92534 is weather sealed for indoor or outdoor locations.
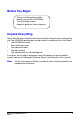
Attaching the Camera
1. Position the camera to the desired mounting location on a wall or ceiling. Be
sure the location is solid on a flat, smooth surface (for example, a
crossbeam).
2. Using the supplied mounting template, mark the four screw holes for
installation.
3. Use four screws appropriate to your installation, screw the camera to the
marked holes.
The mounting bracket can be separated from the camera housing for easier
installation. This is done by unscrewing and removing the thumb screw on the
bracket. Replace and tighten the thumb screw after installation is complete.
Note To ensure a waterproof installation, the notch in the camera base that
the power and video connections exit through should be facing down. If
the power and video connections exit the top of the base (wall mounted
only), water may pool in the camera base. Apply appropriate sealant
around the notches and any other gaps between the camera base and
the mounting surface.
Positioning the Camera
Caution Do not swivel and position the camera without the mounting bracket
firmly in place.
Loosen the thumb screws and move the camera into position. Swivel the camera
to capture the desired field of view. Tighten the thumb screws to set the position.