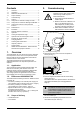
HCW 82/HCF 82 Fernversteller HCW 82/ Raumtemperaturfühler HCF 82 Montage und Bedienung Setpoint Adjuster HCW 82/ Room Temperature Sensor HCF 82 Installation and Operation Combiné d'ambiance HCW 82/ Sonde de température ambiante HCF 82 Installation et Utilisation Modulo ambiente HCW 82/HCF 82 Montaggio e Funzionamento Sensor a distancia HCW 82/ Sensor de temperatura ambiente HCF 82 Montaje y funcionamiento Temperatuurvoeler HCW 82/ Temperatuurvoeler met instellknop HCF 82 Montage en bediening Fjernregu
Übersicht Inhalt 1. 1.1. 1.2. 1.3. 2. 2.1. 2.1.1. 2.1.2. 2.1.3. 2.1.4. 2.2. 3. 3.1. 3.2. 3.3. 3.4. 4. 5. 6. 7. 8. Übersicht ............................................................... 3 Anwendung ........................................................... 3 Unterschiede HCW 82/HCF 82 ............................. 3 Lieferumfang ......................................................... 3 Inbetriebnahme ..................................................... 3 Teach-in ....................................
Inbetriebnahme 2.1. 2.1.1. 2.1.4. Teach-in Zuordnung zum Etagenregler Um den HCW 82/HCF 82 einer Temperaturzone zuzuordnen, führen Sie die Anweisungen aus dem Kapitel "Inbetriebnahme" der Montageanleitung "Etagenregler HCE 80/HCE 80R/HCC 80/HCC 80R" aus. 2.1.2. 2.1.3. Wenn der Teach-in misslungen ist: ► ► Achten Sie bei der Wahl des Betriebsorts jedes Geräts auf mindestens 1 m Abstand zu Funkgeräten wie FunkKopfhörern, schnurlosen Telefonen nach DECT-Standard etc.
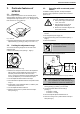
Besonderheiten HCW 82 3. Besonderheiten HCW 82 3.1. Bedienung Die Raumsollwert-Temperatur lässt sich am Fernversteller HCW 82 mit einem Stellrad auf einfache Weise einstellen. Der Einstellbereich beträgt ± 12 °C, ausgehend vom Basiswert 20 °C (in Position 0). Abb. 5: HCW 82 ► Wählen Sie am Stellrad (1) (siehe Abb. 5) die gewünschte Änderung zur voreingestellten Temperatur (Angaben auf der Skala in °C). 3.2. 3.3.
Batteriewechsel 3.4. Fensterkontakt installieren ► Schließen Sie einen beliebigen Sensor mit potenzialfreiem Kontakt an den HCW 82 an (Installation an Anschluss 1 und Anschluss 2, siehe Abb. 7 (2), Seite 5). ► Ordnen Sie den HCW 82 dem Hometronic Manager HCM 200D als Sensor zu (siehe Anleitung HCM 200D "Raum einem Sensor zuordnen"). 6. Hilfe im Problemfall Problem Teach-in fehlgeschlagen Werden mehrere potenzialfreie Kontakte verwendet, müssen diese in Reihe geschaltet werden. 4.
Overview Contents 1. 1.1. 1.2. 1.3. 2. 2.1. 2.1.1. 2.1.2. 2.1.3. 2.1.4. 2.2. 3. 3.1. 3.2. 3.3. 3.4. 4. 5. 6. 7. 8. 2. Overview ............................................................... 7 Application............................................................. 7 Differences HCW 82/HCF 82 ................................ 7 Scope of delivery................................................... 7 Commissioning...................................................... 7 Teach-in ..............................
Commissioning 2.1. 2.1.1. 2.1.4. Teach-in Assignment to underfloor heating controller In order to assign a temperature zone to the HCW 82/ HCF 82, follow the instructions from the chapter entitled "Start-up" in the "Underfloor heating controller HCE 80/HCE 80R/ HCC 80/HCC 80R" installation instructions. Failed teach-in If the teach-in has failed: ► Improve the data transfer (see below). ► Repeat the teach-in.
Particular features of HCW 82 3. 3.1. Particular features of HCW 82 Operation 3.3. In addition to battery operation, the setpoint adjuster HCW 82 is also prepared for operation with an external power source. The room setpoint temperature can be set easily at the setpoint adjuster HCW 82 by means of an adjustment dial. The adjustment range amounts to ± 12 °C, starting from the basic value of 20 °C (in position 0). Fig.
Changing batteries 3.4. Installing the window contact ► Connect any sensor with floating contact to the HCW 82 (installation to connection 1 and connection 2, see Fig. 7(2), Page 9). ► Assign the HCW 82 to the Hometronic Manager HCM 200D as a sensor (refer to the HCM 200D instructions "Assigning a room to a sensor"). 6. Help with problems Problem Teach-in failed If several floating contacts are used, these have to be connected in series. 4.
Vue d'ensemble Sommaire 1. 1.1. 1.2. 1.3. 2. 2.1. 2.1.1. 2.1.2. 2.1.3. 2.1.4. 2.2. 3. 3.1. 3.2. 3.3. 3.4. 4. 5. 6. 7. 8. 1. Vue d'ensemble................................................... 11 Utilisation............................................................. 11 Différences HCW 82/HCF 82 .............................. 11 Contenu............................................................... 11 Mise en service ................................................... 11 Reconnaissance.....................
Mise en service 2.1. 2.1.1. Reconnaissance Affectation au régulateur de zones Pour affecter le HCW 82/HCF 82 à une plage de température, suivez les instructions du chapitre "Mise en service" des instructions de montage "Régulateur de zones HCE 80/HCE 80R/HCC 80/HCC 80R". 2.1.2.
Particularités du HCW 82 3. Particularités du HCW 82 3.3. 3.1. Commande A la place des piles, la télécommande HCW 82 est également prévue pour le fonctionnement sur une source de courant externe. La molette de réglage du combiné d'ambiance HCW 82 permet de régler simplement la consigne de température ambiante. La plage de réglage est de ± 12 °C, à partir de la valeur de base de 20 °C (en position 0).
Changement de piles 3.4. ► ► Installer le contact de fenêtre Raccordez une sonde de détection avec contact libre de potentiel au HCW 82 (installation au raccordement 1 et au raccordement 2, voir Figure 7 (2), Page 13). Affectez le HCW 82 au Hometronic Manager HCM 200D comme sonde (voir mode d'emploi HCM 200D "Affecter le régulateur à une sonde"). 6.
Panoramica Indice 1. 1.1. 1.2. 1.3. 2. 2.1. 2.1.1. 2.1.2. 2.1.3. 2.1.4. 2.2. 3. 3.1. 3.2. 3.3. 3.4. 4. 5. 6. 7. 8. 2. Panoramica ......................................................... 15 Applicazione ........................................................ 15 Flessibilità HCW 82/HCF 82................................ 15 Volume di fornitura .............................................. 15 Messa in funzione ............................................... 15 Teach-in ....................................
Messa in funzione 2.1. 2.1.1. 2.1.4. Teach-in Assegnazione per regolatore di piani Per poter assegnare al HCW 82/HCF 82 una zona termica è necessario seguire le istruzioni riportate al capitolo "Messa in funzione" delle istruzioni di montaggio del "Regolatore di piani HCE 80/HCE 80R/HCC 80/HCC 80R". Teach-in fallito In caso di fallimento del teach-in: ► migliorare la trasmissione (vedi in basso). ► ripetere il teach-in.
Particolarità HCW 82 3. 3.1. Particolarità HCW 82 Funzionamento La temperatura nominale dell’ambiente può essere impostata facilmente con il modulo HCW 82 attraverso una rotella di regolazione. Il campo di regolazione è di ± 12 °C, partendo da un valore di base di 20 °C (alla posizione 0). Figura 5: HCW 82 ► Selezionare sulla rotella (1) (vedere Figura 5) la modifica desiderata per la temperatura preimpostata (indicazioni sulla scala in °C). 3.2. 3.3.
Sostituzione delle pile 3.4. Installazione del contatto a finestra ► Collegare un sensore a scelta privo di contatto a HCW 82 (installazione al collegamento 1 e collegamento 2, vedere Figura 7 (2), pagina 17). ► Assegnare HCW 82 al Hometronic Manager HCM 200D come sensore (vedere istruzioni HCM 200D "Assegnazione di un ambiente ad un sensore"). 6. Se si presentano problemi Problema Teach-in fallito Nel caso in cui si utilizzino più contatti privi di tensione è necessario collegarli in serie. 4.
Presentación Índice 1. 1.1. 1.2. 1.3. 2. 2.1. 2.1.1. 2.1.2. 2.1.3. 2.1.4. 2.2. 3. 3.1. 3.2. 3.3. 3.4. 4. 5. 6. 7. 8. Presentación ....................................................... 19 Uso...................................................................... 19 Diferenciación enter HCW 82/ HCF 82................ 19 Suministro ........................................................... 19 Puesta en marcha ............................................... 19 Sincronización ................................
Puesta en marcha 2.1. 2.1.1. 2.1.4. Sincronización Asignación al controlador de suelo radiante Para asignar el HCW 82/HCF 82 a una zona de temperatura, lleve a cabo los puntos expuestos en el capítulo "Puesta en marcha" de las instrucciones de montaje "Controlador de suelo radiante HCE 80/HCE 80R/HCC 80/ HCC 80R". 2.1.2.
Particularidades de HCW 82 3. 3.1. 3.3. Particularidades de HCW 82 El regulador remoto HCW 82, además del funcionamiento a pilas, puede funcionar con una fuente de energía externa. Funcionamiento El valor predefinido de la temperatura ambiente puede ajustarse fácilmente con el mando del sensor remoto HCW 82. El margen de regulación es ± 12 °C, partiendo del valor predefinido de 20 °C (en posición 0).
Cambio de pilas 3.4. Instalación del contacto de ventana ► Conecte un sensor con contacto libre de potencial al HCW 82 (instalación en la conexión 1 y conexión 2, véase Figura 7 (2), página 21). ► Asigne el HCW 82 al Hometronic Manager HCM 200D como sensor (véase instrucción HCM 200D "Asignar una habitación a un sensor"). 6. Ayuda en caso de problemas Problema Sincronización fallida Ponga correctamente las pilas. ► Elimine las fuentes perturbadoras (metal, aparatos de radio).
Overzicht Inhoud 1. 1.1. 1.2. 1.3. 2. 2.1. 2.1.1. 2.1.2. 2.1.3. 2.1.4. 2.2. 3. 3.1. 3.2. 3.3. 3.4. 4. 5. 6. 7. 8. Overzicht ............................................................. 23 Gebruik................................................................ 23 Verschillen HCW 82/HCF 82 ............................... 23 Inhoud van de verpakking ................................... 23 Inbedrijfstelling .................................................... 23 Teach-in ......................................
Inbedrijfstelling 2.1. 2.1.1. 2.1.4. Teach-in Inleren op de voerverwarmingsregelaar Om de HCW 82/HCF 82 als een temperatuurzone van de vloerverwarningsregelaar in te leren, volgt u de instructies uit het hoofdstuk "Inbedrijfstelling" van de montagehandleiding "Etageregelaar HCE 80/HCE 80R/HCC 80/ HCC 80R". 2.1.2.
Bijzonderheden HCW 82 3. Bijzonderheden HCW 82 3.1. Bediening De ingestelde kamertemperatuur kan op de HCW 82 temperatuurvoeler met een instelknop eenvoudig worden gewijzigd. Het instelbereik bedraagt ± 12 °C, uitgaande van de basiswaarde 20 °C (nulstand). Afbeelding 5: HCW 82 ► Selecteer met de instelknop (1) (zie Afbeelding 5) de gewenste wijziging van de vooraf ingestelde temperatuur (schaalverdeling in °C). 3.2. 3.3.
Batterijen vervangen 3.4. Raamcontact installeren ► Sluit een willekeurige sensor met potentiaalvrij contact aan op de HCW 82 (aansluiting 1 en 2, zie Afbeelding 7 (2), pagina 25). ► Wijs de HCW 82 toe als sensor aan de Hometronic Manager HCM 200D (zie gebruiksaanwijzing HCM 200D "Kamer aan een sensor toewijzen"). Wanneer meerdere potentiaalvrije contacten worden gebruikt, moeten deze in serie worden geschakeld. 4.
Oversigt Indhold 1. 1.1. 1.2. 1.3. 2. 2.1. 2.1.1. 2.1.2. 2.1.3. 2.1.4. 2.2. 3. 3.1. 3.2. 3.3. 3.4. 4. 5. 6. 7. 8. Oversigt ............................................................... 27 Anvendelse.......................................................... 27 Forskelle mellem HCW 82 og HCF 82 ............... 27 Leveringens omfang............................................ 27 Ibrugtagning ........................................................ 27 Teach-in ...............................................
Ibrugtagning 2.1. 2.1.1. 2.1.4. Teach-in Tilknytning til etageregulering For at knytte HCW 82/HCF 82 til en temperaturzone skal du følge instruktionerne i kapitlet "Ibrugtagning" i monteringsvejledningen til "Etageregulering HCE 80/HCE 80R/HCC 80/ HCC 80R". 2.1.2. 2.1.3. Hvis Teach-in-processen mislykkes: ► Indstilling af HCF 82 til frostbeskyttelse HCW 82/HCF 82 kan kun knyttes til Hometronic Manager som frostbeskyttelsesføler, hvis enhedskontakten HS 30 anvendes til kedelforespørgsel.
Særlige egenskaber ved HCW 82 3. 3.1. Særlige egenskaber ved HCW 82 Betjening 3.3. Fjernreguleringen HCW 82 kan anvendes både med batterier og med en ekstern strømkilde. Den nominelle rumtemperatur er nem at indstille på fjernreguleringen HCW 82 ved hjælp af et indstillingshjul. Indstillingsområdet er ± 12 °C, med udgangspunkt i grundværdien 20 °C (til position 0).
Batteriskift 3.4. Installation af en rudekontakt ► Slut en vilkårlig føler med potentialfri kontakt til HCW 82 (Installation til tilslutning 1 og tilslutning 2, se Figur 7 (2), side 29). ► Knyt HCW 82 til Hometronic Manager HCM 200D som føler (se vejledningen HCM 200D "Tilknytning af en føler til et rum"). 6. Problemløsning Problem Teach-in mislykkedes Årsag Batterierne er lagt forkert i Radioforbindelsen forstyrres Hvis der anvendes flere potentialfrie kontakter, skal disse serieforbindes. 4.
Manufactured for and on behalf of the Environmental and Combustion Controls Division of Honeywell Technologies Sàrl, Ecublens, Route du Bois 37, Switzerland by its Authorized Representative: Honeywell GmbH Böblinger Straße 17 71101 Schönaich, Germany Tel.: (++49) (0) 7031 637 01 Fax: (++49) (0) 7031 637 493 http://europe.hbc.honeywell.com The right is reserved to make modifications This document is definitive for the enclosed product and replaces all previous publications. Honeywell Inc.