
Operation Manual


Recording Video | 63
800-21090V2 - A - 03/2016
2. On the Record page, select the recording type (Auto, Manual, Stop) that you want to
enable on each channel, for both the main stream and secondary stream.
3. Under Snapshot, enable snapshot recording on the desired channels.
4. Click Apply, and then click Save.
Configuring the Video Recording Schedule
To configure the video recording schedule
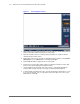
1. In the SETTING field in the Main Menu, go to STORAGE > SCHEDULE.
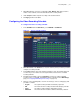
Figure 4-2 Storage Schedule Settings
2. On the Record tab, in the Channel box, select the channel (camera) for which you want to
configure a recording schedule.
3. In the PreRecord box, enter a time between 0 and 30 seconds. The default setting is 4
seconds. The pre-record time sets how long the NVR records before the scheduled
recording start time.
4. If the NVR has two HDDs, select the Redundancy check box to enable redundant
recording on the second HDD. This HDD must first be configured on the HDD Manage
page (see Configuring HDD Management Settings on page 119).
5. At the top of the scheduling table, select the check box(es) of the recording type(s) that
you want to schedule:
• Regular
The regular recording schedule is indicated by a green bar.
•MD
The motion detection recording schedule is indicated by a yellow bar.
•Alarm
The alarm recording schedule is indicated by a red bar.
•MD&Alarm
The motion detection and alarm schedule is indicated by a blue bar.