Galaxy 8/18/60/128/500/504/512 User Guide Honeywell Security
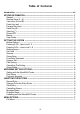
Table of Contents Introduction ------------------------------------------------------------------------------------------ vii KEYPAD INFORMATION ---------------------------------------------------------------------------- 1 General ---------------------------------------------------------------------------------------------- 1 Number Keys (0 – 9) ----------------------------------------------------------------------------- 1 View Keys (A and B) ---------------------------------------------------------------
Quick Menu ---------------------------------------------------------------------------------------- 7 Accessing The Menu ----------------------------------------------------------------------------- 8 Full Menu ------------------------------------------------------------------------------------------- 8 Quick Menu ---------------------------------------------------------------------------------------- 8 Omit Zones (User Level 3 And Above) ---------------------------------------------------- 9 Purpose ------
All --------------------------------------------------------------------------------------------------- 13 Help Message ------------------------------------------------------------------------------------ 13 Walk Test (User Level 5 and Above) ----------------------------------------------------- 14 Purpose -------------------------------------------------------------------------------------------- 14 Selecting Walk Test ----------------------------------------------------------------------------- 14 All Zon
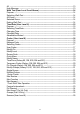
AVOIDING FALSE ALARMS ---------------------------------------------------------------------- 26 ZONE REFERENCE TABLES ---------------------------------------------------------------------- 27 ALARM AND HELP MESSAGES ---------------------------------------------------------------- 28 Other Keypad In Use (Galaxy 8 And 18 Only) --------------------------------------------- 28 Alarm In Progress -------------------------------------------------------------------------------- 28 PA Reset Required ----------------
INTRODUCTION The Galaxy alarm system is, in fact, a computer which has been designed using the latest software and hardware technology. First and foremost, the Galaxy meets all your security needs. The engineer will program and commission the system to your own exacting requirements. Warning: There are no user serviceable parts inside. Please refer all servicing to a qualified installer.
KEYPAD INFORMATION General The Galaxy Alarm system is controlled by Galaxy Mk7 Full Alpha Liquid Crystal Display (LCD) keypads. A maximum of 16 keypads may be connected to the Galaxy 8, 18 and 60 and 128 control panels. A maximum of 32 keypads may be attached to the Galaxy 500, 504 and 512 control panels. GALAXY 504 V4.
Enter Key (ent) The ent key accepts and processes entered data. Valid actions are performed and the next option is accessed. Escape Key (esc) The esc key aborts the current option to return to the previous option level. Any option modification made prior to the option being aborted is erased. Successive pressing of the esc key returns the user to the start display (known as the BANNER). The esc key also aborts the setting routine if pressed during the exit time.
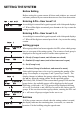
SETTING THE SYSTEM Before Setting Before setting the system ensure all doors and windows are secured and areas protected by movement detectors are free from obstruction. Entering A Pin - User Level 1-2 As each digit is entered the keypad responds with a bleep and displays a *. When all the digits are entered, press the ent or A > key to start the setting routine. Entering A Pin - User Level 3 - 6 As each digit is entered the keypad responds with a bleep and displays a *.
Sounder During the setting period the sounder emits a continuous tone if all of the zones are closed. If a zone is opened during the setting period, the sounder begins to pulse. The sounder also pulses during the last 25% of the setting time to indicate time running short. Zones Open 3 zones open [<] [>] to view The exit time will reset should any zones be open or opened during setting. The display will indicate the number of zones open and invite viewing. Closing the zones will restart the exit time.
MICROMAX SETTING OPTIONS Setting with the MicroMAX Cards The MicroMAX user cards can be used to set the system. This is done by assigning a MAX user card (or fob) with one of the setting options. When the MAX card is held against a MAX module for three seconds, the MAX function is activated. For example, if the MAX function assigned is 13 = Part Set, then activating the card held function results in the system being part set.
UNSETTING THE SYSTEM Normal Entry Unsetting starts immediately when the FINAL door is opened or an ENTRY zone is activated. The sounder pulses slowly and the user must go directly to the keypad and enter a valid PIN, followed by A>,
MENU OPTIONS There are two menu structures on the Galaxy control panels: Full Menu Only accessed by default by the Manager code on the Galaxy 60, 128, 500, 504 and 512 control panels. Quick Menu A selection of options from the full menu. The quick menu is the default menu access for all user codes (level three and above) as well as the Manager code on the Galaxy 8 and 18 control panels.
Accessing The Menu To access the menu enter a valid code and press the ent key. The Full Menu or Quick Menu is accessed, depending on the user level. Note: 1. If the user does not have group choice, all groups assigned to the user code must be unset. 2. If the user has group choice, at least one group on the system must be unset. 3. If there are no groups, then the system must be unset. Full Menu The Full Menu has a hierarchy of four structures contained within it.
Omit Zones (User Level 3 And Above) " # ! $ %$ Purpose This option allows the user to omit zones before setting the system. Zones must be eligible for omission otherwise they will not be displayed. Note: Selecting Omit Zones Enter the QUICK MENU. The 0=OMIT ZONES option is displayed. Press the ent key to select this option.
! " Atm 1/2/3/4 Zones (512 Only) ATM zones are omitted by entering one of the ten ATM codes (user 188 to user 197). To select this option enter an ATM code followed by the ent key. Use the A> key to scroll through the four ATM zone options (ATM1 to ATM4) and select by pressing the ent key.
Chime (User Level 3 and Above) PIN + ent 0 = OMIT ZONES [ent] to Select 2 2 = CHIME [ent] to Select ent CHIME MODE 0 = OFF > A CHIME MODE 1 = ON ent Purpose The Chime mode is switched on and off by this option. When the Chime mode is on, any zones that have been programmed by the engineer for chime will activate momentarily when opened. Note: Your system may not require any zones of this type. Selecting Chime Enter the QUICK MENU. Press key 2 followed by the ent key.
Status The current status of the zone is displayed as circuit information, e.g. Open or Closed. This information alternates with function information. Description The zone description, if programmed, is displayed on the bottom line of the display. The descriptor is assembled from alpha-numeric text and describes the zone in detail, e.g. West Office Door.
* !" Additional Information The # key can be used to reveal additional information on some types of events. This information is displayed on the bottom line. The information includes details such as zone descriptors, user levels and which keypad was used. Printing If a serial printer is connected to the system, a system history can be printed by pressing the * key.
Walk Test (User Level 5 and Above) PIN + ent 0 = OMIT ZONES [ent] to Select 6 6 = Walk Test ent to select ent 1=TEST ALL ZONES 2=SELECTED ZONES 1 WALK TEST ACTIVE ESC to abort NO ENTRIES 2 1001 FINAL #=TEST ENT=START >A 1002 EXIT #=TEST ENT=START # 1002 EXIT TEST ENT=START Purpose The Walk Test option provides a method of testing the zones to ensure that they are operating correctly. There are two options available: 1. All zones can be tested 2.
Time/Date (User Level 6) Purpose PIN + ent 0 = OMIT ZONES [ent] to Select 7 7 = TIME/DATE [ent] to Select ent 15:25 14/12/1999 A=TIME B=DATE A> NEW TIME --:-- or key.
Codes (User Level 6) PIN + ent 0 = OMIT ZONES [ent] to Select 8 8 = CODES [ent] to Select ent CODES 1 = User Codes >A CODES 2 = PIN Warning >A CODES 3 = MAX Users Purpose The Codes menu option enables the managers, (user level 6), to allocate PINs and related information to users. The codes option is divided into three sub–menus: 1.
PIN + ent 0 = OMIT ZONES [ent] to Select 8 8 = CODES [ent] to Select ent CODES 1 = User Codes ent ð 001 USER L3 ent [ent] to Select 1 = Modify PIN ent 001 PIN > 5678 ent 001 PIN > #5678 Indicates Dual Code 001 USER L3 Selecting Codes Enter the QUICK MENU. Press key 8 followed by the ent key. User Codes When the Codes option has been selected, press key 1 to access User Codes. Display each of the user numbers using key A>.
Modify Level Each user is assigned an access level which determines the menu options available to the user (see p.7, Table 1. Menu Options). On selecting this option, enter the level to be assigned to the user and press the ent key to accept the programming and return to the previous menu level. See Table 2. User Access Levels, for access availability.
ð ! """"""" #$% #$% /. 7! ! " &' ( )* +, - #. && 0 ! 1 % 2 0 340 0 $ 3 #. 5 2 # 6 • Quick Menu All user codes default to the quick menu. This menu is made up of a selection of ten options (0 – 9) from the menu options 11 – 68.
PIN + ent 0 = OMIT ZONES [ent] to Select 8 8 = CODES [ent] to Select ent CODES 1 = User Codes ent ð 001 USER L3 ent [ent] to Select 1 = Modify PIN 5 [ent] to Select 5 = Temp Code ent Temp Code 00 (0-99) days 2+5 Temp Code 25 (0-99) days ent Note: The manager code cannot be assigned as a Temporary Code. Pin Change (Galaxy 128, 500, 504 and 512) To program a user code as a PIN Change code, select the Temporary Codes option and press the * key instead of a number of days for a temporary code.
PIN + ent 0 = OMIT ZONES [ent] to Select 8 8 = CODES [ent] to Select ent CODES 1 = User Codes ent 001 USER L3 A ________ ent [ent] to Select 1 = Modify PIN Modify Groups (Galaxy 18, 60, 128, 500, 504 and 512) This option determines the system groups that the user has access to and operational control over. The Modify Groups option is only available when the Group Mode has been enabled by the engineer. The system defaults to groups disabled.
• Group Choice Users can be allocated to more than one group, but also have the choice of which of the allocated groups to view, set or unset. Pressing * key while assigning groups to the user assigns the group choice feature. Notes: 1.The manager has fixed access to all system groups. This cannot be reprogrammed. 2.The manager is assigned group choice by default, but the feature can be removed.
# & + ! ! " " $ % " $ Max Function The MAX card can be assigned to a single menu option. The user must be authorised to access the menu option, either by the user level assigned or by having the menu option access level changed by the engineer. The default option is Not Used. A new option is assigned by scrolling using the A> or
PIN + ent 0 = OMIT ZONES [ent] to Select 8 8 = CODES [ent] to Select ent CODES 1 = User Codes Pin Warning This option determines the number of days notification before the expiry date of any user codes programmed as PIN Change. During the notification period, the user is prompted to enter a new code on entry of the expiring PIN. The default period is 99 days, with a programmable range of 1 – 99.
>A ent Max Users 2 = Groups ent Groups A 1_______ >A 1_______ >A Groups B 1_______ >B 1_______ 2+3 Groups B 1_______ >B 123_____ ent MAX No >0000000000 Enter new MAX No. ent & ' ! " " ! $ % " # $ # On selecting the Modify Groups option, the groups currently allocated to the user are displayed. All users default to group 1.
AVOIDING FALSE ALARMS False alarms are inconvenient and may be costly. Police can withhold response from consistent offenders. Here are nine points to help avoid false alarms. 1. Be sure you fully understand how to operate the alarm system. In your absence someone thoroughly instructed, should be available to operate the system. 2. Before leaving the premises ensure that all doors and windows are securely closed. 3.
ZONE REFERENCE TABLES Zone Galaxy 18 & 60 Galaxy 60 only Function Description Chime Omit Part Function Description Chime Omit Part Function Description Chime Omit Part 1001 1002 1003 1004 1011 1012 1013 1014 1015 1016 1017 1018 RIO------------------------ Zone 1 2 3 4 5 6 7 8 RIO------------------------ Zone 1 2 3 4 5 6 7 8 27
ALARM AND HELP MESSAGES Other Keypad In Use (Galaxy 8 And 18 Only) This message advises the user that the system is already in use. The Galaxy 8 and 18 allow only one user at a time. ALARM IN PROGRESS Alarm In Progress Pa Reset Required The system is currently in alarm condition and must be cancelled by a valid PIN or keyswitch operation.
INSTALLER DETAILS Name: ----------------------------------------------------------------------------------Address: --------------------------------------------------------------------------------------------------------------------------------------------------------------------------------------------------------------------------------------------------------------------------------------------------------------------------------------------------------------Telephone: -----------------------------------
Honewell Security 2 Redwood Crescent Peel Park Campus East Kilbride G74 5PA © Copyright Honeywell Security IU1-0022 Rev 2.