
HSF600 Fan Manual


4
ASSEMBLY INSTRUCTIONS (continued)
Fig.15
Fig.14
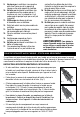
Align slot
with pin
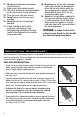
• Align hole in center of Fan Blade with the screw extending from the Motor Assembly (Fig. 13).
Make sure that the 2 slots on the back of the Fan Blade align with the bars extending from the
shaft surrounding the screw attached to the Motor Assembly. (Fig. 14).
Then push the Fan Blade into place.
• Attach the blade knob on the center of the fan, tighten by turning COUNTER CLOCKWISE (Fig. 15).
Screw
from motor
assembly
Fig.13
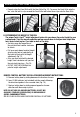
C. ASSEMBLING THE UPPER PORTION OF THE FAN
• Remove the thumb screw from the lower portion of the fan motor assembly by turning it
counter-clockwise (Fig. 7)
• Insert the Fan Motor Assembly into the Fan Pole (Fig. 8), once both halves are aligned reinsert
the thumb screw (Fig. 9) and tighten by turning clockwise.
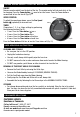
• Circular Rear Grille Mounting Nut will come attached to the Motor Assembly. Remove it by
turning COUNTER-CLOCKWISE. You will re-attach the Rear Grille Mounting Nut later (Fig. 10).
• Place the Rear Grille onto the Motor Housing, making sure the 2 holes in the center of the Rear
Grille fit over the 2 raised knobs on the Motor Housing (Fig. 11). Now place the Rear Grille
Mounting Nut onto the center of the fan, and tighten by turning it CLOCKWISE (Fig. 12).
Fig.8
Fig.7
Fig.9
Fig.12
Rear Grille
Mounting
Nut
Fig.10
Fig.11