
Fan Manual


3
NOTE: Remove all contents from the box being careful not to discard the manual and hardware needed
for assembly. A phillips head screw driver ( ) is required for assembly and is not included with the fan
purchase.
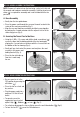
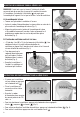
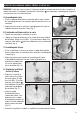
A. Pedestal Assembly
• Place the power cord through the center of the front and rear
pedestal assemblies with the screw hole openings facing
towards the fan.
• Align the front and rear pedestal assembly and firmly snap
together (Fig 7).
B. Securing the Tower Fan to the Pedestal
• Gently turn fan upside down.
• Line up the 3 screw holes on the pedestal with the 3 screw
holes on the bottom of the fan housing. Use the 3 (M5 x 12)
screws included in the box and a phillips head screw driver
( ) to secure the pedestal to the fan housing (Fig. 8).
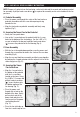
C. Base Assembly
• With the fan in the upside down position, pass the power cord
through the recessed slot located in the center of the rear base
assembly (Fig 9).
• Align the rear and front base assembly and firmly snap together
by pushing the 4 round extrusion into the adjacent circles of the
connecting pieces (Fig 10).
D. Securing the Tower
Fan to the Base
• Align the 3 screw holes in
the bottom of the pedestal
with the 3 screw holes
located on the base. Using
the 3 (M5 x 12) screws and
phillips head screw driver
(
), secure the base into
the bottom portion of the
fan housing (Fig 11).
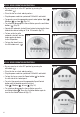
• Place the power cord
through the cut out on the
bottom of the base. Gently
pull any slack out of the
power cord and place the
cord securely in the power
cord holding bracket
(Fig. 12).
• Place the fan right side up.
Your fan is now ready for use.
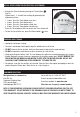
HY-013 AND HY-023 SERIES ASSEMBLY INSTRUCTIONS
Fig. 7
Fig. 8
Fig. 9
Fig. 10
Fig. 11 Fig. 12