
User's Manual


LYNXR-I Installation and Setup Guide
- 5 -
Mounting the Control
Wall Mounting
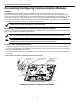
The illustration below shows the front assembly separated from the back plate.
DO NOT disconnect the ribbon cable from the terminal strip board. Disconnect the cable only from the
front assembly board.
1. Release the front assembly from the back
plate by depressing the two locking tabs
at the top of the unit with the blade of a
medium size screwdriver.
2. Once these tabs have been released,
insert the screwdriver in the side of the
case and release the side locking tabs by
gently twisting.
3. Carefully disconnect the ribbon cable from
the front assembly, leaving the ribbon
cable connected to the terminal block
PC board. The back plate contains the
terminal block for making wiring
connections.
4. Mount the back plate to a sturdy wall,
feeding the field wiring through the
appropriate openings in the back plate.
5. After wiring connections are made,
carefully reconnect the ribbon cable to
the front assembly PC board connector
(properly aligning the red wire).
6. Snap the front assembly to the back plate
so it is secured by the locking tabs.
LOCKING
TABS
LOCKING
TABS
LOCKING TABS
RED WIRE
MARKING
DISCONNECT
THIS END ONLY!
07000-003-V1
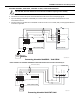
Desktop Mounting
For desktop use the optional mounting base (model LYNX-DM, purchased separately) must be used.
1. Slide the control panel onto the mounting
base locking tabs.
2. Bring all wiring through the bottom of the
mounting base, using one of the three
wire entry locations, before making
connections to the control panel.
3. Use tie-wraps to secure the wiring to the
built-in wire loops as needed. Use the two
supplied screws to secure the control
panel to the mounting base.
ADD
ESCAPE
DELETE
SELECT
AWAY
OFF
STAY
AUX
01009-004-V1
WIRE ENTRY
KNOCKOUT
(1 of 3)