
Install Instructions

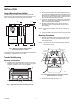
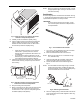
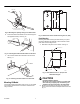
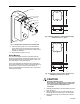


Table Of Contents

4. Hold the thermostat in place and mark the screw hole NOTE: Tinnerman nuts can be used by making clearance
centers in the terminal unit. See Fig. 17. holes for the screws.
5. Punch or drill pilot holes in the mounting surface for
sheet metal screws. 6. Mount the thermostat in the unit.
7. Mount the sensing bulb in the unit using the hangers.
See Fig. 6.
SENSING
BULB
CAPILLARY
THERMOSTAT
SCALEPLATE
CONTROL SHAFT
MAIN
SETPOINT
KNOB
10-32 x 1/4-IN.
SCREW (2)
BRANCH
PROTECTED BARBS
C4651
MOUNT AS SHOWN
OR TURN 90° TO
ANY OF FOUR
POSITIONS AS
REQUIRED.
10 x 5/8-IN.
SHEET METAL
SCREW (2)
MOUNTING BRACKET
APPLICATIONS
Refer to Figs. 18 through 21 for typical applications.
Fig. 18. Typical LP916A duct mounted
heating application.
N.O.
B
M LP916A
DA
DISCHARGE
AIR
SUPPLY
M5417
M
Fig. 19. Typical LP916A mixed air application.
DAMPER
OPERATOR
RA
N.O.
N.C.
OA
DA
LP916A
B
M
M
M5449
DISCHARGE
95-5559EF 6