HONEYWELL PROFESSIONAL WEATHER STATION WITH REMOTE CONTROL TE923W USER MANUAL
Table of Contents Introduction Standard Package Contents Installation Before you begin UV (Ultraviolet) Sensor Thermo-Hygrometer Sensor Rain Gauge Anemometer (wind sensor) Main Unit Battery installation Buttons and Controls Navigating through the modes Customizing your Weather Station LED Backlight Options Connecting the Weather Station to a PC Using Different Weather Modes Pressure and Weather Forecast Mode UV Mode Clock and Alarm Mode Manual Settings Sunrise/Sunset Mode Temperature and Humidity Mode Rain
Introduction Thank you for selecting the Honeywell Professional Weather Station with remote control. This compact and easy-to-use product features a wide variety of time and weather data, such as precise atomic time, perpetual calendar, air temperature, relative humidity, barometric pressure, wind speed and direction, rainfall, UV levels and etc.
Standard Package Contents Picture Components Main Unit Remote Control AC/DC 7.
4 screws for securing rain gauge to the flat surface; 4 screws for securing anemometer to vertical surface Mounting hardware 2m (6ft) USB cable PC connection cable Installation The Honeywell Professional Weather Station TE923W operates at 433MHz radio frequency, so no wire installation is required between the main unit (receiver) and the remote weather sensors (transmitters).
Before you begin • We recommend using alkaline batteries for the remote weather sensors and the main unit when temperatures are above 32°F (0°C). We recommend using lithium batteries for the remote weather sensors when temperatures are below 32°F (0°C). • Avoid using rechargeable batteries. (Rechargeable batteries cannot maintain correct power requirements). • ALWAYS install batteries in the remote weather sensors before the main unit.
UV (Ultraviolet) Sensor FEATURES • Ultraviolet light levels measurement • Remote UV levels data transmission to the main unit via 433MHz signal • 328 feet (100 meters) transmission range • Low battery indicator • Three different placement options – ground, stake and wall A B G F C E D A. LED INDICATOR • Flashes once when the remote sensor transmits a reading to the main unit • Flashes twice when battery power is low B. BATTERY COMPARTMENT SCREW Holds battery compartment door in place C.
Assembly • Snap the U-shaped sensor holder onto the UV sensor unit side grooves • Insert the round end of the U-shaped holder into one of the mounting hardware pieces provided Battery installation • Unscrew the lid on top of the UV sensor unit. • Remove the screw from the battery compartment door with a small Phillips screwdriver • Insert two 2 “AA” size 1.5V batteries (not included) matching the polarities shown in the battery compartment.
Thermo-Hygrometer Sensor FEATURES • Remote data transmission to the main unit via 433 MHz signal • 328 feet (100 meters) transmission range without interference • LCD display of measured temperature and humidity • Five (5) transmission channels selection • Case can be wall mounted using built-in hanger A. LED INDICATOR • Flashes once when the remote sensor transmits a reading to the main unit. • Flashes twice when battery power is low. B. BATTERY COMPARTMENT Holds two AA-size batteries C.
• The remote thermo-hygrometer sensor can be placed on the flat surface or mounted on the wall in vertical position • Use the wall mount hardware and screws provided when mounting the thermo-hygrometer sensor on the wall Placement tips: • The remote thermo-hygrometer sensor should be placed in the area with a free air circulation and sheltered from the direct sunlight and an extreme weather conditions. • Ideally, place the thermo-hygrometer sensor above the natural surfaces (such as a grassy lawn).
Rain Gauge FEATURES • Precipitation measurement • Remote rainfall data transmission to the main unit via 433 MHz signal • 100 feet (30 meters) transmission range without interference • Built-in installation level • Non-corrosive protective screen A B C A. Rain gauge bucket Holds all rain gauge components B. Knob Secures the top on the rain gauge bucket C. Rain gauge bucket feet Allows securing the rain gauge on its place G D E H F I D.
G. Built-in leveler Allows leveling rain gauge on the surface H. Bucket see-saw mechanism Collects the rainfall in one of its containers and self-empties once full I. Protective screen Protects the rain gauge funnel from debris Battery installation • Unlock the funnel-shaped top on the rain gauge by turning both knobs on the sides in an anti-clockwise direction. • Remove the funnel-shaped top lifting it off the rain gauge bucket.
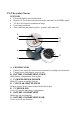
Anemometer (wind sensor) FEATURES • Wind speed and wind direction measurement • Remote wind speed and wind direction data transmission to the main unit via 433 MHz signal • Operating range 100 feet (30 meters) • Wall or pole mount A B D C A. WIND VANE Measures wind direction B. WIND CUPS Measures wind speed C. ANEMOMETER BASE • Holds battery compartment • Allows mounting the anemometer vertically D.
E. WIND CUPS SHAFT Holds wind cups on the anemometer arm F. BATTERY COMPARTMENT Holds 2 AA-size batteries G. WALL MOUNT SCREW OPENINGS Allows securing the anemometer in place H. BATTERY COVER Allows securing 2 AA size batteries on the anemometer base Assembly • Place the wind cups over the wind cups shaft of the anemometer arm • Insert the wrench tool provided into the wind cups opening and tighten the small screw inside.
Main Unit The main unit measures pressure, indoor temperature, humidity, and receives atomic time data from the US Atomic Clock and all remote weather sensors. It should be placed indoors.
• 4 AA batteries Battery installation • Open the battery compartment door on the back of the main unit. • Insert four (4) AA size batteries according to the polarities shown and replace the battery compartment door. • Connect 7.5 V AC/DC adapter provided to the main display unit and plug into to the wall power outlet. Note: The AC/DC adaptor connection is required for automatic backlight control and a handheld remote control functions.
any other time. In order to set the altitude, you will have to restart the main unit completely. To set the pressure & altitude units and program your altitude, use the handheld remote control or main unit control panel: Buttons and Controls Most of the handheld remote control buttons are corresponding to the main unit controls. To expose the main unit control buttons, press the OPEN button on the upper right corner of the main unit and the controls’ cover door will open.
E. HISTORY F ALARM/CHART G. CHANNEL H. LIGHT/SNOOZE Allows displaying the sea-level pressure history Allows displaying the time alarms and alerts for the temperature, rainfall and wind.
Pressure and Recalls the Pressure and Weather Forecast Mode Weather Forecast Mode Recalls the Rain Mode Rain Mode Recalls the Sunrise/Sunset Mode Sunrise/Sunset Mode Recalls the Clock and Alarm Mode Clock and Alarm Mode Change Bar-chart Display Changes bar-chart display to history for Sea-level pressure, channel 1 temperature or channel 1 relative humidity Navigating through the modes The main unit has seven (7) different modes (windows) each displaying the separate data category.
UV Window Displays: • UV index or Minimum Ultraviolet Exposure • Daily Maximum • Weekly Maximum • Remote UV sensor battery status Clock and Alarms Window Displays: • US Atomic Time clock with time and calendar • Single alarm, weekday alarm and ice warning alarm (pre-alarm) Sunrise/Sunset Window 20
Displays: • Sunrise and sunset times • Longitude and Latitude Temperature and Humidity Window Displays: • Temperature and humidity readings for indoor and selected channel • Comfort level indication • Dew point temperature • High and Low temperature alerts • Remote Thermo-Hygrometer sensor battery status Rain Window Displays: • Precipitation amount for the last hour, day, yesterday, last week and last month • Rainfall alert • Remote rain gauge battery status 21
Wind Window Displays: • Wind Chill temperature • Temperature at place of anemometer • Wind direction • Wind speed • Wind gust speed • Alert for wind speed and wind gust speed • Remote anemometer battery status Customizing your Weather Station It is required to program: • The pressure parameters during Initial Setup (See Pressure and Weather Forecast Mode P.23) • The time, the date and the weekday language (Clock and Alarm Mode: P.27) • The location data (Sunrise/Sunset Mode: P.
LED Backlight Options The main unit backlight can be turned on, off or automatically toggled depending on the environment light conditions. Use the light sensor switch at the back of the main unit to select a desired backlight setting. For the automatic backlight control, the sensitivity of the light sensor can be adjusted to high or low using the switch, located on the back panel.
• • • • • Press UP or DOWN button selecting the pressure in inHg, hPa/mBar or mmHg Press SET to confirm and move to the altitude unit selection mode Press UP or DOWN button selecting the altitude unit in feet or meters. Press SET button to confirm and move to the altitude programming mode. Press UP or DOWN to adjust an altitude value. Press and hold either button for the advanced setting. • Press SET to confirm the programming. IMPORTANT: After the initial setup the altitude cannot be adjusted anymore.
Viewing the Pressure, Temperature and Humidity Bar Charts The bar chart in Pressure and Weather forecast window can be configured to display a historical data for the sea level pressure and temperature or humidity for channel 1.
Snow Note: The weather forecast accuracy is approximately 70%. Display shows forecasted, not current conditions. The SUNNY icon indicates clear weather, even when displayed during the night-time. Understanding the Moon Phase Diagram UV Mode The current UV intensity is indicated by the numerical value and more intuitive display, by categorizing it into the levels “LOW”, “MED”, HIGH”, V. HIGH” and EXTREME. It is also represented by a comfort icon that corresponds to different levels.
In UV Mode, press and hold SET to convert units between MED/h and UVI. Clock and Alarm Mode Manual Settings The main unit can be manually set to display the time, calendar or UTC time. There are three time alarms available on the main unit: Weekday alarm (W), Single alarm (S) and Ice Warning Alarm (Pre-Al). • If Weekday alarm is activated, it will sound at the set time and the alarm icon will flash Mondays through Fridays.
longitude, Time Zone and select the Daylight Savings Time on or off. • Press UP or DOWN to adjust the latitude. Press and hold either button for quick digits advance. • Press SET to confirm the selection. • Continue setting the longitude using the same technique. • Set the Time Zone by pressing UP or DOWN to adjust the time in 30 min intervals. Press and hold either button for quick digits advance. • Press SET to confirm selection.
• Set the alarm hour using the UP or DOWN. Press and hold either button for quick digit advance. • Press ALARM/CHART to confirm selection. • Set the alarm minutes using UP or DOWN. Press and hold either button for quick digit advance. • Press ALARM/CHART to confirm selection. • Set a Snooze interval (all three alarms share same snooze time duration) using UP or DOWN. Press and hold either button for quick digit advance. • Press ALARM/CHART to confirm your selection.
• Make sure the unit is positioned at 8 feet (2 meters) distance from any interference source such as a TV, computer monitor, microwave, etc. • Within concrete wall rooms such as basements or office buildings, the received signal may be weakened. Always place the Projection Clock near the window for better reception. Once the atomic time signal is received, the date and time will be set automatically, and the [ ] icon will appear.
dates. Accessing Sunrise/Sunset Mode From the main unit: Press UP or DOWN until the sunrise and sunset icons on the lower left of the display will start flashing. From the remote control: Press . Programming the Location Data • In Sunrise/Sunset Mode, press and hold SET to enter the location programming mode until the city code in the Time and Alarm display will flash. • Select the city code closest to your area by pressing the UP or DOWN. Refer to P.40 for a list of available codes.
• • The corresponding sunrise and sunset times will be displayed for the selected date. Press MEMORY or SET to return display to the Sunrise/Sunset Mode. Understanding of the Sunrise/Sunset Display The sunrise time displayed in the morning will be different from the one displayed in the afternoon/night: From 12 am to 12 pm the current day sunrise time will be displayed.
flash. From the remote control: Press . Viewing Temperature and Humidity for each Channel Static Display: In Temperature and Humidity Mode, press the CHANNEL button to recall a different channel. Channel Auto-Scan Display: To enable automatic scan of the different channels, press and hold CHANNEL, until the 3 icon is displayed. Each valid channel will be alternately displayed with a 5 seconds delay.
Disabling Temperature Alarm(s) In the Temperature & Humidity Mode press the ALARM/CHART to disable the alarm(s). Viewing the Max/Min Channel Temperature and Humidity In the Temperature & Humidity Mode press the MEMORY button to recall a current temperature and humidity, minimum temperature and humidity or maximum temperature and humidity at the remote location.
Viewing Rain Statistics In the Rain Mode, press either SET or MEMORY button to recall a rain statistics for the past hour, past 24 hours, yesterday, past week or past month. Tip: For the rain rate estimate the Last Hour rainfall value is understood as “inch/hr” or “mm/hr”. Resetting the Rainfall Statistics Memory In the Rain Mode, press and hold MEMORY to reset all rainfall statistics.
The wind speed and gust alert functions can be programmed to alert you if the wind speed or gust exceeds a pre-configured limit. The wind speed can be displayed in km/h, mph, m/s or knots. Note: The wind speed alert has a 5 mph deviation and the wind gust speed alert has a 7 mph deviation. It is set to prevent the alerts from sounding all the time due to small fluctuations close to the alert value.
flash. Set the alert using the UP or DOWN. Press and hold either button for fast digits advance. • Press ALARM/CHART to confirm your selection and return to the wind alert selection screen. Disabling the Wind Alert To disable wind alert press ALARM/CHART. • Maintenance Changing Batteries The battery status of each weather sensor is checked every hour. If the low battery indicator lights up, replace the batteries in the corresponding unit.
• • • Clean small holes and parts with Q-tips or pipe-cleaner. Watch out for spiders or insects that might have crawled into the funnel. Clean the swinging mechanism with a damp cloth.
PRECAUTIONS This product is engineered to give you years of satisfactory service if handled carefully. Here are a few precautions: • Do not immerse the units in water. • Do not clean the units with abrasive or corrosive materials. They may scratch the plastic parts and corrode the electronic circuits. • Do not subject the product to excessive force, shock, dust, temperature, or humidity, which may result in malfunctions, shorter lifespan, damaged batteries, and damaged parts.
Appendix - City Codes US and Canadian Cities City Code Zone DST City Code Zone DST Atlanta, Ga. ATL -5 SU Memphis, Tenn. MEM -6 SU Austin, TX AUS -6 SU Miami, Fla. MIA -5 SU Baltimore, Md. BWI -5 SU Milwaukee, Wis. MKE -6 SU Birmingham, Ala. BHM -6 SU Minneapolis, Minn. MSP -6 SU Boston, Mass. BOS -5 SU Montreal, Que., Can. YMX -5 SU Calgary, Alba., YYC -7 SU Nashville, Tenn. BNA -6 SU Chicago, IL CGX -6 SU New Orleans, La.
World Cities City Code Time DST City Code Time DST Addis Ababa, ADD 3 NO Cairo, Egypt CAI 2 sg Adelaide, ADL 9.5 SA Calcutta, India CCU 5.
Milan, Italy MIL 1 SE Singapore, SIN 8 Montevideo, MVD -3 SM Sofia, Bulgaria SOF 2 SE Moscow, Russia MOW 3 SK Stockholm ARN 1 SE Munich, MUC 1 SE Sydney, Australia SYD 10 SA Nairobi, Kenya NBO 3 NO Tokyo, Japan TKO 9 NO Nanjing NKG 8 NO Tripoli, Libya TRP 2 NO Naples, Italy NAP 1 SE Vienna, Austria VIE 1 SE New Delhi, DEL 5.
Accuracy: 0.015 inHg (5 Hpa; 0.38 mmHg) Sampling interval: 20 minutes Altitude Compensation Range: -657 ft to 16404 ft (-200m to +5000 m) Temperature (Indoor) Operating Range: 14.2°F to 140°F (-9.9°C to 60°C) Resolution: 0.2°F (0.1°C) Accuracy: 2°F (1°C) Sampling Interval: 10 seconds Temperature (remote) Range: -40°F to 176°F (-40°C to 80°C) Resolution: 0.2°F (0.
Resolution: 0.1mph (0.16 Km/h) Accuracy: (2mph + 5%) Starting Threshold: 3mph (4.8 Km/h) Wind/Gust Speed Display Update Interval: 33 seconds Wind/Gust Sampling Interval: 11 seconds Rainfall 1h/24h/yesterday range: 0 to 78.73 inch (0 to 1999.9 mm) Last week/ last month range: 0 to 787.3 inch (0 to 19999 mm) Resolution: 0.03 inch (0.6578 mm) Accuracy: +/- 5% +/- 0.03 inch (+/-5%mm +/-0.
Remote Thermo - Hygrometer: 2.37(L) x 4(H) x 1(D) inches / 60(L) x 101(H) x 25(D) mm Remote UV unit: 2.58(L) x 4.45(H) x 2.58(D) inches / 65.5(L) x 113(H) x 65.5(D) mm Remote Anemometer: 19.16(L) x 19.16(H) x 15.35(D) inches / 486.6(L) x 486.6(H) x 390(D) mm Remote Rain gauge: 6.49(L) x 6.89(H) x 4.72(D) inches / 165(L) x 175(H) x 119(D) mm IR Remote Control: 1.61(L) x 5.94(H) x 0.86(D) inch / 40(L) x 150(H) x 22(D) mm FCC STATEMENT This device complies with Part 15 of the FCC Rules.
Manufacturer: Hideki Electronics Ltd. Address: Unit 2304-06, 23/F Riley House, 88 Lei Muk Road, Kwai Chung, New Territories, Hong Kong is in conformity with Part 15 of the FCC Rules. Operation is subject to the following two conditions: This device may not cause harmful interference. This device must accept any interference received, including interference that may cause undesired operation. The information above is not to be used as a contact for support or sales.