
Install Instructions
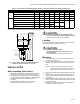
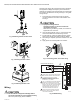
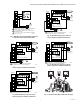

Table Of Contents

ML6420, ML7420 NON-SPRING RETURN ELECTRIC LINEAR VALVE ACTUATORS
3 63-2533—03
Table 1. Close-off ratings for ML6420, ML7420 Electric Linear Valve Actuators and Honeywell Valves (psi).
a
Represents maximum pressure difference between the outlet and either of the two inlets.
b
Do not exceed 100 psi with V5011G valves used in steam applications.
Fig. 1. Approximate dimensions of ML6420, ML7420
Electric Linear Valve Actuator in in. (mm).
INSTALLATION
When Installing this Product...
1. Read instructions carefully. Failure to follow them could
damage the product or cause a hazardous condition.
2. Check ratings and description given in the specifications
to make sure the product is suitable for your application.
3. Installer must be a trained, experienced service
technician.
4. After installation is complete, check out product
operation as provided in these instructions.
CAUTION
Electrical Shock or Equipment Damage Hazard.
Can shock individuals or short equipment circuitry.
Disconnect power supply before installation.
Location
Install the actuator in a location that allows enough clearance
for mounting accessories and for servicing.
CAUTION
Equipment Damage Hazard.
Can damage actuator due to condensation or a
valve gland leak.
Install the actuator in a position above horizontal.
Mounting
1. Place the actuator on the valve with the U-bolt around
the valve collar. See Fig. 2.
2. Place the U-bolt against the valve collar and secure the
actuator to the valve by turning each U-bolt nut clock-
wise.
NOTE: To assure even pressure on the collar, first
tighten the nuts finger-tight and then alternate
turning each U-bolt nut until both are snug.
3. Push aside the stem button retaining clip and hold. See
Fig. 3.
4. Lift valve stem until the head of the valve stem button is
inside the large slot of the stem button retaining clip on
the actuator.
5. Release the stem button retaining clip to secure the stem
button. Check to make certain the stem button is secured
by the retaining clip.
6. Remove the cover from the actuator using a Phillips or
crosspoint screwdriver. See Fig. 4.
Type Valve 1/2 in. 3/4 in. 1 in. 1-1/4 in. 1-1/2 in. 2 in. 2-1/2 in. 3 in.
FlangeV5011A ——————2816
V3350/3351/3450/3451 — — — — — — 21 14
V5013B,C; V3360/3361/3460/3461 — — — — — —
21
a
14
a
NPT V5011F,G
150
b
150
b
150
b
134
b
77 49 28 16
V5011H,J 150 150 150 145 — — — —
V5011N1xxx, V5011N3xxx, V5013N 230 230 163 104 67 37
V5011N2xxx 100 100 100 100
V5013F 150 150 150 126 77 49
5-5/15
(135)
6-5/16
(161)
x
2-11/16 (67)
12-11/16 (322)
MINIMUM
CLEARANCE
9-3/16
(233)
9-9/16
(242)
5-9/16
(141)
M17419
1/2 (13) FPT
YOKE
DIAMETER
1-3/8 (35)