
Operation Manual


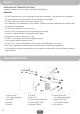

EN
3
1.
2.
3.
4.
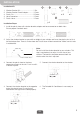
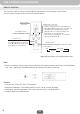
Drill a hole in an outside wall or through a window pane. Respect the height and dimensions of the
hole given in Fig. 2 and Fig. 3.
Insert & secure the Flange Fixture into the newly drilled hole.
Fix one end of the Plastic Hose into the Flange Fixture that was secured on the wall.
Fix the other end of the Plastic Hose onto the Hose Connector and then onto the rear Exhaust outlet
of the unit (See Fig. 3).
INSTALLATION
1.
2.
3.
4.
5.
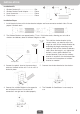
Flange Fixture......................................
Hose Connector..................................
Hole Cover..........................................
Plastic Hose........................................
Exhaust Nozzle....................................
Installation
kit:
1 Piece
2 Pieces
1 Piece
1 Piece
1 Piece
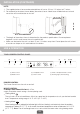
Through a Drilled Hole in the Wall or Window
If required, your Portable Air Conditioner can be installed semi-permanently.
NOTE: When the unit is not in use, remove the Plastic Hose from the Flange Fixture on the wall and use
the included Hole Cover to cover the hole on the wall.
Fig.1
Fig.2
1
2
4.9”
5 mm
In the
wooden
kickboard
of a french
window
In the wall: we
recommend you to
insulate the section
of wall using suitable
insulation materials.
In
the
window
panel
Fig.3
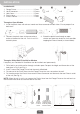
1. Install the plastic hose with exhaust nozzle and hose connector on both sides. Ensure proper fit on
both ends.
Through an Open Window
Connect the plastic hose to the rear exhaust
outlet on the back of the unit. Push-in until it is
locked in place.
Extend the plastic hose through an open
window and close the window as far as possible
trapping the Exhaust Nozzle (as shown below).
2.
3.
11.8”
11.8”
30 cm
1
4
5
x 1
x 2 x 1
x 1
x 1
2
3
MIN. 36 cm / 14”
MAX. 102 cm / 40”
30 cm