
Install Instructions


MP953C-F
Pneumatic Actuators
INSTALLATION INSTRUCTIONS
BEFORE INSTALLATION
Be sure the actuator is the correct size and has the necessary
travel to match the valve. A stem extension is included with
certain actuators.
IMPORTANT
Take special care in securing valve stem button to
large-size MP953C or E Actuators with stem
extensions.
INSTALLATION
The following are possible installation sections. Refer only to
the applicable section(s) for your installation.
Valve Stem Extension Installation
Valve stem extensions extend the valve stem height to accom-
modate mounting direct-acting MP953C and E Actuators.
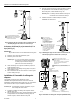
8 in. Actuator and 1-1/2 through 3 in. Valves (see Fig. 1)
1.
Loosen setscrew on top of valve stem.
2.
Remove stem button.
3.
Screw stem extension onto valve stem until extension
bottoms.
4.
Screw stem button on stem extension and adjust height
from top of valve bonnet shoulder to top of stem button
with stem down.
5.
Tighten top locking setscrew.
MP953C
MP953E
1
2
M17369
STEM
BUTTON
VALVE
STEM
VALVE
BONNET
1
2
5-1/4 IN. (133mm) WITH STEM
DOWN FOR V5011A,C,F,G,
N1XXX, N2XXX AND V5013B,D.
5-15/16 IN. (151mm) WITH STEM UP
FOR V5011N3XXX AND V5013A,F,N.
THE EXTENSION IS DRILLED
TO ACCEPT A 1/16 IN. DRIFT
PIN TO ASSIST IN TIGHTENING.
Fig. 1. Stem Extension for Mounting 8 in. (200 mm)
Actuator on 1-1/2 through 3 in. Valves.
13 in. Actuator and 2-1/2 or 3 in. Valve (see Fig. 2)
1.
Loosen setscrew on top of valve stem.
2.
Remove and discard stem button and setscrew.
NOTE: The stem has wrench flats to help hold the
stem while tightening the extension.
3.
Screw stem extension onto valve stem until extension
bottoms.
4.
Tighten extension setscrew.
5.
Screw new stem button on extension.
6.
Adjust to 8-5/16 in. (211 mm) from top of stem button to
valve bonnet with stem down.
7.
Tighten top and side setscrews.
® U.S. Registered Trademark
Copyright © 2000 Honeywell Inc. • All Rights Reserved
95- 6044EF