
User Manual


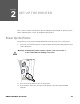
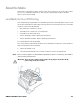

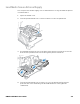
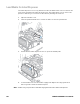
Table Of Contents
- PM45 and PM45c
- Customer Support
- Get Started
- Set Up the Printer
- Connect the Printer
- Configure the Printer
- Printer Configuration Menus
- Configure the Printer from the Web Page
- Configure the Printer with PrintSet 5 or Print Set MC
- Configure the Printer with Programming Commands
- Change Background Image for the Ready Screen
- Printer Profiles
- Save a Printer Profile from the Web Page
- Load a Printer Profile from the Web Page
- Save a Printer Profile from the Main Menu
- Load a Printer Profile from the Main Menu
- Load a Printer Profile Using Programming Commands
- Install a Configuration File from a USB Storage Device
- Export a Configuration File to a USB Storage Device
- Quick Choice Menu (Shortcuts)
- Customize the Printer Web Page
- Troubleshooting
- Maintenance
- Product Specifications
- Default Settings
- Print Labels with INPrint
- Accessories and Options

18 PM45 and PM45c User Guide
3. Load the media roll onto the media supply hub.
Note: Make sure you push the roll all the way against the inner wall of the printer.
4. Route the media through the print mechanism.
5. Adjust the media and dancer guides to hold the media in place. Adjust the
printhead balance.
6. Adjust the label gap and black mark sensor by turning the sensor adjustment
knob. The sensor blue LED should line up with the center of the media.
7. Turn the printhead lift lever clockwise to close the printhead.
8. The media is automatically advanced once you lock the printhead in place.