HONEYWELL TE831W-2 COMPLETE WIRELESS WEATHER STATION USER MANUAL TE831W-2
Table of Contents Introduction Standard Package Contents Installation Before you begin Thermo-Hygrometer Sensors TS33C Rain Gauge TS906 Anemometer (wind sensor) TS805 Main Unit Power Buttons and Controls Initial Set up Connecting the Weather Station to a PC Operation and Window Selection Custom Weather Station Settings LED Backlight Options Time Alarm Settings Memory Reset procedure Maintenance Troubleshooting PRECAUTIONS Appendix - City Codes Specifications FCC STATEMENT DECLARATION OF CONFORMITY STANDARD
Introduction Thank you for selecting the Honeywell Complete Wireless Weather Station. This compact and easy-to-use product uniquely measures and monitors weather data right at your immediate location. It includes a wide range of weather features plus precise atomic time and perpetual calendar. Weather measurements include: air temperature, relative humidity, barometric pressure, wind speed and direction, rainfall levels and more.
Before you begin The components of this Honeywell Complete Wireless Weather Station operate at 433MHz radio frequency. No interconnecting wires are required between the main unit (receiver) and the remote sensors (transmitters). Note: Your weather station comes with alkaline batteries included in each weather instrument.
• Make sure that the remote sensors are easily accessible for cleaning and maintenance. Note: When the temperature falls below freezing, the outdoor sensor batteries may have reduced voltage and a reduced effective range. We recommend using lithium batteries at temperatures below 32°F (0°C). IMPORTANT: We recommend cleaning the remote sensors periodically, as dirt and debris affects sensor accuracy.
• Set one sensor to Channel 1 and the second sensor to Channel 2, etc. The sensors must operate on separate channels. Install 2 “AA” size batteries matching the polarities shown in the battery compartment. IMPORTANT: When channel number is selected, it will be displayed on the sensor’s LCD display • Replace the battery compartment door and secure the screws. • Secure the thermo-hygrometer remote sensor in the desired location.
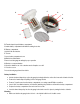
G D B A H E C F I D. Funnel-shaped top with battery compartment Contains battery compartment and rainfall counting electronics E. Battery compartment Holds two AA-size batteries F. Screws Secures battery compartment cover G. Built-in level with bubble Ensures level rain gauge mounting for proper operation H. Bucket see-saw mechanism Collects the rainfall in one of its containers and self-empties once full I.
• • • Place the protective screen over the top to protect the rain gauge from the debris. Where practical, mount the rain gauge in place with wood screws (not included). Make sure that the rain gauge is in open area where precipitation falls directly into the gauge’s bucket, ideally 2-3 feet above the ground. Placement tips • The rain gauge should be placed in an open area away from the walls, fences, trees and other coverings which may reduce the amount of rain falling into the bucket.
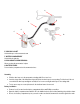
A E D G C B F H E. WIND CUPS SHAFT Holds wind cups on the anemometer arm F. BATTERY COMPARTMENT Holds 2 AA-size batteries G. WALL MOUNT SCREW OPENINGS Allows securing the anemometer in place H. BATTERY COVER Secures battery compartment on the anemometer base Assembly • • Slide the wind cups on to the anemometer rotating shaft. Do not use force. Insert the longer arm of the Allen Wrench (provided) into the wind cup set screw opening.
unit (0.0 mph will appear on the main unit’s wind window if the signal was sent and received successfully) Aligning This procedure must be performed after main unit has been powered and all remote weather sensors were received successfully. • • Manually point the wind direction vane to the north (use a compass or map if necessary). Press the “SET” button located inside battery compartment (on the shorter side) with a paper clip.
• • • • • • • • • • • Barometric pressure in imperial or metric units Altitude adjustment for pressure compensation 24 hour barometric pressure history chart Multiple weather alerts including: Hi/Low temperature, Daily Rainfall, Hi wind gust and Hi wind speed alerts Indoor/Outdoor Temperature & Humidity in up to 5 remote locations (3 additional sensors required) Dew point and comfort level indicators Wind direction, speed and wind gust averages and memory Rainfall amount with minimum and maximum memory 200
Buttons and Controls H I G F E D C B A K L J 12
A. UP B. DOWN C. SET D. CHANNEL E. MEMORY F. HISTORY G ALARM/CHART H.
Initial Set up 1. Power up each of the remote sensors as instructed in previous sections.( Remove clear protective plastic slips from the battery compartments) 2. Then power up the main display. 3. Once the main unit is powered, the display will briefly show all available LCD segments for a moment. 4. IMPORTANT: Do not press any buttons during the set up process which typically takes about 5-10 minutes. The display functions will be automatically set including local altitude and pressure parameters.
If you want to use collected weather data in other applications, the software allows storing data on your computer hard drive in text file called RECORDS.txt. This file can be exported to Excel. This file location is: C:/Program Files/WeatherCapture. NOTE: Check our website periodically for useful tips and the latest software versions Operation and Window Selection The main unit has five different operating windows each displaying unique data.
• With the Clock and Alarm icon flashing, press and hold SET button until the day of week language abbreviation “ENG” will flash. • Press UP or DOWN arrow button to select the desired language for day of the week in English, German, French, Italian, Spanish or Dutch • • Press SET button to confirm selection. Select the desired City Code flashing (LAX is Los Angeles for example) for your area by pressing UP or DOWN. This will set the unit to the appropriate time zone for your location.
Pressure and Weather Forecast Window Your weather station is designed to display (local) barometric pressure, sea level pressure, weather forecast and moon phases. Historical statistics can also be viewed, including the sea-level pressure for the past 24 hours, moon phase for the past and following 39 days, and a selectable bar-chart for viewing pressure/ temperature & humidity history. Pressure is displayed inHg (English), hPa/mBar (scientific) or mmHg (metric). Altitude is displayed in meters or feet.
desired at a later date, using the steps outlined in the section for Setting or Changing Pressure and Altitude settings. Changing Pressure and Altitude Parameters The weather station is designed to measure local pressure and calculate the other two parameters based on the Local Pressure. Sea Level Pressure and Altitude are interdependent. If you adjust altitude, it will calculate sea level pressure, if you adjust sea level pressure, it will automatically calculate altitude.
• • Press and hold SET until the altitude digits are flashing. Set the altitude value by pressing the UP or DOWN arrow buttons. Press and hold UP or DOWN arrow button for faster digits advancement • Press SET button to confirm your selection. Viewing the Sea Level Pressure History • • From any mode, press the HISTORY button. Unit will select the Pressure/ Weather display.
Weather Forecast Displays Note: The weather forecast accuracy is approximately 70%. Display shows 12 to 24 hour forecast, not current conditions. The SUNNY icon indicates clear weather, even when displayed during the night-time. Temperature and Humidity Window The weather station supports Indoor Temperature & Humidity and up to five remote temperature and humidity sensors (2 remotes are included). Temperature can be displayed in either Celsius (ºC) or Fahrenheit (ºF).
remote channels Thermo-Hygrometer remote battery status is monitored on the main unit. Display: Selecting Temperature and Humidity Window Press main unit UP or DOWN arrow buttons until the IN icon on the upper right will flash. Viewing Temperature and Humidity for each Channel At any time simply press the CHANNEL button to recall a different remote thermo hygrometer channel.
with icon (if disabled, displays OFF). You can program the same temperature alarm limits for all five temperature and humidity channels Programming Upper and Lower limits for Temperature Alarm • In the Temperature and Humidity Mode, press ALARM/CHART button once selecting the desired alarm limit – Upper or Lower • Press and hold ALARM/CHART button until the remote temperature and starts flashing.
Viewing Rain Statistics With the rain icon flashing Press either SET or MEMORY button to recall a rain statistics for the past hour, past 24 hours, yesterday, past week or past month. Note: Last Hour rainfall value is displayed as a rate of rain in either “inch/hr” or “mm/hr”. Rainfall Memory Reset With the rain icon flashing, press and hold the MEMORY button to reset all rainfall statistics.
records the maximum wind speed and gusts collected during the day. Wind speed and gust alerts can be programmed based on pre-configured limits. Wind speed is displayed in km/h, mph, m/s or knots. Selecting Wind Window Press main unit UP or DOWN until the WIND icon on the display starts flashing. Note: The wind speed alert is set at 5 mph default and the wind gust alert is set to 7 mph default to prevent false alerts from small fluctuations.
If the alert is disabled, “OFF” will be displayed; otherwise the alert value is shown. When a wind alert is displayed, press UP or DOWN arrow button to activate or deactivate it. Wind Alert programming • With the wind icon flashing, press ALARM/CHART button to select the desired alarm. • • • Press and hold ALARM/CHART button until alert and corresponding icon will flash. Set the alert using UP or DOWN arrow button. Press and hold either button for fast digits advance.
• • • Set the alarm minutes using UP or DOWN arrow button. Press and hold either button for quick digit advance. Press ALARM/CHART button to confirm selection. Set a Snooze interval (both alarms share same snooze time duration) using UP or DOWN arrow button. Press and hold either button for quick digit advance. • Press ALARM/CHART button to confirm your selection. After programming is completed, the display will return to the alarm selection screen.
Remote Sensor Status The wave icon above the current channel display shows the connection status of the corresponding remote sensor: Activate Search for Remote Sensors Normally the main display will automatically find and display measurement results from the remote sensors. However, occasionally other radio transmission sources (TV, Cordless or Cell Phones etc) can interrupt the sensor signal. If this happens simply press and hold the DOWN arrow button for 4 – 6 seconds to activate a new search.
Changing Batteries in the Main Unit • • • First connect the AC/DC adaptor provided to the main unit to avoid losing any data. Remove the battery compartment door at the back and replace all batteries. Do not mix old and new batteries. Replace the battery compartment door. Changing Remote Sensor Batteries • • • Replace the batteries following the setup instructions for the corresponding sensor. When the batteries are properly installed, the remote sensor will resume sending signals to the main unit.
Check or replace the batteries for the corresponding sensor. Then press and hold DOWN arrow button on the main unit to search for all remote signals. If this does not work, check the wireless transmission path from the corresponding sensor to the main unit and change locations to improve reception. Wireless signals pass through solid objects and walls, however, whenever is possible the sensor should be within line-of-sight with the main unit.
Appendix - City Codes The Table below will assist in determining the appropriate time zones.
Specifications Radio Frequency: 433 MHz RF Reception range: 100-328 feet (30 -100 m) Barometric Pressure Measuring Range: 14.75 inHg to 32.44 inHg (500 Hpa to 1100Hpa); (374.5 mmHg to 823.8 mmHg) Resolution: 0.003 inHg (0.1 Hpa, 0.08 mmHg) Accuracy: 0.015 inHg (5 Hpa; 0.38 mmHg) Sampling interval: 20 minutes Sea level Altitude Compensation Range: -657 ft to 16404 ft (-200m to +5000 m) Temperature (Indoor) Operating Range: 14.2°F to 140°F (-9.9°C to 60°C) Resolution: 0.2°F (0.
Range: 0° to 360° Resolution: 22.5° Accuracy: 11.25° Starting Threshold: 3mph (4.8 Km/h) Transmitting interval: 33 seconds Operating Range: 100 feet (30 m) Wind Speed Range: 0 to 199.9mph (199.9 Km/h, 173.7 Knots, 89.3 m/s) Resolution: 0.1mph (0.16 Km/h) Accuracy: (2mph + 5%) Starting Threshold: 3mph (4.8 Km/h) Wind/Gust Speed Display Update Interval: 33 seconds Wind/Gust Sampling Interval: 11 seconds Operating Range: 100 feet (30 m) Rainfall 1h/24h/yesterday range: 0 to 78.73 inch (0 to 1999.
Battery life (alkaline) Main unit: 2 month (without AC adapter) Thermo-Hygrometer: over 12 months Anemometer: 2 years Rain Gauge: 2 years Weight (without batteries) Main unit: 8.15oz (231g) Remote Thermo-Hygrometer: 2.29oz (65g) Remote Anemometer: 11.12oz (315g) Remote Rain gauge: 10.24oz (290g) Dimensions Main unit: 7.31 (L) x 5.39 (H) x 1.26 (D) inches / 185.8 (L) x 136.9 (H) x 32 (D) mm Remote Thermo - Hygrometer: 2.37 (L) x 4 (H) x 1 (D) inches / 60 (L) x 101 (H) x 25 (D) mm Remote Anemometer: 19.
DECLARATION OF CONFORMITY Name: Hideki Electronics, Inc. Address: 7865 SW Mohawk, Tualatin, OR 97062 Telephone No.: 1-503-612-8395 declare that the product Product No.: TE831W-2 Product Name: Complete Wireless Weather Station Manufacturer: Hideki Electronics Ltd. Address: Unit 2304-06, 23/F Riley House, 88 Lei Muk Road, Kwai Chung, New Territories, Hong Kong is in conformity with Part 15 of the FCC Rules. Operation is subject to the following two conditions: This device may not cause harmful interference.