
Owner's Manual


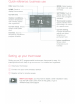


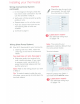
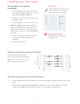

Table Of Contents
- User Guide
- Welcome
- Table of Contents
- Quick Reference
- Setting Up
- Installation
- Connecting to Wi-Fi Network
- Registering Online
- Setting Time / Date
- Setting the Fan
- Setting System Mode
- Preset Energy-Saving Schedules
- Adjusting Program Schedules
- Overriding Schedules
- Viewing Equipment Status
- Setting Vacation Hold
- Setting Holiday / Event Schedules
- Setting Custom Events
- Setting Holiday Schedule
- Setting Holidat Override
- Initiating Occupancy Mode
- Customizing Screen Color
- Setting Preferences
- Cleaning the Screen
- Adjusting Security Settings
- Software Updates
- unregistering Your Thermostat
- Smart Response Technology
- Pre-Occupancy Purge
- Compressor Protection
- Auto Changeover
- Setting Advanced Preferences
- Chaging System Setup
- FAQs
- Getting Help and Responding to Alerts
- Troubleshooting
- Glossary
- C Wire Addendum
- Quick Start Guide
- Wiring Labels
- Thermostat ID Card
- Warranty

Installing
your thermostat
You
might need the following tools
to install
this thermostat:
•
No. 2 Phillips
screwdriver
•
Pen
• Pencil
• Level (optional)
1
Switch OFF
power to your
heating/cooling system.
Important!
To
protect your
equipment, switch
OFF
the power
to your heating/cooling system
at the breaker box or the system
switch.
2 Remove old
thermostat
faceplate
and
leave
wires connected.
•
2a
Take
a picture of the
wire connections for
later
reference.
B
2b
If
no wire
is
connected to
·-
a
terminal labeled C
or no
C terminal
exists
on
the
old
thermostat, view the
Alternate
Wiring videos at
wifithermostat.com/videos
or reference the C-wire
addendum
in
the box.
Important!
C
wire 'is
required
and
is
the power source for your
thermostat. Without a
C
wire, your
thermostat
will not power
up.
• Drill
and bits
(3/16"
for
drywall,
7/32"
for
plaster) (optional)
•
Hammer (optional)
• Electrical
tape
(optional)
I
<D
CJ
CJ
or
I
C=:J
C=:J
0
CJ
CJ
C=:J
C=:J
CJ
C=:J
C=:J
CJ
<D
~
3
-
Circuit
breaker
box
-
-
-
-
Heating/cooling
system power
switch
Note:
You
will
need a
picture of your wire
connections to wire the
new thermostat.
-
-
-
-
-
-
©
~
~w
-
-
-
-
-
-
-
D :
--
;-
--------
0 0
0
Term1nal
designation
-
If
you have
an
older thermostat
with a
sealed
mercury tube, turn
to page
ii
for proper
disposal
instructions.