
Owner's Manual


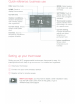


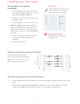

Table Of Contents
- User Guide
- Welcome
- Table of Contents
- Quick Reference
- Setting Up
- Installation
- Connecting to Wi-Fi Network
- Registering Online
- Setting Time / Date
- Setting the Fan
- Setting System Mode
- Preset Energy-Saving Schedules
- Adjusting Program Schedules
- Overriding Schedules
- Viewing Equipment Status
- Setting Vacation Hold
- Setting Holiday / Event Schedules
- Setting Custom Events
- Setting Holiday Schedule
- Setting Holidat Override
- Initiating Occupancy Mode
- Customizing Screen Color
- Setting Preferences
- Cleaning the Screen
- Adjusting Security Settings
- Software Updates
- unregistering Your Thermostat
- Smart Response Technology
- Pre-Occupancy Purge
- Compressor Protection
- Auto Changeover
- Setting Advanced Preferences
- Chaging System Setup
- FAQs
- Getting Help and Responding to Alerts
- Troubleshooting
- Glossary
- C Wire Addendum
- Quick Start Guide
- Wiring Labels
- Thermostat ID Card
- Warranty

Installing
your thermostat
3
Label
the wires.
Use the
supplied
sticky tags
to
label
each wire
as
you
disconnect it.
Label
wires
according to the
old thermostat
terminal designations, not by
wire
color.
Wl
nng ~betl
Apolv~..,.....-.g~t;
••..C'I
......
..,.,-
..
ho••ppo•JJ•I
..
oo
ll!fmnli'!M~'•'ltiU'I'""
,...,.,....tr.m~a•"'I'ISJ
~lf"IO!I!al
B B
V2
G G
H
R R RC
VNR
V.'VR
w
X X
Xt
AUX AUX
Etiquettes
de
lila
A6tulos
pa
ra
loa
ca
b
les
lorsqi>G..OUIIeiWII!l
..
IJ'qOM
CotoouoO&teiif'CI'IJosOC'tlla
L<••
~'">-<It•
ttwn·•·~l<il
,..,,..,~
<l+·""o''"'"&Jf\
,;.
w~
.,. .
.,,
•.•
,
·
colezc:eoc:Mqolf'lk::.~l
enc-C&:IIrllln:-trO¥eriOS
c+v.lfUi"ll<:v<'
........
...,...,.lc
(~ct.ltem-.o51411<.>1C1u.lll
~•·ed'!"'flbo~
V2
c c
E E
F
F-
r-
Sticky
tag
H L L
0
0
p p
AC AH RH
T T
u u
w
W1
Wt
W2 W2
W3 W3
X1
X2
X2
y
v
Yt
Vt
-
-Blank
tags
Note:
If
no tag matches a
li!l
~!HS
2 •
~~~
•
t'r~t:o-:III'IUSA
terminal
designation, write
the
appropriate
letter
on a blank
sticky tag.
4
Remove
wallplate.
Remove the old wallplate from
the
wall after
all
wires have been
labeled
and disconnected.
Note:
Wrap
the wires around
a
pencil
to prevent them from
falling
back into the
wall.
5
Mount
wallplate
for Wi-Fi
thermostat.
~
Mount your new
wallplate
using screws and anchors
included
with the thermostat.
If
necessary:
Drill 3/16-in
holes
for
drywall.
Drill
7/32-in
holes
for plaster.
Note:
You may be able
to use
your existing
wall
anchors. Hold
the
wallplate
up
to
the
existing
anchors
to
check for
alignment.
c
4
----+-
Terminal
designation
Wall plate