
Owner's Manual
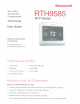


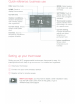


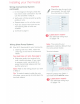
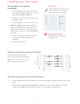

Table Of Contents
- User Guide
- Welcome
- Table of Contents
- Quick Reference
- Setting Up
- Installation
- Connecting to Wi-Fi Network
- Registering Online
- Setting Time / Date
- Setting the Fan
- Setting System Mode
- Preset Energy-Saving Schedules
- Adjusting Program Schedules
- Overriding Schedules
- Viewing Equipment Status
- Setting Vacation Hold
- Setting Holiday / Event Schedules
- Setting Custom Events
- Setting Holiday Schedule
- Setting Holidat Override
- Initiating Occupancy Mode
- Customizing Screen Color
- Setting Preferences
- Cleaning the Screen
- Adjusting Security Settings
- Software Updates
- unregistering Your Thermostat
- Smart Response Technology
- Pre-Occupancy Purge
- Compressor Protection
- Auto Changeover
- Setting Advanced Preferences
- Chaging System Setup
- FAQs
- Getting Help and Responding to Alerts
- Troubleshooting
- Glossary
- C Wire Addendum
- Quick Start Guide
- Wiring Labels
- Thermostat ID Card
- Warranty

Installing your thermostat
Wiring
(Conventional
System
continued)
c
In
the image on the right, check the
box next to each connection.
You
will
use this checklist
in
Step
9.
d Verify wire
is
firmly secured by gently
pulling on wire.
e Repeat steps
a-d
for
all other wires.
f Push any excess wire back into the
wall
opening after
all
wires are
installed.
g Continue to page
8.
Wiring
(Heat
Pump
System)
68
Wire Wi-Fi thermostat to your heat pump.
a Starting with the C Wire, match the
sticky tag on the wire to the terminal
labels.
You
must
have
a
C
wire.
See
page
5.
b
Slide
wire gently into terminal
hole
until
it clicks into place.
(If
you need
to remove a wire, use a pen tip to
press the terminal release and then
pull
the wire out.)
Note: Refer to the wiring picture you took
in
Step
2.
Tip:
To
make it easier to
slide the wire
into place, use a pen tip to hold
down the
terminal release.
6
Important!
Check the box for each wire
you connect.
You
will
need
this information in Step
9.
c O
KD
Rc
D
RD
D
W-0/8
D v
D G
D
W2-Aux/E
0
Y2
D L
Labels
don't
match?
See alternate wiring keys
on pages 7-8.
Note: The wiring for your
application might be different than
the wiring shown below.
Terminal release
I
EXAMPLE
WIRING
l
Yours may
look
different
I
Remove jumper loop ONLY if
you have both R
and
Rc
wires.
Labels
don't
match?
See alternate wiring keys
on pages 7-8.