
Installation Instructions


STATIC PRESSURE REGULATING DAMPER (SPRD)
3 69-1518-2
Selecting Damper Location
Install the SPRD in the ductwork or plenum upstream of
any zone dampers and downstream of the air handler or
furnace. Then run a duct from the SPRD into the return. It
is preferable to place it as far as practical from the air
handler.
The round SPRD can be mounted in vertical or horizontal
ductwork. The rectangular SPRD can be mounted only in
horizontal ductwork. Be sure there is adequate room for
the weight arm to swing freely.
The equipment should be protected from freeze-up and
from tripping the high limit with a C7735 on the TZ-3,
TZ-4, EZ-2, EZ-4, EMM-3, and EMM-3U or with a C7835
on network zoning systems.
Alternatively, the SPRD can dump air from the supply to
a non-critical temperature area such as a hallway,
basement, or false ceiling (in commercial applications).
Honeywell does not recommend using dump zones.
Mounting the Damper
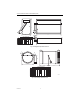
Rectangular SPRD
1. Cut a 4 in. opening into the side of the air duct. Be
sure the opening is cut fully to the top and bottom
of the duct. (See Fig. 1 for damper dimensions.)
2. Slide the damper into the opening
3. Secure the mounting plate to the air duct using the
six no. 8 18 x 1/2 sheet metal screws (included).
Round SPRD
1. Install a duct collar into the duct. See Fig. 2 for
damper dimensions.
2. Slide the damper onto the duct collar
3. Secure the damper using no. 8 18 x 1/2 sheet
metal screws (not included) through the damper
and duct collar.
Settings/Adjustment
After the damper is installed into the duct, assemble the
counter-weight subassembly into the damper:
1. Remove the counterweight subassembly from the
carton.
2. Loosen the set screw on the extension so the
extension can slip over the damper shaft.
3. Place the extension on the desired side of the
damper shaft.
4. Adjust the angle of the counterweight to approxi-
mately 45 degrees from the vertical down position
and tighten the set screw to 40+/- 10 in. lb torque.
5. Adjust the counterweight by loosening the thumb
screw on the counterweight, moving the counter-
weight to the desired position and retightening the
thumb screw.
a. Move the counterweight toward the end of the
arm to increase the damper closing force.
b. Move the counterweight toward the damper
shaft to decrease the damper closing force.
6. Set the thermostats so only the smallest zone is
calling for circulation fan or air conditioning. The
SPRD should be partially or fully open. The velocity
from the registers should be acceptable. Adjust the
SPRD, if necessary.
7. Set all thermostats to call for circulation fan or air
conditioning. The SPRD should now be closed.