
Install Instructions
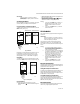

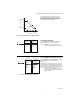
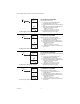
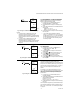
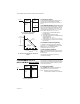
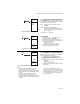
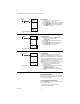
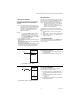
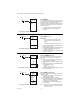
Table Of Contents

T775R SERIES 2000 ELECTRONIC STAND-ALONE CONTROLLER
11 62-0249—05
IMPORTANT
After four minutes of inactivity (no buttons
pressed), the LCD display reverts to the home
screen display.
Accessing the Menus
Menus are used for programming, scheduling, viewing the
summary settings, and setup of advanced options.
Program, Schedule, and Summary Menus
To access these menus from the home screen, press the
MENU button (See Fig. 22).
Fig. 22. Menus.
Depending on whether scheduling is enabled or not, the
LCD displays one of two menus as shown in Fig. 22.
Scheduling is enabled from the Setup menu’s Output
settings (Refer to “3.3.5.1. USE SCHED” on page 26).
Setup Menu
To access the Setup menu for advanced options, press
and hold the MENU button for five seconds (See Fig. 23).
Fig. 23. Setup Menu.
Using the Menus
When you are working with the menus, use the:
• Left arrow button (W) to scroll backward through the
menus
• Right arrow button (X) to select the highlighted menu
item and display its content
• Up and Down arrow buttons (S and T) to scroll up
and down through a list of items or to increase or
decrease the value of a displayed parameter
NOTES:
1. If you press the HOME button or there is no
keypad activity for four minutes, you exit
Program mode and return to the home
screen.
2. If you press the MENU button, you exit and
return to the menu.
PROGRAMMING
The controller must be programmed before being placed
into service.
IMPORTANT
During programming, the controller is live at all
times. For example, the contacts may open and
close when adjusting the setpoint.
The programming process uses a hierarchical menu
structure that is easy to use. You press the W and X
arrow buttons to move forward and backward through the
menus.
NOTES:
1. The T775P controller interface is intuitive.
You may want to use these procedures
simply as a reference to locate the particular
option or parameter of interest.
2. The menus can display only those relays that
are defined in Setup (Refer to “3.3.4. NBR OF
RELAYS” on page 25). For example, if you
configure only two relays, then only two
relays display on the appropriate menus.
3. If you press the HOME button or there is no
keypad activity for four minutes, you exit
Program mode and return to the home
screen.
4. If you press the MENU button, you exit
Program mode and return to the menu.
Setpoint and Differential
The following describes the relationship between setpoint
and differential for heating and cooling. These settings are
programmed for each output relay.
Heating Mode Setpoint and Differential
In heating mode, the differential is below the setpoint. The
relay de-energizes when the temperature rises to the
setpoint. As the temperature drops to the setpoint minus
the differential, the relay energizes.
Cooling Mode Setpoint and Differential
In cooling mode, the differential is above the setpoint. The
relay de-energizes when the temperature falls to the
setpoint. As the temperature rises to the setpoint plus the
differential, the relay energizes.
Setpoint High Limit
You can set an irreversible setpoint high limit maximum
value for any single displayed setpoint value.
MENU
PROGRAM
EXIT
home
menu
OR
MENU DISPLAY WHEN
SCHEDULING IS NOT SET
MENU DISPLAY WHEN
SCHEDULING IS SET
MENU
MOD1 40%
MOD2 60%
DI ON
HOME
RELAYS 1 2 3 4
ON
F
o
F
o
SENSORS
SENSOR A
78
SENSOR B
84
PROGRAM
SCHEDULE
SUMMARY
EXIT
M24300
home
menu
SETUP
MOD1 40%
MOD2 60%
DI ON
HOME
RELAYS 1 2 3 4
ON
FIVE
SECONDS
F
o
F
o
SENSORS
SENSOR A
78
SENSOR B
84
SENSORS
OUTPUTS
EXIT
M24301