
Install Instructions


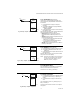
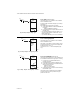
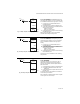
Table Of Contents

T775R SERIES 2000 ELECTRONIC STAND-ALONE CONTROLLER
27 62-0249—05
Fig. 66. Setup - Outputs - Options - DI Options.
3.3.5.3. DI OPTIONS (digital input options)
The DI Option you select applies to all outputs. This
option overrides any Setpoint/Setback values entered in
the Schedule.
1. Press the X button to display the DI Option
selections.
2. Use the S and T buttons to highlight DISABLE,
SETBACK, or IGNORE.
Default: DISABLE
3. Press the X button to accept the value and display
the SHOW RT option.
When the digital input (DI) closes, all outputs follow the DI
option value (Disable, Setback, or Ignore):
• DISABLE disables the outputs; relays return to
de-energized state and Mod outputs return to 0%
output.
• SETBACK enables a setback temperature value to be
programmed for each output.
— To program the Setback temperature with Reset,
Refer to Fig. 34 on page 15.
— To program the Setback temperature without
Reset, Refer to Fig. 43 on page 18.
• IGNORE causes the digital input to have no effect on
the Relay or Mod outputs.
Fig. 67. Setup - Outputs - Options - Show Runtime.
3.3.5.4. SHOW RT (show run time hours)
1. Press the X button to display the Show RT values.
2. Use the S and T buttons to select YES or NO.
Default: YES
3. Press the X button to accept the value and return to
the Options menu.
Selecting YES shows the RT (run time) hours for each
relay on the home screen displays.
NOTE: Run times can be reset to zero for each individ-
ual relay. You must do this for each relay that
you want to reset to zero. Refer to “3.3.6.4.
RESET RT (run time)” on page 30.
3.3.5.5. Exit Options Setup
Press the W button (or highlight EXIT and press the X
button) to exit and return to the Outputs menu.
Continue with “3.3.6. Setting up the Relays”
Fig. 68. Setup - Outputs - Relay Menu.
3.3.6. Setting up the Relays
1. From the Outputs menu, use the S and T buttons
to highlight the desired relay (1-4 depending on
model).
2. Press the X button to display the selected relay
menu.
The TYPE selection shown in Fig. 68 displays only for
Relay 1 and Relay 3.
Continue with the remainder of section 3.4 to setup the
relay outputs.
SETUP
OUTPUTS
OPTIONS
DI OPTS
SETUP
OUTPUTS
OPTIONS
DI OPTS
SELECT DI
OPTIONS
FOR
OUTPUTS
DISABLE
SETBACK
IGNORE
M24346
SETUP
OUTPUTS
OPTIONS
SHOW RT
SETUP
OUTPUTS
OPTIONS
SHOW RT
USE
RUNTIME
FOR
RELAYS
YES
NO
M24347
SETUP
OUTPUTS
RELAY 1
SETUP
OUTPUTS
RELAY 1
TYPE
SCHEDULE
RESET
RESET RT
EXIT
M24349