TABLE OF CONTENTS Honeywell Wireless Rain Gauge (TC150) USER MANUAL INTRODUCTION PRODUCT OVERVIEW REMOTE RAIN GAUGE REMOTE SENSOR BEFORE YOU BEGIN BATTERY INSTALLATION REMOTE TEMPERATURE SENSOR MAIN UNIT LOW BATTERY WARNING HOW TO USE THE TABLE STAND GETTING STARTED REMOTE AND INDOOR TEMPERATURES AUTO-SCANNING CHECKING REMOTE RAINFALL DATA MAXIMUM AND MINIMUM TEMPERATURE LOST COMMUNICATION TRANSMISSION COLLISION CALENDAR AND CLOCK DISPLAY MODES MANUAL SETTINGS ALARMS SNOOZE PRECAUTIONS SPECIFICATIONS FCC
INTRODUCTION Thank you for selecting the Honeywell Wireless Rain Gauge. This device monitors and displays rainfall data along with the indoor/outdoor temperature from up to three remote locations.
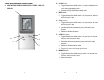
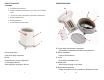
FRONT VIEW (RAIN MODE CONTROL PANEL) A. WEATHER AND TIME INFORMATION IN A THREE - LINE LCD DISPLAY B. ALARM button • Toggles between the rainfall modes – a current rainfall data and a rain alarm programming mode • Activates the high rainfall alarm setting mode C. MODE button A • Toggles between the rainfall modes – for the past hour, 24hours, and for the past 7 days D.
REAR VIEW (TIME AND TEMPERATURE CONTROLS PANEL) N P K. ALARM button Toggles between the alarm modes –weekday alarm (W), single alarm (S) and ice warning alarm (Pre-AL) L. MEMORY button • J H K Toggles between current, minimum and maximum readings of the indoor and remote temperatures I • Clears the memory M. CHANNEL button M • Recalls a different channel of the remote temperature • Enables remote temperature channels auto scanning feature N.
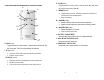
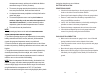
REMOTE RAIN GAUGE REMOTE RAIN GAUGE FEATURES • • • • • • Precipitation measurement Remote rainfall data transmission to the main unit via 433 MHz signal D G 100 feet (30 meters) transmission range without interference Built-in installation level Mounting hardware Non-corrosive protective screen B A H E F I C A. Rain gauge bucket Holds all rain gauge components B. Knob Secures the top on the rain gauge bucket C. Rain gauge bucket feet Allow securing the rain gauge on its place D.
I. Protective screen Protects the rain gauge funnel from debris Resets all readings D. CHANNEL SWITCH REMOTE SENSOR FEATURES • • • • • • Remote temperature transmission to the main unit via 433 MHz signal 100 feet (30 meters) transmission range without interference LCD display of measured temperature Three transmission (3) channels selection Selection of the temperature display in Celsius or Fahrenheit Case can be wall mounted using built-in hanger A. LED INDICATOR • Holds two AA-size batteries C.
the temperature sensor) and the main unit within the effective transmission range of 100 feet (30 meters). • • • The remote rain gauge must be placed outdoors on the open area, away from the walls, fences and trees and level. It is important that excess precipitation can freely flow from the remote rain gauge. The remote temperature sensor can be placed indoors or outdoors, depending on the area where the temperature is intended to be measured.
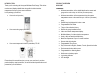
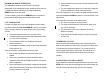
REMOTE TEMPERATURE SENSOR NOTE: Install the batteries; select the channel and temperature in C° or F° before mounting the remote temperature sensor. • Remove the screws from the battery compartment with a small Phillips screwdriver. • Set the channel. The switch is located in the battery compartment. Channel 1 is typically selected if only one remote sensor is being used. • Install 2 “AA” size alkaline batteries (not included) matching the polarities shown in the battery compartment.
REMOTE AND INDOOR TEMPERATURES The remote temperature information is located on the middle line of the main unit’s display. The indoor temperature with the icon IN is located next to the remote temperature. The wave icon above the remote channel number indicates the reception status from the remote temperature sensor. There are three following types of the reception status that may be displayed: The unit is in searching mode.
MAXIMUM AND MINIMUM TEMPERATURE The maximum and minimum record of the indoor and remote temperatures will be automatically stored in the memory of the main unit. To display the minimum, maximum or the current reading press MEMORY button on the back panel. To clear the memory, press and hold MEMORY button on the back for two seconds and all previously stored readings will be erased.
• MANUAL SETTINGS CLOCK • Press and hold MODE button for 3 seconds: the language letters will flash. • • Press UP (▲) or DOWN (▲) to change flashing letters. After the first value is set, press MODE button again to move to the next value • Continue setting temperature in Celsius or Fahrenheit, year, month, date, calendar format, 12 or 24 hour time format, hour and minutes. • Press the ALARM button again to confirm and the high rain alarm will be set.
• Press the ALARM button again to confirm and the weekday alarm time will be set. • Set Single day alarm if desired in the same manner. SETTING THE ICE WARNING ALARM If Weekday or Single day alarm is set, the Ice Warning Alarm can be programmed. • • • Press the back panel ALARM button once to enter into the Ice Warning Alarm setting mode. The abbreviation “OFF” with a “PRE-AL” next to it will be displayed. Press and hold the back panel ALARM button for two seconds.
SPECIFICATIONS Main Unit TIME 12/24 hour display in hh: mm format Date format: month-day or day-month format Day of the week is selectable in five languages (English, Spanish, French, German, Italian) Time zone manual adjustment Dual two-minute crescendo alarms with 8 minutes snooze Programmable ice warning alarm (Channel 1) WEATHER Rainfall Proposed operating range: 0 to 1999.9mm/0 to 78.74 inch Rainfall resolution: 0.03 inch (0.7 mm) Indoor Temperature Proposed operating range: -5.0°C to +50.0°C/23.
FCC STATEMENT DECLARATION OF CONFORMITY This device complies with Part 15 of the FCC Rules. Operation is subject to the following two conditions: (1) This device may not cause harmful interference, and (2) This device must accept any interference received, including interference that may cause undesired operation. Warning: Changes or modification to this unit not expressly approved by the party responsible for compliance could void the user’s authority to operate the equipment.
STANDARD WARRANTY INFORMATION This product is warranted from manufacturing defects for one year from date of retail purchase. It does not cover damages or wear resulting from accident, misuse, abuse, commercial use, or unauthorized adjustment and repair. Note that online product registration is required to ensure valid warranty protection. To register your product, go to our Company website at: www.honeywellweatherstations.com. Click Online Product Registration under the Customer Service menu.