HONEYWELL TE821W SEMI-PROFESSIONAL WEATHER STATION USER MANUAL TE821W
Table of Contents Introduction Standard Package Contents Installation Before you begin Thermo-Hygrometer Sensor TS33C Rain Gauge TS906 Anemometer (wind sensor) TS805 Main Unit Power Buttons and Controls Initial Set up Operation and Window Selection Custom Weather Station Settings LED Backlight Options Time Alarm Settings Memory Reset Procedure Maintenance Troubleshooting PRECAUTIONS Appendix - City Codes Specifications FCC STATEMENT DECLARATION OF CONFORMITY STANDARD WARRANTY INFORMATION 3 3 3 3 4 6 7 9 10
Introduction Thank you for selecting the Honeywell Semi-Professional Weather Station. This compact and easy-to-use product uniquely measures and monitors weather data right at your immediate location. It includes a wide range of weather features plus precise atomic time and perpetual calendar. Weather measurements include: air temperature, relative humidity, barometric pressure, wind speed and direction, rainfall levels and more.
interconnecting wires are required between the main unit (receiver) and the remote sensors (transmitters). Power up and test communications between all of the sensors and the main unit BEFORE mounting them outside. • • For most applications alkaline batteries are acceptable where temperatures remain above 32°F (0°C). At temperatures below 32ºF(0ºC) use lithium batteries otherwise transmission performance will be reduced or interrupted • • Avoid using rechargeable batteries.
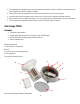
A. LED INDICATOR • Flashes once when the remote sensor transmits a reading to the main unit. • Flashes twice when battery power is low. B. BATTERY COMPARTMENT Holds two AA-size batteries C. RESET Resets all readings (requires small paper clip.) D. CHANNEL SWITCH Selects the desired sensor channel from 1 to 3 E.
• The remote thermo-hygrometer sensor should be placed in the area with a free air circulation and sheltered from the direct sunlight and an extreme weather conditions. • • • • Ideally, place the thermo-hygrometer sensor above the natural surfaces (such as a grassy lawn). Avoid placing the thermo-hygrometer sensor near sources of heat such as chimneys and heating elements. Avoid areas that collect or radiate heat from the sun, such as metal, brick/concrete structures, paving, or patio decks.
Contains battery compartment and rainfall counting electronics E. Battery compartment Holds two AA-size batteries F. Screws Secures battery compartment cover G. Built-in level with bubble Ensures level rain gauge mounting for proper operation H. Bucket see-saw mechanism Collects the rainfall in one of its containers and self-empties once full I.
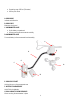
• • Operating range 100 feet (30 meters) Wall or pole mount A. WIND VANE Indicates wind direction B. WIND CUPS Measures wind speed C. ANEMOMETER BASE • Holds battery compartment • Allows mounting the anemometer vertically D. ANEMOMETER ARM Connects battery to the anemometer head assembly. A E D G C B F H E. WIND CUPS SHAFT Holds wind cups on the anemometer arm F. BATTERY COMPARTMENT Holds 2 AA-size batteries G.
H. BATTERY COVER Secures battery compartment on the anemometer base Assembly • • Slide the wind cups on to the anemometer rotating shaft. Do not use force. Insert the longer arm of the Allen Wrench (provided) into the wind cup set screw opening. Feel the head of the set screw inside the wind cups and tighten carefully the set screw securing the wind cups to the rotating shaft.
Main Unit The main unit measures pressure, indoor temperature, humidity, and receives atomic time data from the US Atomic Clock and outdoor measurements from remote sensors. It should be placed indoors.
Placement tips • • • • Make sure that the main unit is locating within the operating range of all remote sensors. Ideally the remote sensors should be mounted within the line of sight of the main unit. Transmission range may be affected by trees, metal structures and electronic appliances. Test reception before permanently mounting all the remote sensors.
Buttons and Controls H I G F E D C B A K J 12
A. UP B. DOWN C. SET D. CHANNEL E. MEMORY F. HISTORY G ALARM/CHART H. SENSOR – AUTO, ON, OFF I. SENSITIVITY – HIGH/LOW J LIGHT/SNOOZE K.
Initial Set up 1. Power up each of the remotes as instructed in previous sections.( Remove clear protective plastic slips from the battery compartments) 2. Then power up the main display. 3. Once the main unit is powered, the display will briefly show all available LCD segments for a moment. 4. IMPORTANT: Do not press any buttons during the set up process which typically takes about 5-10 minutes. The display functions will be automatically set including local altitude and pressure parameters.
2. 3. 4. 5. Time with the City abbreviation Time with the Seconds Month/ Day/ Year or Day/ Month/ Year. Current UTC Time (Coordinated Universal Time) Selecting Clock and Alarm Window Press main unit UP arrow button or DOWN arrow button until the clock icon next to the time/date display continues to flash. Initial Settings: City, Time, Date and Language • With the Clock and Alarm icon flashing, press and hold SET button until the day of week language abbreviation “ENG” will flash.
• Press SET to confirm selection. • Press UP or DOWN to select the correct minute. • Press SET to confirm selection and to complete the initial programming for your weather station. After programming is completed, the display will return to the default Clock and Alarm Window. Note: If you do not complete this sequence your entries will be lost. Note: Press and hold SET anytime during the setup to return to normal Clock and Alarm Window and all previous settings will be cancelled.
Select Pressure and Weather Forecast Window Press UP or DOWN arrow buttons on the main unit until the weather forecast icon begins to flash, upper display left corner. NOTE: Wait at least 5 - 10 minutes after initial set up to view a pressure or altitude information. Pressure and Altitude Information Press SET button once (do not hold it) to alternate between the Sea Level Pressure, Local Pressure and Local Altitude settings.
• • • • Set the pressure units by pressing the UP or DOWN arrow buttons Press MEMORY button to confirm your selection Press and hold SET button until the local pressure digits will flash. Set the sea level pressure by pressing the UP or DOWN buttons to adjust the pressure value. Press and hold UP or DOWN arrow buttons for faster digits advancement • Press SET to confirm your selection.
Previous moon phases are selected with the minus sign selected: -1 day, -2 days, etc or future moon phase are selected based on the days ahead: +1 day, + 2 days, etc up to 39 days. • • After selecting the Pressure and Weather Forecast display, press MEMORY button, so “+ 0 days” is flashing. Press UP or DOWN arrow buttons selecting from today’s date a future (+) or past (-) days and the corresponding moon phase will be displayed. Press and hold either button for a quick advance.
Note: The weather forecast accuracy is approximately 70%. Display shows 12 to 24 hour forecast, not current conditions. The SUNNY icon indicates clear weather, even when displayed during the night-time. Temperature and Humidity Window The weather station supports Indoor Temperature & Humidity and up to five remote temperature and humidity sensors (1 remote sensor is included). Temperature can be displayed in either Celsius (ºC) or Fahrenheit (ºF).
With Temperature and Humidity icon flashing, press the SET button to alternate between “temperature and relative humidity” or “dew point and relative humidity.” Temperature in Celsius or Fahrenheit With Temperature and Humidity icon flashing, press and hold the SET button to alternate between temperature in Celsius (ºC) or Fahrenheit (ºF).
rainfall can be displayed in mm or inches. There is a daily rainfall alert that can be programmed in the unit if the daily rainfall exceeds a pre-programmed limit. Selecting Rain Window Press the UP or DOWN arrow buttons on the main unit until the RAIN icon Display: on the display starts flashing. Viewing Rain Statistics With the rain icon flashing Press either SET or MEMORY button to recall a rain statistics for the past hour, past 24 hours, yesterday, past week or past month.
Disabling the Daily Rainfall Alert In the Daily Rainfall Alert Mode press the ALARM/CHART button to disable the alert. Wind Window Wind direction is shown by compass points (i.e. NW) or in bearings starting from north (i.e. 22.5º). The unit displays anemometer temperature or wind chill, average wind speed (over the past 10 minutes), gust, and wind other information. It records the maximum wind speed and gusts collected during the day.
Resetting the Wind Statistics Memory With the wind icon flashing, press and hold MEMORY button to reset all wind statistics. Enabling or Disabling the Wind Alerts With the wind icon flashing, press the ALARM/CHART button to recall a current wind speed, a wind speed alert with the “ALARM HI” displayed or gust alert with the “GUST ALARM HI” displayed. If the alert is disabled, “OFF” will be displayed; otherwise the alert value is shown.
Note: Press SET button anytime during alarm programming mode to return to the default clock display. Programming Time Alarms With the Clock and Alarm icon flashing, press the ALARM/CHART button to select the desired alarm. • • • • • • Press and hold ALARM/CHART button until the hour digit will flash Set the alarm hour using UP or DOWN arrow button. Press and hold either button for quick digit advance. Press ALARM/CHART to confirm selection. Set the alarm minutes using UP or DOWN arrow button.
clock is programmed to search for the atomic time signal daily each hour between 1:00 am and 4:30 am. Once the time signal has been successfully received, the time and date will be updated automatically. To manually enable or disable the atomic time receiver: • Press and hold UP arrow button - if atomic time reception is activated, a triangular tower icon will start flashing next to the clock icon. If reception is disabled, the triangular tower icon will disappear.
Maintenance Changing Batteries The battery status of each weather sensor is checked every hour. If the low battery indicator lights up, replace the batteries in the corresponding unit. Changing Batteries in the Main Unit • • • First connect the AC/DC adaptor provided to the main unit to avoid losing any data. Remove the battery compartment door at the back and replace all batteries. Do not mix old and new batteries. Replace the battery compartment door.
Thermo-Hygrometer 15 minutes Anemometer (Wind Sensor): 15 minutes Rain Gauge (Rain Sensor) 30 minutes Check or replace the batteries for the corresponding sensor. Then press and hold DOWN arrow button on the main unit to search for all remote signals. If this does not work, check the wireless transmission path from the corresponding sensor to the main unit and change locations to improve reception.
Specifications Radio Frequency: 433 MHz RF Reception range: 100-328 feet (30 -100 m) Barometric Pressure Measuring Range: 14.75 inHg to 32.44 inHg (500 Hpa to 1100Hpa); (374.5 mmHg to 823.8 mmHg) Resolution: 0.003 inHg (0.1 Hpa, 0.08 mmHg) Accuracy: 0.015 inHg (0.5 Hpa; 0.38 mmHg) Sampling interval: 20 minutes Sea level Altitude Compensation Range: -657 ft to 16404 ft (-200m to +5000 m) Temperature (Indoor) Operating Range: 14.2°F to 140°F (-9.9°C to 60°C) Resolution: 0.2°F (0.
Transmitting Interval: around 47 seconds Operating range: 328 feet (100 m) Wind Direction Range: 0° to 360° Resolution: 22.5° Accuracy: 11.25° Starting Threshold: 3mph (4.8 Km/h) Transmitting interval: 33 seconds Operating Range: 100 feet (30 m) Wind Speed Range: 0 to 100 mph (160 Km/h, 86.897 Knots) Resolution: 0.1mph (0.16 Km/h) Accuracy: (2mph + 5%) Starting Threshold: 3mph (4.
Anemometer: 2 years Rain Gauge: 2 years Weight (without batteries) Main unit: 8.15oz (231g) Remote Thermo-Hygrometer: 2.29oz (65g) Remote Anemometer: 11.12oz (315g) Remote Rain gauge: 10.24oz (290g) Dimensions Main unit: 7.31 (L) x 5.39 (H) x 1.26 (D) inches / 185.8 (L) x 136.9 (H) x 32 (D) mm Remote Thermo - Hygrometer: 2.37 (L) x 4 (H) x 1 (D) inches / 60 (L) x 101 (H) x 25 (D) mm Remote Anemometer: 19.16 (L) x 19.16 (H) x 15.35 (D) inches / 486.6 (L) x 486.6 (H) x 390 (D) mm Remote Rain gauge: 6.
DECLARATION OF CONFORMITY Name: Meade Instruments Corp. Address: 27 Hubble, Irvine, CA 92618 Telephone No.: 1-949-451-1450 declare that the product Product No.: TE821W Product Name: Semi-Professional Weather Station Manufacturer: Hideki Electronics Ltd. Address: Unit 2304-06, 23/F Riley House, 88 Lei Muk Road, Kwai Chung, New Territories, Hong Kong is in conformity with Part 15 of the FCC Rules. Operation is subject to the following two conditions: This device may not cause harmful interference.