T6 Pro Programmable Thermostat User Guide Package Includes: • T6 Pro Thermostat • UWP™ Mounting System • Standard Installation Adapter (J-box adapter) • Decorative Cover Plate – Small; size 4-49/64 in x 4-49/64 in x 11/32 in (121 mm x 121 mm x 9 mm) • Screws and anchors • 2 AA Batteries • Installation Instructions and User Guide + – Thermostat controls • System status information • Indoor temperature setpoint • Schedule information • Actual indoor temperature Cool On/Heat On/Em Heat On, Recovery, Com
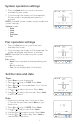
System operation settings 1 Press the Mode button to cycle to the next available System mode. 2 Cycle through the modes until the required System mode is displayed and leave it to activate. NOTE: Available System modes vary by model and system settings. System modes: ‒‒ Auto ‒‒ Heat ‒‒ Cool ‒‒ Em Heat ‒‒ Off Fan operation settings 1 Press the Fan button to cycle to the next available Fan mode. 2 Cycle through the modes until the required Fan mode is displayed and leave it to activate.
Program Schedule You can program four time periods each day, with different settings for weekdays and weekends. We recommend the pre-sets (shown in the table below), since they can reduce your heating/cooling expenses. Heat Wake - Set to the time you wake up and the Wake ° temperature you want during the morning, until (6:00 am) you leave for the day. Away Away - Set to the time you leave home and the ° (8:00 am) temperature you want while you are away (usually an energy-saving level).
Program schedule override (temporary) 1 Press or to adjust the temperature. 2 Once at the desired setpoint temperature, no further action is needed. The new setpoint temperature will be held until the next scheduled time period begins. For more information on schedule time periods, see “Program Schedule” on page 3. 3 To cancel the Temporary Hold, Press and then press Cancel. or Program schedule override (permanent) 1 Press or to adjust the temperature.
Adjusting keypad lockout 1 Press Menu on the thermostat. 2 Press or to go to LOCK. Press Select. 3 Press or to go to OFF, PART, or ON, and then press Select. OFF: Unlocked, and full access allowed. PART: Partial lockout, allowing only the temperature to be changed. ON: No access allowed. 4 To unlock the keypad, press the CENTER button and then enter the password “1234”. To enter the password, press or to change the first digit of the number. Then press Select.
Battery replacement Batteries are optional (to provide backup power) if your thermostat was wired to run on AC power when installed. If your thermostat was not wired to run on AC power, then batteries are required. When the low battery warning appears, carefully pull the thermostat from the wall mount. Install fresh batteries immediately when the low battery icon appears. The icon appears about two months before the batteries are depleted.
Air Filter Reminder 1 The alert icon screen. appears on the Home 2 Press Menu, and then press shows ALRT. until display 3 Press Select to display which alert(s) are present. 4 The message REPL (REPLACE AIR FILTER) appears. 5 The reminder can be snoozed or cleared. Resideo recommends changing the air filter before clearing the reminder. 6 To snooze, press Select. The word SNZE (SNOOZE) appears. 7 Press Select again to snooze the reminder for 7 days.
Troubleshooting If you have difficulty with your thermostat, please try the following suggestions. Most problems can be corrected quickly and easily. Display is blank • • • • Heating or cooling system does not respond • Press Mode button to set system Heat (see page 2). Make sure the desired temperature is set higher than the inside temperature. • Press Mode button to set system Cool (see page 2). Make sure the desired temperature is set lower than the inside temperature.
5-year limited warranty Resideo warrants this product, excluding battery, to be free from defects in workmanship or materials, under normal use and service, for a period of five (5) years from the date of first purchase by the original purchaser. If at any time during the warranty period the product is determined to be defective due to workmanship or materials, Resideo shall repair or replace it (at Resideo’s option).
CAUTION: ELECTRICAL HAZARD Can cause electrical shock or equipment damage. Disconnect power before beginning installation. CAUTION: EQUIPMENT DAMAGE HAZARD Compressor protection is bypassed during testing. To prevent equipment damage, avoid cycling the compressor quickly. CAUTION: MERCURY NOTICE If this product is replacing a control that contains mercury in a sealed tube, do not place the old control in the trash.
T6 Pro Thermostat Programmable Guide de l’utilisateur La boîte comprend : • • • • • • • Thermostat T6 Pro Système de montage UWP™ Adaptateur pour installation standard (adaptateur de boîte de jonction) Plaque décorative – petite; dimensions : 121 x 121 x 9 mm (4 49/64 x 4 49/64 x 11/32 po) Vis et chevilles 2 piles AA Guide de l’utilisateur et notice d’installation – + Commandes du thermostat • Informations d’état du système Cool On (Refroidissement)/ Heat On (Chauffage), Recovery (Récupération)/ Em Heat
Réglages pour le fonctionnement du système 1 Appuyez sur le bouton Mode pour passer au prochain mode de système disponible. 2 Faites défiler les modes jusqu’à ce que le mode de système requis soit affiché, et laissez-le s’activer. REMARQUE : Les modes de système disponibles varient en fonction du modèle et des paramètres du système.
Programmation Vous pouvez programmer quatre périodes de temps par jour, avec des réglages différents pour les jours de la semaine et les fins de semaine. Nous recommandons les paramètres prédéfinis (illustrés dans le tableau ci-dessous), car ils permettent de réduire vos frais de chauffage/refroidissement. Wake (Réveil) - Réglez à l’heure du lever et à la température voulue le matin, jusqu’à votre départ.
Dérogation (temporaire) au programme 1 Appuyez sur température. ou pour régler la 2 Une fois la température de consigne souhaitée obtenue, aucune autre action n’est requise. La nouvelle température de consigne est utilisée jusqu’à ce que la prochaine période commence. Pour plus d’informations sur les périodes du programme, consultez la section Programmation à la page 3. 3 Pour annuler le maintien temporaire, appuyez sur ou puis sur Cancel (Annuler).
Réglage du verrouillage du clavier 1 Appuyez sur Menu sur le thermostat. 2 Appuyez sur ou pour aller à LOCK (Verrouillage). Appuyez sur Select. 3 Appuyer ou pour se rendre à OFF (arrêt), PART (partiel), ou ON (marche), et puis appuyer sur Select (sélectionner). OFF (arrêt) : Déverrouillé et accès total permis. PART (partiel) : Verrouillage partiel, ne permet qu’à la température d’être modifiée. ON (marche) : Aucun accès permis.
Remplacement des piles Les piles sont facultatives (pour fournir une alimentation de secours) si le thermostat a été câblé sur le courant secteur lors de l’installation. Si ce n’est pas le cas, les piles sont requises. Lorsque l’avertissement de pile faible s’affiche, retirez avec soin le thermostat du support mural. Installez immédiatement des piles neuves lorsque l’icône indiquant que la charge des piles est faible s’affiche.
Rappel de remplacement du filtre à air 1 L’icône d’alerte d’accueil. s’affiche sur l’écran 2 Appuyez sur Menu, puis appuyez sur jusqu’à ce que l’affichage montre ALRT (alerte). 3 Appuyer sur Select (Sélectionner), pour afficher l’/les alerte(s) présente(nt). Back Home 4 Le message REPL (Remplacer le filtre à air) s’affiche. 5 Le rappel peut être mis en pause ou effacé. Resideo recommande de remplacer le filtre à air avant d’effacer le rappel. 6 Pour mettre en pause, appuyez sur Select.
Dépannage En cas de difficultés avec le thermostat, essayez les suggestions suivantes. La plupart des problèmes peuvent être réglés rapidement et facilement. Rien n’apparaît à l’écran Le système de chauffage ou de refroidissement ne répond pas • Vérifiez le disjoncteur et réinitialisez-le si nécessaire. • Assurez-vous que l’interrupteur de marche-arrêt du système de chauffage et de refroidissement est sur marche. • Assurez-vous que la porte de l’appareil de chauffage est bien fermée.
Garantie limitée de 5 ans Resideo garantit ce produit, à l’exception des piles, contre tout défaut de pièce ou de main-d’œuvre, durant une période pour cinq (5) ans à partir de la date d’achat par le consommateur d’origine si le produit est utilisé et entretenu convenablement. En cas de défaillance ou de mauvais fonctionnement pendant la période de garantie, Resideo remplacera ou réparera le produit, à sa discrétion.
MISE EN GARDE : RISQUE DE CHOC ÉLECTRIQUE Peut provoquer des chocs électriques ou endommager le matériel. Couper l’alimentation électrique avant d’effectuer le raccordement. MISE EN GARDE : RISQUE DE DOMMAGES DE L’ÉQUIPEMENT La protection du compresseur est annulée durant le test. Pour éviter d’endommager l’équipement, éviter d’actionner le compresseur trop rapidement.
T6 Pro Termostato Programable Guía del usuario El paquete incluye: • • • • • • • Termostato T6 Pro Sistema de montaje UWP™ Adaptador de instalación estándar (adaptador de caja de conexiones) Cubierta decorativa pequeña: tamaño de 121 mm x 121 mm x 9 mm (4-49/64 in x 4-49/64 in x 11/32 in) Tornillos y tarugos 2 baterías AA Instrucciones de instalación y Guía del usuario + – Controles del termostato • Información del estado del sistema Cool On (refrigeración activada)/Heat On (calefacción activada)/Em Hea
Configuraciones de funcionamiento del sistema 1 Presione el botón Mode para pasar al siguiente modo disponible del sistema. 2 Avance a través de los modos hasta que se muestre el modo requerido del sistema y déjelo para activarlo. NOTA: Los modos disponibles del sistema varían según el modelo y las configuraciones del sistema. Modos del sistema: ‒‒ Auto (Automático) ‒‒ Heat (Calefacción) ‒‒ Cool (Refrigeración) ‒‒ Em Heat (Calef. emerg.
Cronograma del programa Puede programar cuatro períodos de tiempo por día, con diferentes configuraciones para los días de semana y los fines de semana. Recomendamos las configuraciones preestablecidas (que se muestran en el cuadro a continuación), debido a que estas reducen los gastos de calefacción y refrigeración. Wake (Despertar) - Programe la hora en que se Heat Cool Calefacción Refrigeración despierta y la temperatura que desea durante la mañana, hasta que se marche de su casa.
Anulación del cronograma del programa (temporal) 1 Presione o para regular la temperatura. 2 Una vez que se encuentre en la temperatura del punto de referencia deseado, no necesita hacer nada más. El nuevo punto de referencia de la temperatura se mantendrá hasta que comience el siguiente período. Para obtener información sobre los períodos de tiempo del cronograma, consulte “Cronograma del programa” en la página 3. 3 Para cancelar la pausa temporal, presione o y luego presione Cancel (cancelar).
Ajuste del bloqueo del teclado 1 Presione Menu (menú) en su termostato. 2 Presione o para ir a LOCK (bloqueo). Presione Select (seleccionar). 3 Presione o para ir a OFF (apagado), PART (parcial) u ON (encendido) y seguidamente presione Select (seleccionar). OFF (apagado): Desbloqueado y permite el acceso total. PART (parcial): Bloqueo parcial, permitiendo solo el cambio de la temperatura. ON (encendido): Acceso no permitido.
Reemplazo de las baterías Las baterías son opcionales (para ofrecer suministro de energía de respaldo) si su termostato fue cableado para funcionar con corriente CA cuando fue instalado. Si su termostato no fue cableado para funcionar con suministro de energía CA, necesita baterías. Cuando aparezca la advertencia de batería baja, retire el termostato con cuidado del montaje de pared. Instale baterías nuevas inmediatamente cuando aparezca el icono de baterías con poca carga.
Recordatorio del filtro de aire 1 Aparece el icono de aviso de inicio. en la pantalla 2 Presione Menú, y después pulse que la pantalla muestra ALRT. hasta 3 Presione Select (seleccionar) para mostrar cuál(es) alerta(s) está(n) presente(s). 4 Aparece el mensaje REPL (reemplace el filtro de aire). 5 El recordatorio se puede repetir o borrar. Resideo recomienda el cambio del filtro de aire antes de eliminar el recordatorio. 6 Para repetir el aviso, presione Select (seleccionar).
Localización y solución de problemas Si tiene dificultades con el termostato, intente seguir las sugerencias que se indican a continuación. La mayoría de los problemas pueden solucionarse de manera fácil y rápida. La pantalla está en blanco • Revise el interruptor de circuito y, si es necesario, reinícielo. • Asegúrese de que el interruptor de suministro de energía del sistema de calefacción y refrigeración esté encendido. • Asegúrese de que la puerta del sistema de calefacción esté bien cerrada.
Garantía limitada de 5 años Resideo garantiza que este producto, excluyendo la batería, no tiene defectos en la mano de obra ni en los materiales en condiciones de uso y servicio normales durante un período de cinco (5) años desde la fecha de compra por parte del comprador original. Si en cualquier momento, durante el período de vigencia de la garantía, se determina que el producto está defectuoso debido a la mano de obra o los materiales, Resideo lo reparará o reemplazará (a elección de Resideo).
10
11
PRECAUCIÓN: PELIGRO DE ELECTROCUCIÓN Puede causar descargas eléctricas o daños al equipo. Desconecte el suministro eléctrico antes de comenzar la instalación. PRECAUCIÓN: RIESGOS DE DAÑOS AL EQUIPO Se evita la protección del compresor durante la prueba. Para prevenir daños al equipo, evite encender y apagar rápidamente el compresor.