
VisionPRO 8000 Spec Sheet 2017
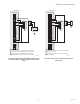
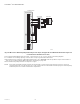
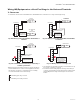
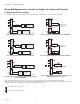

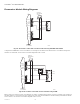
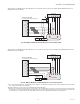
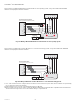
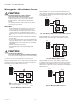
Table Of Contents
- Application
- Features
- Contents
- Specifications
- System Installation
- Installation Options
- Guidelines for Installing RedLINK Devices
- Installing Equipment Interface Module (if used)
- Wiring 24 Vac Common
- Selecting Discharge and Return Air Temperature Sensor Mounting Locations
- Installing Discharge and Return Air Temperature Sensors
- Selecting Thermostat Location
- Installing Wallplate
- Installing VisionPRO® 8000 with RedLINK™
- Wiring the Thermostat
- Remove Coin Cell Battery Tab
- Mounting Thermostat on Wallplate
- Power Optional RedLINK™ Accessories
- Performing Initial Setup
- Installer Tests
- Operation
- Setting the Time/Date
- Setting the Fan
- Setting System Mode
- Adjusting Program Schedules
- Overriding Schedules: Residential Use
- Overriding Schedules: Commercial Use
- Viewing Equipment Status
- Setting Vacation Hold: Residential Use
- Setting Holiday/Event Schedules: Commercial Use
- Setting Custom Events: Commercial Use
- Setting Holiday Schedule: Commercial Use
- Setting Holiday Override: Commercial Use
- Initiating Occupancy Mode: Commercial Use
- Remote Setback: Commercial Use
- Adjusting Humidification Settings
- Adjusting Dehumidification Settings: Residential Use
- Adjusting Dehumidification Settings: Commercial Use
- Adjusting Ventilation Settings
- Ventilation Options
- Setting Preferences
- Cleaning the Thermostat Screen
- Adjusting Security Settings
- Viewing Dealer Information
- Advanced Features
- Installer Options
- Using the Temperature Display
- Using the Humidity Display
- Universal Outputs (U1, U2, U3)
- Universal Inputs (S1, S2, S3, S4)
- Data Logs
- Dry Contact Alerts
- Set Up the Dry Contact Alerts
- Staging Control
- Heat Pump and Backup Heat Operation
- Indoor Air Quality (IAQ) Control
- IAQ Reminders
- Customizable Reminders
- MicroSD card
- Commercial Features
- Overriding Schedules: Commercial Use
- Setting Holiday/Event Schedules: Commercial Use
- Setting Custom Events: Commercial Use
- Setting Holiday Schedule: Commercial Use
- Setting Holiday Override: Commercial Use
- Initiating Occupancy Mode: Commercial Use
- Ramp Rates (Commercial Use)
- Remote Setback (Commercial Use)
- Economizer and Time of Day (TOD) Operation
- Pre-Occupancy Purge
- Battery Replacement
- Optional Accessories
- Portable Comfort Control
- Remote Indoor Sensors
- Replacing a Thermostat
- Replacing an Equipment Interface Module
- Wiring
- Zoning
- Troubleshooting
- Regulatory Information

VISIONPRO
®
8000 WITH REDLINK™
68-0312—05 134
Wiring IAQ Equipment or a Heat/Cool Stage to the Universal Terminals
To Equipment Interface Module
“U” terminals can be used for humidification, dehumidification, ventilation or a stage of heating/cooling.
Fig. 332. Typical hookup of powered humidifier.
Fig. 333. Typical hookup of powered ventilation.
Fig. 334. Typical hookup of powered dehumidifier (whole
house dehumidifer).
Fig. 335. Typical hookup of non-powered humidifier.
Fig. 336. Typical hookup of non-powered ventilation.
Fig. 337. Typical hookup of variable speed blower for
dehumidification in low speed.
1Any combination of universal relays (U1, U2, U3) can be used. They are set in the thermostat installer setup.
2Wire the universal EIM relay to the low speed fan for dehumidification control at the equipment. The EIM relay can be set
to be normally open or normally closed in the thermostat installer setup.
POWERED
HUMIDIFIER
RH
RC
R
C
U3
U3
U2
U2
U1
U1
MCR32393A
24
VAC
120
VAC
24
VAC
120
VAC
24
VAC
1
POWERED
VENTILATOR
RH
RC
R
C
24
VAC
U3
U3
U2
U2
U1
U1
MCR32396A
24
VAC
120
VAC
24
VAC
120
VAC
1
POWERED
DEHUMIDIFIER
RH
RC
R
C
U3
U3
U2
U2
U1
U1
MCR32398A
24
VAC
120
VAC
24
VAC
120
VAC
24
VAC
1
FIELD INSTALLED
JUMPER BETWEEN
R AND U1
RH
RC
R
C
24 VAC
U3
U3
U2
U2
U1
U1
NON-POWERED
HUMIDFIER
24
VAC
120
VAC
1
FIELD INSTALLED
JUMPER BETWEEN
R AND U1
RH
RC
R
C
24 VAC
U3
U3
U2
U2
U1
U1
NON-POWERED
VENTILATOR
MCR31587
24
VAC
120
VAC
1
FIELD INSTALLED
JUMPER BETWEEN
R AND U1
RH
RC
R
C
24 VAC
U3
U3
U2
U2
U1
U1
OR
DEHUMIDIFICATION
WITH LOW SPEED FAN
24
VAC
120
VAC
1
2
Normally open, dry contacts
Normally closed, dry contacts