
VisionPRO 8000 Spec Sheet 2017
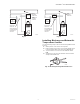
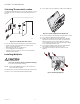

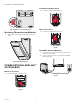

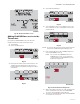
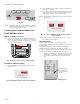
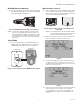

Table Of Contents
- Application
- Features
- Contents
- Specifications
- System Installation
- Installation Options
- Guidelines for Installing RedLINK Devices
- Installing Equipment Interface Module (if used)
- Wiring 24 Vac Common
- Selecting Discharge and Return Air Temperature Sensor Mounting Locations
- Installing Discharge and Return Air Temperature Sensors
- Selecting Thermostat Location
- Installing Wallplate
- Installing VisionPRO® 8000 with RedLINK™
- Wiring the Thermostat
- Remove Coin Cell Battery Tab
- Mounting Thermostat on Wallplate
- Power Optional RedLINK™ Accessories
- Performing Initial Setup
- Installer Tests
- Operation
- Setting the Time/Date
- Setting the Fan
- Setting System Mode
- Adjusting Program Schedules
- Overriding Schedules: Residential Use
- Overriding Schedules: Commercial Use
- Viewing Equipment Status
- Setting Vacation Hold: Residential Use
- Setting Holiday/Event Schedules: Commercial Use
- Setting Custom Events: Commercial Use
- Setting Holiday Schedule: Commercial Use
- Setting Holiday Override: Commercial Use
- Initiating Occupancy Mode: Commercial Use
- Remote Setback: Commercial Use
- Adjusting Humidification Settings
- Adjusting Dehumidification Settings: Residential Use
- Adjusting Dehumidification Settings: Commercial Use
- Adjusting Ventilation Settings
- Ventilation Options
- Setting Preferences
- Cleaning the Thermostat Screen
- Adjusting Security Settings
- Viewing Dealer Information
- Advanced Features
- Installer Options
- Using the Temperature Display
- Using the Humidity Display
- Universal Outputs (U1, U2, U3)
- Universal Inputs (S1, S2, S3, S4)
- Data Logs
- Dry Contact Alerts
- Set Up the Dry Contact Alerts
- Staging Control
- Heat Pump and Backup Heat Operation
- Indoor Air Quality (IAQ) Control
- IAQ Reminders
- Customizable Reminders
- MicroSD card
- Commercial Features
- Overriding Schedules: Commercial Use
- Setting Holiday/Event Schedules: Commercial Use
- Setting Custom Events: Commercial Use
- Setting Holiday Schedule: Commercial Use
- Setting Holiday Override: Commercial Use
- Initiating Occupancy Mode: Commercial Use
- Ramp Rates (Commercial Use)
- Remote Setback (Commercial Use)
- Economizer and Time of Day (TOD) Operation
- Pre-Occupancy Purge
- Battery Replacement
- Optional Accessories
- Portable Comfort Control
- Remote Indoor Sensors
- Replacing a Thermostat
- Replacing an Equipment Interface Module
- Wiring
- Zoning
- Troubleshooting
- Regulatory Information

VISIONPRO
®
8000 WITH REDLINK™
19 68-0312—05
RedLINK Internet Gateway
1. Press and quickly release the button on the bottom of
the Internet Gateway. After a short delay, the RedLINK
status light will glow steady green.
Fig. 49. RedLINK Internet Gateway connect button.
NOTE: The Internet Gateway must be registered online
before use at www.mytotalconnectcomfort.com.
Enter the MAC ID and MAC CRC numbers located
on the bottom of the Internet Gateway. For addi-
tional information, see instructions provided with
the device.
TrueSTEAM
1. Press and quickly release the CONNECT button on
THM4000 Wireless Adapter. After a short delay, the
CONNECTED status light will glow steady green.
Fig. 50. Connect button on TrueSTEAM wireless adapter.
Wireless Indoor Sensor
1. Press and quickly release the CONNECT button. After
a short delay, the status light (see Fig. 51) will glow
green for 15 seconds. If the status light turns red, the
sensor did not link with the thermostat.
Fig. 51. Wireless indoor sensor connect button and
status light.
NOTE: In normal operation, the status light remains
off. If it begins flashing red, batteries are low
(power will be depleted after 2–3 weeks).
2. After a short delay (up to 15 seconds), check thermo-
stat to confirm the connection of the sensor.
Fig. 52.
3. If you are installing more than 1 wireless indoor sen-
sor, give each sensor a name as you install it. Press
Yes when the “Rename Indoor Sensor?” screen is dis-
played, as shown in Fig. 53.
Fig. 53.
4. Select the Indoor Sensor name from the list and press
Done. The Indoor Sensor names are used when
selecting which sensor to use for temperature con-
trol, humidification control, and dehumidification
control.
MCR32943
THM4000R1000
TrueSTEAM
MCR34523
MCR32934
MCR32935