
VisionPRO 8000 Spec Sheet 2017
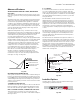
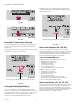

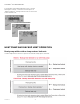
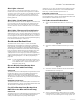
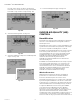
Table Of Contents
- Application
- Features
- Contents
- Specifications
- System Installation
- Installation Options
- Guidelines for Installing RedLINK Devices
- Installing Equipment Interface Module (if used)
- Wiring 24 Vac Common
- Selecting Discharge and Return Air Temperature Sensor Mounting Locations
- Installing Discharge and Return Air Temperature Sensors
- Selecting Thermostat Location
- Installing Wallplate
- Installing VisionPRO® 8000 with RedLINK™
- Wiring the Thermostat
- Remove Coin Cell Battery Tab
- Mounting Thermostat on Wallplate
- Power Optional RedLINK™ Accessories
- Performing Initial Setup
- Installer Tests
- Operation
- Setting the Time/Date
- Setting the Fan
- Setting System Mode
- Adjusting Program Schedules
- Overriding Schedules: Residential Use
- Overriding Schedules: Commercial Use
- Viewing Equipment Status
- Setting Vacation Hold: Residential Use
- Setting Holiday/Event Schedules: Commercial Use
- Setting Custom Events: Commercial Use
- Setting Holiday Schedule: Commercial Use
- Setting Holiday Override: Commercial Use
- Initiating Occupancy Mode: Commercial Use
- Remote Setback: Commercial Use
- Adjusting Humidification Settings
- Adjusting Dehumidification Settings: Residential Use
- Adjusting Dehumidification Settings: Commercial Use
- Adjusting Ventilation Settings
- Ventilation Options
- Setting Preferences
- Cleaning the Thermostat Screen
- Adjusting Security Settings
- Viewing Dealer Information
- Advanced Features
- Installer Options
- Using the Temperature Display
- Using the Humidity Display
- Universal Outputs (U1, U2, U3)
- Universal Inputs (S1, S2, S3, S4)
- Data Logs
- Dry Contact Alerts
- Set Up the Dry Contact Alerts
- Staging Control
- Heat Pump and Backup Heat Operation
- Indoor Air Quality (IAQ) Control
- IAQ Reminders
- Customizable Reminders
- MicroSD card
- Commercial Features
- Overriding Schedules: Commercial Use
- Setting Holiday/Event Schedules: Commercial Use
- Setting Custom Events: Commercial Use
- Setting Holiday Schedule: Commercial Use
- Setting Holiday Override: Commercial Use
- Initiating Occupancy Mode: Commercial Use
- Ramp Rates (Commercial Use)
- Remote Setback (Commercial Use)
- Economizer and Time of Day (TOD) Operation
- Pre-Occupancy Purge
- Battery Replacement
- Optional Accessories
- Portable Comfort Control
- Remote Indoor Sensors
- Replacing a Thermostat
- Replacing an Equipment Interface Module
- Wiring
- Zoning
- Troubleshooting
- Regulatory Information

VISIONPRO
®
8000 WITH REDLINK™
68-0312—05 76
Fig. 162.
8. Repeat steps 4–5 for the other Dry Contact, if neces-
sary.
Staging Control
Differential Between All Stages
The thermostat provides Differential settings between all
stages. The equipment changes stages based on how far
the indoor temperature is from the setpoint. Differential
settings provide a way to balance comfort and
conservation.
Heat Differential
The indoor temperature must drop to the selected
differential setting before the thermostat will turn on the
stage of heating. For example, if stage 2 is set to 2 °F (1.0
°C), the indoor temperature must be 2 °F (1.0 °C) away
from the setpoint before stage 2 turns on. When set to
Comfort, the thermostat will use the stage of heating as
needed to keep the indoor temperature within 1 °F (0.5 °C)
degree of the setpoint. The thermostat turns on stage 2
when the capacity on stage 1 reaches 90%.
Cool Differential
The indoor temperature must rise to the selected
differential setting before the thermostat turns on the
stage of cooling. For example, if stage 2 is set to 2 °F (1.0
°C), the indoor temperature must be 2 °F (1.0 °C) away
from the setpoint before stage 2 turns on. When set to
Comfort, the thermostat uses the stage of cooling as
needed to keep the indoor temperature within 1 °F (0.5 °C)
degree of the setpoint. The thermostat turns on stage 2
when the capacity on stage 1 reaches 90%.
TO CHANGE DIFFERENTIAL SETTINGS
1. Select Advanced Options to view/adjust differentials
between all stages.
Fig. 163.
2. Default is Comfort. Adjust differentials as needed.
Fig. 164.
Backup Heat Droop
A Backup Heat Droop is available for any system with 2
heating types. For example:
• Heat Pumps with any type of Backup Heat
• Radiant Heat with any type of Backup Heat
• Hot Water Fan Coil with any type of Backup Heat
The Backup Heat Droop restricts backup heat during the
following conditions:
•Normal Operation
• Manual Setpoint Changes
The options are:
• Comfort – keeps temperature within 1 degree of the
setpoint.
• 2 to 15 °F – Backup heat is not used unless the indoor
temperature drops to the selected Backup Heat Droop.
For example, if the Backup Heat Droop is set to 2 °F (1.0
°C), the indoor temperature must be 2 °F (1.0 °C) away
from the setpoint before the backup heat turns on.
NORMAL OPERATION
When the Backup Heat Droop is set to Comfort, the
thermostat uses backup heat as needed to keep the indoor
temperature within 1 °F (0.5 °C) of the setpoint. The
Comfort setting is NOT an option on heat pumps with fossil
fuel backup heat.
When the Backup Heat Droop is set to 2 °F or higher,
backup heat is not used unless the indoor temperature
drops to the Backup Heat Droop setting or the Backup Heat
Scroll to see:
Contact your
dealer to service
your sump pump