
Install Instructions


14004911-001 ADAPTOR PLATE ASSEMBLY
INSTALLATION
Use the following procedures for removing each
manufacturer’s thermostat and installing the appropriate
TP9600 Series Thermostat and 14004911-001 Series Adaptor
Plate Kit. When the old mounting plate is removed, retain the
screws for use when mounting the adapter plate. Cut the
existing tubes as close as possible to the thermostat. Do NOT
remove the antikink springs from cut tubes. Do NOT allow
tubes to slip inside the wall after removing the old thermostat.
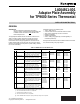
Remove Johnson Thermostat
Loosen (counterclockwise) top and bottom screws to
remove cover.
Remove thermostat mounting screws at top and
bottom, and remove thermostat from mounting plate.
Cut tubes near air head and temporarily plug main line
to conserve air.
Remove mounting plate and retain screws.
Proceed to Install New Thermostat.
70
40 50 60 70 80 90
C2313
Fig. 1. Johnson Thermostat.
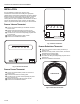
Remove Powers Thermostat
Loosen (counterclockwise) screws on each side to
remove cover.
Pull thermostat from the mounting plate.
Cut tubes near connector and temporarily plug main
line to conserve air.
Remove old mounting plate and retain screws.
Proceed to Install New Thermostat.
MCC POWERS
10 20 3015 25
C2314
2520
Fig. 2. Powers Thermostat.
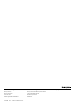
Remove Robertshaw Thermostat
Turn cover screw on bottom inward (clockwise) to
remove cover.
Remove mounting screws, retain screws, and remove
thermostat from mounting plate.
Do NOT remove mounting plate.
Cut tubes near fitting and temporarily plug main line to
conserve air.
Proceed to Install New Thermostat.
ROBERTSHAW
60
70
80
50
70
90
C2315
Fig. 3. Robertshaw Thermostat.
95-7549
2