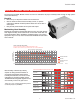
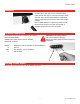
TrueDRY™ DH150 Dehumidification System PROFESSIONAL INSTALLATION GUIDE 1 Assemble 2 Duct 3 Plumb 4 Wire Must be installed by a trained, experienced technician Read these instructions carefully. Failure to follow these instructions can damage the product or cause a hazardous condition.
Installation Guide Table of Contents About your new dehumidifier Maintaining ideal humidity................................................................................... 1 Controls................................................................................................................. 2 Specifications........................................................................................................ 3 Installation Installation Checklist.....................................................
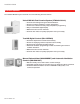
TrueDRY DH150 About the TrueDRY DH150 Dehumidifier The Honeywell TrueDRY DH150 ensures the home is maintained at proper humidity levels through its high performance and efficiency. Benefits • • • Removes up to 150 pints of water from the indoor air. Can be ducted for whole-house humidity control, or operate unducted to address moisture problem areas such as an attic or crawl space. Easy access panels makes service quick and simple.
Installation Guide Control Options The TrueDRY DH150 may be used with one of the following external controls: VisionPRO IAQ Total Comfort System (YTH9421C1010) • • • • • • Controls both heating/cooling and dehumidification. Sensor included for displaying outdoor temperature. Intuitive user interface for easy 7-day temperature programming Easy-to-read backlit digital display. Maintenance and service reminders. Controls other indoor air quality equipment when you’re ready.
TrueDRY DH150 Specifications Install TrueDRY DH150 according to National Electric Codes.
Installation Guide Installation Checklist Tools Required - 3/8-in. hex drive - Drill or duct-cutting tool - Wire stripper/cutter - Standard screwdriver - Duct tape - 8-in. round duct and starter collar - 18–22 gauge, 5-band thermostat wire - 1/2-in. diameter drain line (8 ft) - 1/2-in. drain clamps (quantity 2) Materials Provided - Sheet metal screws (quantity 9) - 6-in. plastic duct collar - 10-in. plastic duct collar - 10-in. oval x 4 in. plastic duct collar Options: - 1/2-in.
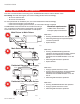
TrueDRY DH150 Door and Collar Assembly Door Install Insert tab on the bottom of the door between the foam installation and the metal side. Push down on the plastic door latch and swing door shut. Once the door is shut release the door latch. M27793 Collar Install Remove the 2 round ducts, 1 oval duct, 3 seals and small bag of mounting hardware from inside the rectangle opening. Adhere seals onto the back of each duct and mount the ducts to the front of the dehumidifier using screws provided.
Installation Guide Ducting: Install to Fit Your Application Flex duct is recommended in connecting to the TrueDRY DH150 collars to reduce vibration noise. Duct Sizing: For total duct lengths, use round or rectangular duct sized accordingly: - 10-inch for less than 25-ft - 12-inch for more than 25-ft For the optional fresh air ventilation port, use round insulated duct sized accordingly: - 6-inch round for lengths of less than 50-ft.
TrueDRY DH150 Plumbing Connect 1/2-in. drain tube to male connection drain outlet. Secure drain tube to connector with hose clamp. Run drain hose continuously downhill to an approved drain or condensate pump. Route to drain with a trap if possible. Place TrueDRY DH150 on supports that raise the base above the top flanges on the drain pan beneath it. Raising it will optimize drain flow by gravity. Terminal Descriptions A four-block wiring terminal is located on the sloped end of TrueDRY DH150.
Installation Guide Wiring GRN GRN 2 1 DHUM (COMPRESSOR AND FAN) 1 R 2 FAN 3 C 4 3 M27795 C FAN R DHUM M27941 69-2271EFS—01 8
TrueDRY DH150 Wiring Wire the TrueDRY DH150 according to the diagram that applies to your desired operation. Follow this diagram for ducted operation with an external humidity control. HVAC MECHANICAL DEHUMIDISTAT R C W Y G DRY CONTACTS DPDT RELAY, 2.6A W Y G + Rc + R DHUM R FAN TrueDRY C M27797 THERMOSTAT For ducted operation with external humidity and ventilation control, follow this diagram.
Installation Guide Wiring Follow this diagram if using TrueDRY DH150 with a powered dehumidistat such as TrueIAQ (DG115EZIAQ).
TrueDRY DH150 Cleaning On an annual basis, maintenance is required to ensure TrueDRY runs at peak efficiency. 1 3 Unplug TrueDRY DH150 before beginning service. Push down the door release and pull. The filter can be removed from either side. 2 Using a 1/2-in. hex drive or standard screwdriver, remove the eight screws on either side of the TrueDRY DH150. The side and top panels can then be removed. Using a damp cloth, wipe excess dust and debris from blower, refrigerant coils, and compressor coils.
Installation Guide Technical Description TrueDRY DH150 uses a refrigeration system similar to an air conditioner to remove heat and moisture from incoming air and add heat to the air that is discharged. Hot, high-pressure refrigerant gas is routed from the compressor to the condenser coil. The refrigerant is cooled and condensed by giving up its heat to the air that is about to be discharged from the unit.
TrueDRY DH150 Troubleshooting Problem Recommended Troublshooting Steps Impeller fan does not run with fan switch in either position. Impeller fan does not run with ventilation timer activated. Compressor runs briefly but cycles on & off with humidity control turned to ON. 1. 2. 3. 4. 5. Loose connection in impeller fan circuit. Obstruction prevents impeller fan rotation. Defective impeller fan. Defective impeller fan relay. Defective impeller fan capacitor. Impeller fan runs with fan switch 1.
Installation Guide Troubleshooting Refrigerant Charging If the refrigerant charge is lost due to service or a leak, a new charge must be accurately weighed in. If any of the old charge is left in the system, it must be recovered before weighing in the new charge. Refer to the unit nameplate for the correct charge weight and refrigerant type. Impeller Fan Replacement The motorized impeller fan is a unitary assembly consisting of the motor and impeller fan.
TrueDRY DH150 Troubleshooting Replacing a Burned Out Compressor The refrigerant and oil mixture in a compressor is chemically very stable under normal operating conditions. However, when an electrical short occurs in the compressor motor, the resulting high temperature arc causes a portion of the refrigerant oil mixture to break down into carbonaceous sludge, a very corrosive acid, and water.
Installation Guide Parts List Description Part Number Heat Exchanger 50035445-001 Evaporator 50035445-002 Capillary Tubes .050 in. x .124 in. x 59.00 in. 50035445-003 Compressor—Toshiba 8.1 50035445-004 Accumulator 50035445-005 Filter/Drier 50035445-006 Tube—Cond.
TrueDRY DH150 5-Year Limited Warranty Honeywell warrants this product to be free from defects in the workmanship or materials, under normal use and service, for a period of five (5) years from the date of purchase by the consumer. If at any time during the warranty period the product is determined to be defective or malfunctions, Honeywell shall repair or replace it (at Honeywell’s option).
Automation and Control Solutions Honeywell International Inc. Honeywell Limited-Honeywell Limitée 1985 Douglas Drive North 35 Dynamic Drive Golden Valley, MN 55422 Toronto, Ontario M1V 4Z9 http://yourhome.honeywell.com ® U.S. Registered Trademark. © 2008 Honeywell International Inc. 69-2271EFS—01 M.S. 12-08 Printed in U.S.A. on recycled paper containing at least 10% post-consumer paper fibers.
TrueDRY DH150 Système de déshumidification GUIDE D’INSTALLATION PAR UN PROFESSIONNEL 1 Assembler 2 Raccorder à la gaine d’air 3 Raccorder à la plomberie 4 Brancher Doit être installé par un technicien d’expérience ayant reçu la formation pertinente. Lire attentivement les instructions. Le fait de ne pas les suivre risque d’endommager le produit ou de constituer un danger.
Guide d'installation TABLE DES MATIÈRES À propos de votre nouveau déshumidificateur Maintenir le taux d’humidité idéal..................................................................... 21 Commandes........................................................................................................ 22 Caractéristiques techniques.............................................................................. 23 Installation Vérification de l'installation..................................................
TrueDRY DH150 À propos du déshumidificateur TrueDRY DH150 Le déshumidificateur TrueDRY DH150 de Honeywell maintient un taux d’humidité adéquat dans toute la maison grâce à son haut rendement et à son efficacité. Avantages • • • Retire de l’air ambiant jusqu’à 150 chopines (70 litres) d’eau par jour. Peut être raccordé à une gaine pour la régulation de l’humidité dans toute la maison, ou fonctionner sans gaine pour régler un problème d’humidité dans les endroits tels les greniers ou les vides sanitaires.
Guide d'installation Options de commande Le TrueDRY DH150 peut être employé avec l’un ou l’autre des appareils de commande suivants : Système de régulation d’ambiance pour toute la maison VisionPRO (YTH9421C1010) • Règle à la fois le chauffage-refroidissement et la déshumidification. • Capteur inclus pour l’affichage de la température extérieure. • Interface-utilisateur intuitive pour la programmation simple de la température sur 7 jours. • Grand écran rétroéclairé, facilement lisible.
TrueDRY DH150 Caractéristiques techniques Installer le TrueDRY DH150 selon les exigences du Code national de l’électricité.
Guide d'installation Vérification de l’installation Outils requis - Carré d’entraînement de 3/8 po hex - Perceuse ou outil à découper les conduites - Pinces à dénuder/coupe-fil - Tournevis ordinaire - Ruban adhésif en toile - Gaine ronde de 8 po et collier de départ - Fil à thermostat de calibre 11 - 22 à 5 brins - tuyau de drainage de 1/2 po de diamètre (8 pi) - Pinces pour tuyau de drainage de 1/2 po (quantité : 2) Matériaux fournis - Vis à tôle (quantité : 9) - collier de plastique po
TrueDRY DH150 Installation de la porte et du collier Installation de la porte Insérer la languette au bas de la porte entre le polystyrène et le côté de métal. Pousser le loquet de plastique de la porte vers le bas et refermer la porte. Une fois la porte fermée, dégager le loquet. M27793 Installation du collier Retirer les deux gaines rondes, une gaine ovale, 3 joints et le petit sachet d’accessoires de fixation contenus dans l’ouverture rectangulaire.
Guide d'installation Installation selon votre application Il est recommandé d’utiliser une gaine flexible pour raccorder les colliers du TrueDRY DH150 afin de réduire le bruit causé par la vibration.
TrueDRY DH150 Raccordement à la plomberie Raccorder un tube de vidange de 1/2 po à la sortie de vidange mâle. Fixer le tube de vidange au connecteur à l’aide d’un collier de serrage. Donner une pente descendante ininterrompue au tube vers une pompe de vidange ou une pompe de récupération des eaux condensées approuvée. Si c'est possible, acheminer le tube vers un drain avec une trappe.
Guide d'installation Raccordement électrique NOIR BLANC MÀLT CONDENSATEUR DE MARCHE COMPRESSEUR ROUGE THERMOSTAT DE DÉGIVRAGE RELAIS DU VENTILATEUR CONDENSATEUR DE MARCHE BRUN MÀLT BLEU NOIR NOIR VENTILATEUR 115 V c.a. JAUNE JAUNE 2 24 V c.a. RÉGULATEUR D’HUMIDITÉ BOBINE DE RELAIS DU COMPRESSEUR D.BLEU-5 JAUNE ROSE 1 DHUM (COMPR. ET VENTIL) 1 2 VENTIL 3 C 4 24 V c.a.
TrueDRY DH150 Raccordement électrique Raccorder le TrueDRY DH150 selon le schéma de raccordement qui correspond à l’application voulue. Suivre le schéma de raccordement ci-dessous pour une installation raccordée aux gaines d’air faisant appel à un régulateur d’humidité externe.
Guide d'installation Raccordement électrique Si le TrueDRY DH150 est employé avec un déshumidistat alimenté tel que le TrueIAQ (DG1 1 5EZIAQ), suivre le schéma de raccordement ci-dessous.
TrueDRY DH150 Nettoyage Pour que le TrueDRY offre un rendement optimal, il faut le nettoyer une fois par année. 1 3 Débrancher le TrueDRY DH150 avant de commencer l’entretien. Appuyer sur le loquet de la porte vers le bas et tirer. Le filtre peut être retiré des deux côtés. 2 À l’aide d’un carré d’entraînement hexagonal de 1/2 po ou d’un tournevis standard, retirer les huit vis de part et d’autre du TrueDRY DH150. Il est maintenant possible de retirer les panneaux latéraux et supérieur.
Guide d'installation Description technique Le TrueDRY DH150 fait appel à un dispositif de réfrigération semblable à celui d’un climatiseur pour extraire la chaleur et l’humidité contenues dans l’air d’admission et ajouter de la chaleur à l’air soufflé. Un gaz frigorigène chaud à haute pression est acheminé du compresseur au serpentin d’évaporation. Le frigorigène est ensuite refroidi et condensé, transmettant ainsi sa chaleur à l’air qui est sur le point de sortir de l’appareil.
TrueDRY DH150 Dépannage Problème Raisons possibles Le ventilateur fonctionne, et l’interrupteur 1. Faible température et (ou) humidité ambiante qui pousse l’appareil du ventilateur ainsi que la minuterie du à fonctionner en mode de dégivrage. ventilateur sont à l’arrêt (OFF), mais le 2. Dispositif de protection contre la surcharge du compresseur compresseur effectue des cycles de défectueux. marche et d’arrêt. 3. Compresseur défectueux. 4. Thermostat de dégivrage défectueux. 5.
Guide d'installation Dépannage Charge du frigorigène Si l’appareil a perdu du frigorigène lors d’une réparation ou en raison d’une fuite, il faut ajouter à l’appareil une quantité adéquate de frigorigène. S’il reste encore du frigorigène dans l’appareil, il faut d’abord récupérer ce frigorigène avant d’en ajouter du nouveau. Consulter la plaque signalétique de l’appareil pour connaître le poids exact et le type de frigorigène.
TrueDRY DH150 Dépannage Remplacement d’un compresseur grillé Le mélange de frigorigène et d’huile d’un compresseur est chimiquement très stable en régime de fonctionnement normal. Lorsqu’un court-circuit se produit dans le moteur du compresseur, l’arc à haute température qui se produit transforme le mélange de frigorigène et d’huile en une boue carbonée, un acide très corrosif et de l’eau.
Guide d'installation Liste de pièces Description Numéro de pièce Échangeur de chaleur 50035445-001 Évaporateur 50035445-002 CONDUITE AU FILTRE ÉCHANGEUR DE CHALEUR ÉVAPORATEUR TUBES CAPILLAIRES CONDUITE DE REFOULEMENT Tubes capillaires, 0,50 po x 0,124 po x 50035445-003 59,00 po Compresseur—Toshiba 8.
TrueDRY DH150 Garantie limitée de cinq ans Honeywell garantit ce produit contre tout vice de fabrication ou de matière dans la mesure où il en est fait une utilisation et un entretien convenables, et ce, pour cinq (5) ans à partir de la date d’achat par le consommateur. En cas de défectuosité ou de mauvais fonctionnement pendant la période de garantie, Honeywell remplacera ou réparera le produit (au gré de Honeywell) dans un délai raisonnable.
Solutions de régulation et d’automatisation Honeywell International Inc. Honeywell Limited-Honeywell Limitée 1985 Douglas Drive North 35 Dynamic Drive Golden Valley, MN 55422 Toronto, Ontario M1V 4Z9 http://yourhome.honeywell.com ® Marque de commence enregistrée aux États-Unis © 2008 Honeywell International Inc. 69-2271EFS—01 M.S. 12-08 Imprimé aux États-Unis sur du papier recyclé contenant au moins 10 % de fibres de papier post-consommation.
TrueDRY DH65 Sistema de deshumidificación GUÍA DE INSTALACIÓN PROFESIONAL 1 Ensamble 2 Conductos 3 Plomería 4 Cables Debe ser instalado por un técnico capacitado y experimentado Lea detenidamente estas instrucciones. Si no se siguen estas instrucciones, se puede dañar el producto o provocar una situación peligrosa.
Guía de instalación Índice Acerca de su nuevo deshumidificador Mantenimiento de la humedad ideal................................................................. 41 Controles............................................................................................................. 42 Especificaciones................................................................................................. 43 Instalación Lista de herramientas y materiales............................................................
TrueDRY DH150 Acerca del deshumidificador TrueDRY DH65 Debido a su alto rendimiento y eficacia, el TrueDRY DH65 de Honeywell garantiza que la casa se mantenga a niveles de humedad adecuados. Beneficios • • • Elimina hasta 65 pintas (31 l) de agua del aire interior. Se lo puede entubar para que controle la humedad de toda la casa o puede funcionar sin estar entubado para tratar las áreas con problemas de humedad, tales como el ático o el espacio debajo del suelo.
Guía de instalación Opciones de control El TrueDRY DH150 puede utilizarse con uno de los siguientes controles externos: Sistema de confort total VisionPRO IAQ (YTH9421C1010) • Controla la calefacción/refrigeración y la deshumidificación. • Sensor incluido para visualizar la temperatura exterior. • Interfaz intuitiva del usuario para una fácil programación de la temperatura por siete días. • Pantalla digital con luz de fondo fácil de leer. • Recordatorios de mantenimiento y de servicio técnico.
TrueDRY DH150 Especificaciones Instale TrueDRY DH150 de acuerdo con las normativas nacionales de electricidad.
Guía de instalación Lista de verificación para la instalación Herramientas necesarias - Impulsor de cabeza hexagonal de 3/8 pulgadas - Taladro o herramienta cortante para conductos - Alicates o cortadores de cables - Destornillador estándar - Cinta para embalar - Conducto redondo de 8 pulgadas (20,3 cm) y collar de arranque - Cable de termostato calibre 18 a 22, de 5 bandas - Línea de desagüe de ½ pulgada (1,3 cm) de diámetro (8 pies [2,4 m]) - Abrazaderas de desagüe de 1/2 pulgada (1,3 cm
TrueDRY DH150 Door and Collar Assembly Instalación de la puerta Inserte la pestaña en la parte inferior de la puerta entre la instalación de espuma y el lado metálico. Presione hacia abajo el cerrojo plástico de la puerta y cierre la puerta. Una vez que la puerta esté cerrada, libere el cerrojo de la puerta. M27793 Instalación del anillo Retire los dos conductos redondos, 1 conducto ovalado, los 3 sellos y la bolsa pequeña de herrajes para el montaje de la parte interior de la abertura rectangular.
Guía de instalación Realice la instalación según sus necesidades Se recomienda utilizar un conducto flexible al conectar los anillos del TrueDRY DH65 para reducir el ruido producido por la vibración.
TrueDRY DH150 Plomería Conecte un tubo de desagüe de ½ pulgada (1,3 cm) a la salida de desagüe con conexión macho. Asegure el tubo de desagüe al conector con la abrazadera de la manguera. Dirija la manguera de desagüe siempre hacia abajo y hacia un desagüe aprobado o a una bomba de condensado. Route drain with a trap if possible. Coloque TrueDRY DH150 sobre soportes que eleven la base sobre las bridas superiores de la bandeja de drenaje debajo de él. Elevarlo optimizará el flujo de drenaje por gravedad.
Guía de instalación Cableado NEGRO BLANCO VERDE CONDENSADOR DE ARRANQUE RELÉ DEL COMPRESOR COMPRESOR ROJO TERMOST. DE DESCONGELAMIENTO RELÉ DEL SOPLADOR CONDENSADOR DE ARRANQUE MARRÓN VERDE AZUL NEGRO SOPLADOR NEGRO AMARILLO 2 BLANCO AMARILLO BOBINA DEL RELÉ DEL COMPRESOR CONTROL DE HUMEDAD ROJO-3 NEGRO VIOLETA NEGRO AMARILLO NEGRO NEGRO D.
TrueDRY DH150 Cableado Conecte el TrueDRY DH150 según el diagrama que se aplique al funcionamiento que usted desee. Siga este diagrama para el funcionamiento entubado con un control de humedad externo. EQUIPO DE CALEFACCIÓN, VENTILACIÓN Y AIRE ACONDICIONADO DESHUMIDISTATO MECÁNICO R C W Y G CONTACTOS EN SECO RELÉ BIPOLAR DE DOS POSICIONES, 2.
Guía de instalación Cableado Siga este diagrama si utiliza el TrueDRY DH150 con un deshumidistato eléctrico, tal como el TrueIAQ (DG115EZIAQ).
TrueDRY DH150 Limpieza Se debe realizar el mantenimiento anualmente para garantizar que el TrueDRY funcione en su máxima eficiencia. 1 3 Desenchufe el TrueDRY DH65 antes de comenzar el mantenimiento. Presione hacia abajo el mecanismo para desenganchar la puerta y hale. El filtro puede retirarse desde cualquier lado. 2 Con un impulsor de cabeza hexagonal de ½ pulgada (1,3 cm) o con un destornillador estándar, retire los ocho tornillos que se encuentran a ambos lados del TrueDRY DH150.
Guía de instalación Descripción técnica El TrueDRY DH150 utiliza un sistema de refrigeración, similar al utilizado en los aires acondicionados, que elimina el calor y la humedad del aire entrante y agrega calor al aire que se descarga. El gas refrigerante caliente de alta presión se dirige desde el compresor hasta la bobina del condensador. Al darle calor al aire que está por salir de la unidad, el refrigerante se enfría y condensa.
TrueDRY DH150 Solución de problemas Problema Posibles razones El ventilador del impulsor funciona con el interruptor del ventilador y el temporizador de ventilación OFF (apagado), pero el compresor pasa por las etapas on y off (encendido y apagado). 1. La temperatura ambiente y/o la humedad bajas hacen que la unidad comience el ciclo a través de la modalidad de descongelamiento. 2. La sobrecarga del compresor está defectuosa. 3. El compresor está defectuoso. 4.
Guía de instalación Solución de problemas Carga del refrigerante Si se pierde la carga del refrigerante durante la reparación o debido a una filtración, se debe realizar una carga nueva, pesándola con precisión. Si queda algo de la carga vieja en el sistema, se la debe recuperar antes de pesar la carga nueva. Consulte la placa de identificación de la unidad para saber el peso correcto de carga y el tipo de refrigerante.
TrueDRY DH150 Solución de problemas Reemplazo de un compresor quemado El refrigerante y la mezcla de aceite de un compresor son muy estables desde el punto de vista químico en condiciones normales de funcionamiento. Sin embargo, cuando ocurre un cortocircuito eléctrico en el motor del compresor, el arco alto de temperatura resultante ocasiona que una porción de la mezcla de aceite y refrigerante se descomponga en un sedimento ennegrecido que es un ácido muy corrosivo y agua.
Guía de instalación Lista de piezas Descripción Número de pieza Intercambiador de calor 50035445-001 Evaporador 50035445-002 Tubos capilares 0,050 X 0,124 pulgadas X 59,00 pulgadas (0,13 cm x 0,3 cm x 1,5 m) 50035445-003 Compresor—Toshiba 8.1 50035445-004 Acumulador 50035445-005 Filtro/secador 50035445-006 Tubo-Cond.
TrueDRY DH150 Garantía limitada de 5 años Honeywell garantiza que este producto no tiene defectos en la mano de obra ni en los materiales en condiciones de uso y servicio normales durante un período de cinco (5) años desde la fecha de compra del consumidor. Si en cualquier momento durante el período de garantía se determina que el producto presenta defectos o mal funcionamiento, Honeywell reparará o reemplazará el producto (a elección de Honeywell).
Soluciones de control y automatización Honeywell International Inc. Honeywell Limited-Honeywell Limitée 1985 Douglas Drive North 35 Dynamic Drive Golden Valley, MN 55422 Toronto, Ontario M1V 4Z9 http://yourhome.honeywell.com ® Marca registrada de los EE. UU. © 2008 Honeywell International Inc. 69-2271EFS—01 M.S. 12-08 Impreso en los Estados Unidos, en papel reciclado que contiene, al menos, un 10 % de fibras de papel ya utilizadas.