
Christmas Tree Manual


INSTALLATION
Note: Before you start to assemble your tree, please choose a location near an
electrical wall outlet. Place the tree stand on a level surface.
Please remove protective covers from the base of the pole from each section.
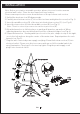
1. Unfold the tree base to a 90 degree angle.
2. Carefully insert bottom section (C) of tree into tree base and tighten the screw (see Fig. 1).
3. Insert the middle section (B) of the tree into the bottom section (C) (see Fig. 2).
4. Insert the top section (A) into the middle section (B) (see Fig. 3).
Plug 1
Foot pedal
switch
Foot pedal
switch
A
B
C
Fig. 2
Fig. 3
Tree base
Fig. 1
side
view
side
view
Fig. 4
Fig. 5
OPEN
OPEN
D
Plug 2
Note: There is a tree top connector on the top section (A).
Tree top connector
6. Shape the branches. Starting with tips closest to the pole, shape one tip to the right,
one to the left and one along the centre of the main stem. Repeat pattern for each
5. Allow the branches to fall into place or gently pull branches up and out. When
adjusting branches be sure that all wires are free of branch hinges (see Fig. 4).
7. Plug the well-connected power supply cord plug 1 from the bottom section (C) into
electrical outlet. Please note this tree comes with an on/off foot pedal switch for
easy illumination. The plug 2 is for tree top lights. Plug the power supply cord
branch (see Fig. 5).
plug 2 into electrical outlet.
EN 4