
Christmas Tree Manual


TROUBLESHOOTHING
3. If you are still experiencing problems with the tree, please contact us at 866-205-9854.
If any lights do not work on your pre-lit tree, please check the following before
1. If entire tree or a section of the tree does not light:
a) Make sure the end connector of the power cord is well connected to the
c) Check that there is power at the electrical outlet.
d) Check fuses in tree’s plugs and replace if necessary (see Replace the fuse below).
2. If a strand of lights still does not work:
a) Check that all lamps are tightly fitted inside the lampholders and that no lamps are broken
or missing. Replace any broken or missing lamps with replacement lamps provided
(see Replace the lamp below). If all lamps are firmly in the lampholders, slightly twist
b) If the lights still do not work, carefully remove each lamp one by one out of the problem
while removing from lampholders. Check the two wires at the bottom of the lampholder.
Each wire should be aligned properly on the lampholder to ensure a proper connection
in the lampholder. If one wire is missing or too short, please replace lamp with a
replacement lamp (provided).
Loose branches
b) Check that each section of the tree is well connected.
calling customer service:
bottom section (D).
the lamps from side to side to ensure proper connection.
light string. Pull the lamp AND plastic base straight out of lampholder. Do not twist lamps
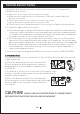
CAUTION! ALWAYS UNPLUG YOUR TREE FROM ITS POWER SOURCE
BEFORE ATTEMPTING EITHER FUSE OR LAMP REPLACEMENT.
EN 5
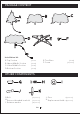
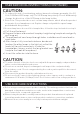
1. If a branch of the tree in section A, B or C falls off, follow the steps below to reinstall
1) Place the branch into the slot of the bracket.
2. If a branch of the tree in section D falls off, follow the steps
below to reinstall it with a spare reverse-threaded iron bolt
diagonal pliers (not included) to crimp the bolt.
2) Insert a spare bolt through the hole and use
Fig. A
and two retainer washers.
1) Place the branch into the slot of the bracket.
the hole and secure using two retainer washers.
2) Insert a spare reverse-threaded iron bolt through
Fig. B
it with a spare bolt.
(See Fig. B)
(See Fig. A)