
THX9321 & THX9421 Product Data
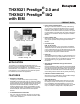

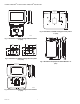

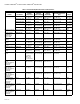


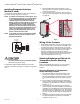
Table Of Contents
- Application
- Features
- Contents
- Specifications
- System Installation
- Installation Options
- Guidelines for Installing RedLINK Devices
- Installing Equipment Interface Module (if used)
- Wiring 24 Vac Common
- Selecting Discharge and Return Air Temperature Sensor Mounting Locations
- Selecting Return Air Temperature Sensor Mounting Location
- Installing Discharge and Return Air Temperature Sensors
- Selecting Thermostat Location
- Installing Wallplate
- Power Optional REDLINK™ Accessories
- Performing Initial Setup
- Linking Thermostat to Equipment Interface Module (if used)
- Linking RedLINK™ Accessories
- Completing Initial Setup
- Adding RedLINK Accessories to the Thermostat
- Locating the Connect Buttons on RedLINK Accessories
- Finding Your Password (Date Code) to Access Installer Options
- Installer Options
- Making Changes to Installer Setup
- Installer Tests
- Operation
- Setting the time/date
- Setting the fan
- Setting system mode
- Preset Energy-Saving Schedules
- Adjusting program schedules
- Overriding schedules: residential use
- Overriding schedules: commercial use
- Viewing equipment status
- Setting vacation hold: residential use
- Setting holiday/event schedules: commercial use
- Setting custom events: commercial use
- Setting holiday schedule: commercial use
- Setting holiday override: commercial use
- Initiating occupancy mode: commercial use
- Remote setback: commercial use
- Adjusting humidification settings
- Adjusting dehumidification settings: residential use
- Adjusting dehumidification settings: commercial use
- Adjusting ventilation settings
- Customizing screen color
- Setting preferences
- Cleaning the thermostat screen
- Adjusting security settings
- Viewing dealer information
- Advanced Features
- Installer options
- Using the temperature display
- Using the humidity display
- Universal Outputs (U1, U2, U3)
- Universal Inputs (S1, S2, S3, S4)
- Alerts and Diagnostics
- Heat Pump and Backup Heat Operation
- Indoor Air Quality (IAQ) Control
- IAQ Reminders
- Customizable Reminders
- USB Port
- Commercial Features
- Overriding schedules: commercial use
- Setting holiday/event schedules: commercial use
- Setting custom events: commercial use
- Setting holiday schedule: commercial use
- Setting holiday override: commercial use
- Initiating occupancy mode: commercial use
- Ramp Rates
- Custom Names
- Remote Setback
- Economizer and Time of Day (TOD) Operation
- Pre-Occupancy Purge
- Battery Replacement
- Optional Accessories
- Portable Comfort Control
- Remote Indoor Sensors
- Backup Control
- Replacing a Thermostat
- Replacing an Equipment Interface Module
- Wiring
- EIM Wiring Diagrams
- THX9321 Thermostat Wiring Diagrams
- THX9321 Thermostat Wiring Diagrams Using Universal Relays to Control Heating or Cooling
- Wiring IAQ Equipment or a Heat/Cool Stage to the Universal Terminals
- Economizer Module Wiring Diagrams
- Wiring C7089U1006 Outdoor Sensor
- Wiring guide — Wired Indoor Sensors
- Zoning
- Troubleshooting
- Regulatory Information

THX9321 PRESTIGE
®
2.0 AND THX9421 PRESTIGE
®
IAQ WITH EIM
68-0311—02 4
Fig. 1. Dimensions of THX9421 Prestige IAQ thermostat in
in. (mm).
Fig. 2. Dimensions of THX9421 Prestige IAQ cover plates
in in. (mm).
Fig. 3. Dimensions of THX9321 Prestige
®
2.0 thermostat in
in. (mm).
Fig. 4. Dimensions of THX9321 Prestige 2.0 cover plate in
in. (mm).
Fig. 5. Dimensions of Equipment Interface Module in in.
(mm).
M34630
3-5/16 (84)
3-1/2
(89)
4-1/2 (115)
7/8
(22)
M34262
1-25/32
(46)
5-33/64
(140)
2-1/8
(54)
4-21/64
(110)
1-25/32
(46)
6-7/8
(175)
2-1/8
(54)
5
(127)
M33329A
6-13/16 (173)
3-5/16 (84)
1-7/16
(36)
3-7/8
(99)
M33330
3-19/64 (84)
7-29/32 (201)
5-1/2
(140)
M33331
4-53/64 (123)
8-7/8
(225)
9-11/32
(237)
1-19/32
(41)