
User's Manual


DD
DD
DD
B
A
K
BB
H
G
CC
H
11
WIRING
2. Wrap electrical tape around each individual wire
connector (DD) down to the wire as shown in Fig. 3.
WARNING: Make sure no bare wire or wire strands
are visible after making connections. Place green and
white connections on opposite side of box from the black
and blue (if applicable) connections.
Turn spliced/taped wires upward and gently push wires
and wire connector (DD) into outlet box.
2
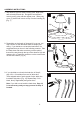
FINAL INSTALLATION
1. Tuck connections neatly into ceiling outlet box. Remove
one screw from the mounting bracket (C) and loosen the
other screw around 1/4 in.
Align the canopy (B) up to ceiling and over the loose
screw. Place the canopy (B) into key hole and rotate
clockwise.
Secure the canopy (B) with previously removed screw.
Place the canopy cover (K) over the canopy (B) and
rotate clockwise until it is locked into right position.
[Fig. 1]
1
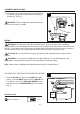
2. Partially insert three blade screws (BB), along with
three blade washers (CC) to attach one blade arm (G)
to a blade (H). Then, tighten each blade screw (BB)
starting with the one in the middle. [Fig. 2] Repeat with
remaining blades (H).
2
BB
CC
Blade Screw x 15
Blade Washers x 15
Hardware Used