
User's Manual


6
3. WARNING7RUHGXFHWKHULVNRI¿UHRUHOHFWULFVKRFNGRQRWXVHWKHIDQZLWKDQ\VROLGVWDWH
speed control device or control fan speed with a full range dimmer switch.
4. WARNING7RUHGXFHWKHULVNRI¿UHHOHFWULFVKRFNRUSHUVRQDOLQMXU\GRQRWEHQGWKH
blade arms when installing them, balancing the blades, or cleaning the fan. Do not insert
objects between the rotating fan blades.
5. WARNING: To reduce the risk of personal injury, use only parts provided with this fan. The
use of parts OTHER than those provided with this fan will void the warranty.
1. CAUTION: Be sure outlet box is properly grounded or that a ground (green or bare) wire is
present.
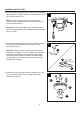
After opening top of carton, remove mounting hardware package from foam inserts. Remove
PRWRUIURPSDFNLQJDQGSODFHRQFDUSHWRURQIRDPWRDYRLGGDPDJHWR¿QLVK
2. CAUTION: Carefully check all screws, bolts and nuts on fan motor assembly to ensure that
they are secured.
WARNING
CAUTION
PREPARATION
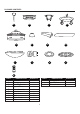
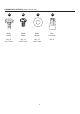
Before beginning assembly of product, make sure all parts are present. Compare parts with package
contents list and hardware contents above. If any part is missing or damaged, do not attempt to
assembly the product. Contact customer service for replacement parts.
Estimated Assembly Time: 120 minutes
Tools required for Assembly (not included): Electrical Tape, Phillips Screwdriver, Pliers, Safety
Glasses, Step Ladder and Wire Strippers
Helpful tools (not included): AC Tester Light, Tape Measure, Wiring Handbook, and Wire Cutters