
Safety Information


01 02 03 04 05 06
07 08 09 10 11 12
13 14 15 16 17 18
19 20 21 22 23 24
25 26 27 28 29 30
Table of Contents
How the System Works………………........…………………………………………….5
Features……………………………………………………………………………………5
Key Definitions……………………………..……………………………………………..6
Operating Guide……………………….....………………………………………..11
Prepare the Remote Transmitter………………........…………………………………11
Charge the Remote Transmitter………………........…………………………..11
Turning ON the Transmitter…………………………......………………………11
Transmitter Digital Display………………………………......…………………..11
Transmitter Battery……………………………………………....……………….11
Prepare the Receiver Collar…………………………………………….......………….12
Charge the Receiver Collar…………………………………………….......……12
To Turn the Receiver Collar On……………………………………….......…….12
To Turn the Receiver Collar Off……………………………………….......…….12
Test the Shock Function…………………………………………………………......….13
Fit the Receiver Collar…………………………………………………………....……..14
FAQ’s....................................................…………………………………........………16
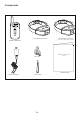
Key Definitions
Remote Transmitter: Transmits the signal to the Receiver Collar. It is
waterproof.
Digital Display
Dog 1: The active collar symbol will display to indicate Dog 1. Dog 1 and
Dog 2 symbols will be displayed and switched (additional purchase
required for 2 dog system).
Operation Lock: When the remote is ready to power off, the lock sign will
show up on the screen momentarily, indicating power off mode.
Level of Shock: Shows Dog 1 or Dog 2 level of Shock (Low-1 to High-10).
Level of Vibration: Shows Dog 1 or Dog 2 level of Vibration (Low-1 to
High-5).
Remote Battery Indicator: The battery indicator provides constant
awareness of the remote battery’s power level.
Receiver Battery Indicator: The battery indicator provides constant
awareness of the receiver battery’s power level.
Button Definitions (factory default settings for Dog 1 mode)