Contents Safety .................................................................................................................... 3 Environment ........................................................................................................ 4 1 Getting Started ................................................................................................. 5 1.1 Getting to know your touch phone .................................................... 5 1.2 Installing the SIM card and storage card ...
9.2 Alarm Clock ..................................................................................... 30 9.3 Calculator .........................................................................................
Safety Never attempt to disassemble your phone. You alone are responsible for how you use your phone and any consequences of its use. As a general rule, always switch off your phone wherever the use of a phone is prohibited. Use of your phone is subject to safety measures designed to protect users and their environment. Do not use your phone in damp areas (bathroom, swimming pool…). Protect it from liquids and other moisture.
manufacturers of such equipment will be able to give you any advice you may need in this area. Hospitals: Always make sure that your phone is switched off in hospitals when so instructed by warning signs or by medical staff. Road safety: Do not use your phone when driving. In order to give your full attention to driving, stop and park safely before making a call. You must comply with any current legislation.
1 Getting Started 1.1 Getting to know your touch phone 1.2 Installing the SIM card and storage card You need to remove the back cover before you can install the SIM card and storage card. Also, you can remove and install the SIM card and storage card when the phone is turning on. To remove the back cover 1. Make sure your device is turned off. 2. Firmly hold the device with both hands and the front panel facing down. 3.
Note: To remove the memory card, press it to eject it from the slot. 1.3 Charging the Battery Your device comes with a rechargeable lithium-ion battery and is designed to use only manufacturer-specified original batteries and accessories. Battery performance depends on many factors, including network configuration, signal strength, and usage patterns. Warning: To reduce risk of fire or burns: • Do not attempt to open, disassemble, or service the battery pack.
Silent mode To silence your phone quickly, press & hold the – volume button to zero volume. Screen sleep After a period of inactivity, your screen will go to sleep (display will turn black). In sleep, your phone uses less battery power. You can control this behavior: Set screen timeout period 1. On the Home screen, touch and select Settings. 2. Select Display > Sleep. Select a time from the menu. Prevent sleep while charging and select Settings. 1. On the Home screen, then touch 2.
shortcuts as you like. 1. The Home screen actually extends beyond the screen width. On Home screen, slide your fingertip left and right along the screen to reveal the full width of the Home screen. This additional space gives you more room to customize Home with applications and shortcuts. 2. Create Home screen shortcuts: • On Home screen, touch & hold the blank screen to select ‘SHORTCUTS’.
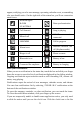
appear, notifying you of a new message, upcoming calendar event, or something else you should notice. On the right side of the status bar, you’ll see connection status icons.
notice disappear from the notification bar temporarily, and then come back after set time. Notes: On the home screen, touch the bar and slide your finger down the screen to open the list of notifications displayed in the sliding window, you can touch the icon on the top of the screen to enter the shortcuts screen, such as Airplane mode, Wi-Fi, Bluetooth, Data connection, Airplane mode, you can open or close the selected function directly. 2 Using phone features 2.
To dial a call, touch ‘Call’ button (Green icon) to make a call. To end a call, touch ‘End’ button (Red icon). to show the call records, 2. On the dial screen, touch Call history tab select an entry listed in the log to call the number. that the contacts with phone numbers are 3. Also, enter Contacts tab listed. Select a contact, and then select the phone number to dial the call. 2.
Note: Whether the group call function can be used depends on whether the network operator supports and provides such function as well as whether you have applied for such function. Please contact network operator for details. 2.5 Using call history appears in the title bar when you missed a call. 1. The missed call icon 2. Use ‘Call history’ tab to check who the caller was, or view all your dialed numbers, and received calls.
Bluetooth 1. Use this check box to turn Bluetooth services on or off. 2. With Bluetooth services on, you can touch Bluetooth to open the Bluetooth settings screen. 3.3 Apps & notifications Apps View all the applications stored on your phone and how much space they occupy. If you’ve downloaded an application from Android™ Market, you can uninstall it from this screen. Select a specific application to: 1. Clear your user data (if you have any associated with a particular application). 2.
Default notification sound: Select a ring tone to use for a notification (e.g., new message). Note that you can override this setting for new Calendar event notifications, text and multimedia message notifications. Go to the applications settings screens to select specific ring tones. Vibrate: Select to have your phone vibrate for incoming calls. Dial pad touch tones: Select to have a tone sound when you use the on-screen Dialer.
interested in these settings: USB debugging: If you want be able to communicate with your phone directly via USB, select ‘USB debugging’ check box. Stay awake: To prevent your phone from sleeping while charging (via power adapter or USB), select ‘Stay awake’ check box. Erase all data (factory reset) You can select to reset your phone to factory settings. This will erase all your data from the phone and require you to sign in and go through the setup screens to use any of the applications.
To control synchronization Contacts, you can do the following: and select Settings. 1. On the Home screen, then touch 2. Select Users & accounts. When any of the applications are synchronizing, . You will also see the last time your data was you will see the “sync” icon synchronized. 3. By default, the personal information in Contacts will sync whenever you make a change or receive a new message.
4. On the pair confirm dialog, select ‘Pair’. 5. Once paired, the device will connect automatically. 6. Pairing and connection status appear under the device name. 7. Once the other Bluetooth device shows “connected” status, you can start using it to make and receive phone calls. 8. To un-pair with a device, touch the icon on the side of device to open the context menu. Select FORGET, as appropriate. If you select ‘FORGET’ when connected, you will be disconnected as well.
details. 3. On the Contact details screen, press MENU to open the context menu. From the menu you can select to share, place on home screen, or delete the contact. Add a contact and select Contacts. Your contact list 1. On the Home screen, then touch appears. 2. Touch the ‘+ ’icon on the right-down of the screen to add new contact. 3. Add all the information you want to store for this contact in the appropriate fields. You must add some information to save a contact.
you must have a phone number stored for them in their contact details. From the Contact details screen, select a phone number and touch ‘Message’ icon, a Compose screen opens for your new message. Complete your message and select ‘Send’. 3. Send email to a contact: To send an email message to a contact, you must have an email address stored for them in their contact details. • Select the contact you want to email. Their Contact details screen opens. • In the Send email section, select the email address.
contain text, emoticons, emotion Sticker, location, picture, audio, and video files. When you compose a message, the phone will automatically convert a text message into a multimedia message as soon as you add an attachment, or if you address the message using an email address rather than a phone number. View the message from the message list Select a message thread in the list to open it for reading.
Compose text and multimedia messages 1. Touch ‘+’ new conversation icon. The New conversation screen opens. If you want to start group conversation, select ‘Start group conversation’ icon on the new conversation screen, the New Group conversation screen opens. 2. Add recipients by typing a name, phone number, or email address in the ‘Type name or number’ field. Matching contacts will appear. Select the recipient or continue typing. Add as many recipients as you wish.
2. The Set up new account screen appears. 3. Type your account email address and password. 4. Select ‘Next’. Follow the prompts to type the email server, protocol, and other account information yourself. After your account settings have been verified, select ‘Next’ to go to your Inbox. 6. To add more accounts, from an Inbox or your Accounts screen, press MENU and select ‘Settings’ > ‘Add account’. Use your email account Once you’ve set up an account, you can do the following: 1.
7. Remove an email account: You can always remove an email account from your phone. Go to your Inbox, press MENU and select ‘Settings’. Touch the account to open account settings screen. Press Menu and select Manage accounts. On Users & accounts screen, touch the account you want to remove, and then select REMOVE ACCOUNT. You will be asked to confirm before the account is removed. Edit account settings To open your Account settings screen, do the following: 1.
1. Go to a Web page: Make sure the focus is on a text box and then start typing the URL. 2. Add a bookmark: Bookmark the Web page you are currently viewing by pressing MENU and touch bookmark icon. 3. Refresh a Web page: To refresh the contents of the current page, press MENU and select ‘Refresh’ icon. Open pages in separate windows You can keep more than one Web page open by using multiple windows to display the pages. Open a new window: From a Web page, touch tabs icon.
8 Experiencing Multimedia 8.1 Camera & Picture All the pictures you can capture or view on your phone are stored on the phone storage. Take a picture Captured pictures are saved to the “DCIM” folder on the phone storage. Before you take a picture, wipe the sensor window to remove any small amounts of oil. and select Camera icon. 1. To open the Camera, on the Home screen, touch 2. The Camera opens in capture mode. Frame your picture within the screen and hold the phone steady. Touch Camera button to capture.
2. Share a picture: In full-screen view, select Share. Select to share your picture via Messaging (MMS), or another application (if you have another application installed on your phone that supports sharing). 3. Set as wallpaper: In full-screen view, press MENU and select Set picture as. From the menu that opens select Wallpaper. Select Set wallpaper, then wallpaper setting window opens.
selecting until you reach the music you want to play. For example, if you select the Artists category, you will see a list of artists in A-Z order. If you select an artist, the list opens to display that artist’s albums. Select an album, and the album’s song list displays. All the music you can listen to on your phone is stored on the phone storage or the memory card. Load music onto your Phone Storage Read the instructions below to add music to your phone storage. 1.
within “music” to organize your music further. If you want to use certain music files as phone, notification, or alarm ring tones. Note: If you do not want a ringtone to appear in your music Library but you do want it to be available as a ringtone, and then create the ‘ringtones’, ‘notifications’, or ‘alarms’ folder outside your ‘music’ folder. 5. When finished copying, close the USB drive window and un-mount or eject the drive as required by your computer's operating system.
4. In the Add to playlist menu that opens, select New to create a new playlist, or one of the existing playlists. 5. The song(s) are added. Manage your playlists Go to the Library screen and select ‘Playlists’. All your playlists appear. Touch & hold the playlist to open the context menu. You can do the following from this screen: Play, Edit (rearrange songs), Delete and Rename. Create ringtones from songs You can set any of your songs as a phone ringtone: 1.
9 Other applications 9.1 Calendar Calendar views You can view your calendar in a variety of ways. Touch the date on the left-top of the screen to select from Day, Week, Month or Agenda. Create an event From any of the views, press MENU and select ‘New event’ to open the new Event details screen. • Type the event name that appears in Day view. • Type the location. • Select date & time. • Description can be as long as you like. • Select a calendar if you display more than one. • Set default repetition time.
Alarm: Select the check box to turn alarm on (checked) or off (cleared). This is the same check box that appears on the main Alarm Clock screen. Time: The time the alarm will go off is shown. To change this time, select Time to open the time setting screen. Set the time you want, and then select OK. Repeat: The current repeat selection is shown. To change the setting, select Repeat and make a selection from the options.
hour format. 9.3 Calculator and select the To open Calculator, on the Home screen, then touch Calculator icon. Calculator panels In the calculator, you can enter numbers and perform basic addition, subtraction, multiplication, and division or insert advanced operators or delimiters, such as sine, cosine, tangent, square root, parentheses, etc. Google, Android, Google Play Protect and other marks are trademarks of Google LLC. HONG KONG IPRO TECHNOLOGY CO.
Before a new model phone is a available for sale to the public, it must be tested and certified to the FCC that it does not exceed the exposure limit established by the FCC, Tests for each phone are performed in positions and locations (e.g. at the ear and worn on the body)as required by the FCC.
harmful interference in a residential installation. This equipment generates uses and can radiate radio frequency energy and, if not installed and used in accordance with the instructions, may cause harmful interference to radio communications. However, there is no guarantee that interference will not occur in a particular installation.