User Guide
Contents Foreword Unboxing your Phone Inserting a SIM card and microSD card Charging your device Quick charging Viewing the battery status 2 2 4 5 Getting Started Setup Wizard Enabling or disabling a SIM card Naming a SIM card Selecting the default mobile data SIM Setting the default SIM card Connecting to the Internet Viewing Recommended Settings 6 6 7 7 7 7 8 Screen and Display Home screen Locking and unlocking the screen Notification panel and status bar Themes Global search Screenshot Screen recordi
Contents Fingerprint recognition Multi-user accounts Security settings 52 54 56 Camera and Gallery Camera options Photos and video recordings Object recognition and Pro camera mode Wide aperture mode Monochrome mode Portrait mode Perfect Selfie mode Slow motion recording Time-lapse mode Adding watermarks to photos Audio notes Managing shooting modes Configuring the camera settings Viewing photos and videos Organizing albums Editing a photo Editing Videos Configuring Gallery 58 58 61 63 63 64 64 64 65 65
Contents Sending a message Replying to a message Searching for messages Deleting message threads Managing messages Returning to the top of the message list Pinning messages to the top of the list Marking messages as read Blocking spam messages Adding a message signature Configuring the message ringtone Adding an email account Sending emails Replying to emails Managing emails Configuring Mail 92 92 93 93 93 93 94 94 94 94 94 95 95 96 96 97 Calendar and Notepad Changing the calendar view Viewing global hol
Contents Encrypting apps Setting apps to close automatically when the screen is locked Configuring Phone Manager 107 108 108 Logging in to two social media accounts at the same time Clock Sound recorder 109 109 110 Tools System Features and Settings Power on and off timer Restarting your device Changing the system language Changing the input method Input method settings Editing text Airplane mode Configuring the sound settings One-handed UI Do not disturb mode Viewing memory and storage information Se
Foreword Read this guide carefully before using your device. All pictures and illustrations in this document are for your reference only and may differ from the final product. Some features in this guide may not be supported by certain devices or carriers. Symbols and definitions Description Reminder Warning Highlights important information and tips, and provides additional information.
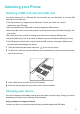
Unboxing your Phone Inserting a SIM card and microSD card Your phone features a 2-in-1 SIM card slot. You can insert two nano-SIM cards, or one nano-SIM card and one microSD card. l The SIM card slot only supports nano-SIM cards. Contact your carrier for a new or replacement nano-SIM card. l Only use standard nano-SIM cards to avoid damaging the SIM card tray. l Ensure that the card is in the correct position and keep the card tray level when inserting it into your device.
Unboxing your Phone You must use the charger and USB cable that came with your device for quicker charging speeds. Using other chargers or USB cables may cause your device to continuously restart or increase the charging time. It may also cause the charger to overheat, or even damage your device. l If your device does not respond when you press the power button, the battery is probably empty.
Unboxing your Phone l Your device may become warm after prolonged use or when exposed to high ambient temperatures. If your device becomes hot to the touch, stop charging it and disable unnecessary features. Place your device in a cool location and allow it to cool down to room temperature. Avoid touching the surface of your device for prolonged periods when it becomes hot. l Charging times may vary depending on the ambient temperature and the remaining battery level.
Unboxing your Phone Viewing the battery status You can view the battery status and configure the status bar to display the remaining battery percentage. Viewing the battery status The battery status is indicated by the battery icon in the status bar. Open Phone Manager.Touch to view the remaining battery percentage and usage time. Displaying the remaining battery percentage in the status bar You can display the remaining battery percentage in the status bar in two ways: l Open Phone Manager.
Getting Started Setup Wizard l Read the Quick Start Guide carefully before using your device for the first time and ensure that the SIM card is installed correctly. l Press and hold the power button to power on your device. Follow the onscreen instructions to complete the initial setup. 1 2 3 Select your language and region, and then touch NEXT. Read Terms and Conditions carefully and then touch AGREE > AGREE to accept. Read About service permissions.
Getting Started Naming a SIM card By default, each SIM card is named after the carrier. You can rename your SIM card to make it easier to identify. 1 2 3 l This feature is only available on dual SIM phones. l Features may vary depending on your carrier. Open Settings. Touch Dual SIM management. Select a SIM card name. Enter a name and touch OK. Selecting the default mobile data SIM You can select a default SIM card for mobile data services.
Getting Started 4 Select the Wi-Fi network you want to connect to. If you select an encrypted network, you will also need to enter the Wi-Fi password. Connecting using mobile data Before using mobile data, ensure that you have a data plan with your carrier to avoid incurring excessive data charges. 1 Swipe down from the status bar to open the notification panel. 2 Touch to enable mobile data. Disable mobile data when not required so as to save battery power and reduce data usage.
Screen and Display Home screen About the home screen Use the home screen to access your apps and widgets. Status bar: Displays notifications and status icons Display area: Displays app icons, folders, and widgets Screen position indicator: Indicates which home screen is displayed Dock bar: Displays frequently used apps Basic screen gestures Use simple touchscreen gestures to perform a variety of tasks, such as launch apps, scroll through lists, and enlarge images. Touch: Touch an item once.
Screen and Display Touch and hold: Touch and hold the target area of the screen for at least 2 seconds. For example, touch and hold a blank area on the home screen to access the home screen editor. Swipe: Swipe your fingers on the screen. Swipe vertically or horizontally to browse other home screens, scroll through a document, and more. Drag: Touch and hold an item, and then move it to another position. For example, use this gesture to rearrange apps and widgets on the home screen.
Screen and Display You must have enough space on the home screen. If there is not enough space, add another home screen or free up some space. Reverting to the standard home screen 1 2 Open Settings. Touch Home screen style > Standard. Switching to simple home screen Simple home screen uses a simple layout and large icons for easier use. 1 Open 2 Touch Advanced settings > Simple mode, and touch Settings. .
Screen and Display 3 On the simple home screen, you can: l Touch app icons to open them. l Touch and hold an icon to enter the home screen editor mode. In this mode you can add or delete apps. l Touch Others to open the app list and view or open more apps. l Touch Standard mode to switch back to the standard home screen. Displaying or hiding notification badges Notification badges appear in the top-right corner of app icons. The badge number indicates the number of new notifications.
Screen and Display 3 Select the desired wallpaper and follow the onscreen instructions to set it as the home screen or lock screen wallpaper (or both). Changing the wallpaper automatically 1 2 3 Open Settings. Touch Display > Wallpaper. Switch Randomly change home screen wallpaper on or off. When Randomly change of home screen wallpaper is enabled, you can configure the Interval and Album to display so that your wallpaper can change automatically at the specified interval.
Screen and Display Some pre-installed apps cannot be uninstalled for the proper running of the system. Shaking your device to auto-align icons Gaps may appear on the home screen after you uninstall apps or move them into folders. You may use the following feature to arrange apps neatly on the home screen. 1 2 3 On the home screen, pinch two fingers together to open the home screen editor. Touch Settings and switch on Shake. Return to the home screen and open the home screen editor again.
Screen and Display Deleting home screens 1 On the home screen, pinch two fingers together to open the home screen editor. 2 Touch on a blank screen to delete it. You cannot delete a home screen if it contains apps or widgets. Moving home screens 1 2 On the home screen, pinch two fingers together to open the home screen editor. Touch and hold the home screen you want to move and drag it to the desired location.
Screen and Display Setting the default home screen 1 On the home screen, pinch two fingers together to open the home screen editor. 2 Touch at the top of a home screen to set the chosen home screen as default. Managing home screen widgets Add, move, or delete widgets from the home screen. Adding widgets 1 2 On the home screen, pinch two fingers together to open the home screen editor. Touch Widgets. Select a widget and drag it to a blank area on the home screen.
Screen and Display Creating a folder Group your apps into categorized folders to make them easier to find. For example, you could create a Social folder for your social media apps. On the home screen, drag an icon onto another icon to create a folder containing both apps. Renaming folders To rename a folder, open it and touch the folder name. Adding apps to a folder 1 Open the folder. 2 3 Touch . Select the apps you want to add and touch OK. Removing apps from a folder 1 Open the folder.
Screen and Display Locking and unlocking the screen Changing the lock screen style Set a screen lock password to prevent unauthorized access to your device. Changing the screen lock method Magazine Unlock is set as the default lock screen style. To change the lock screen style, touch Settings > Screen lock & passwords > Screen lock style and select a style. Setting the screen lock password 1 2 3 Open Settings.
Screen and Display l If you have set a screen unlock pattern, PIN, or password, you will need to draw the unlock pattern or enter your PIN/password to unlock the screen. l If your device has a fingerprint sensor, you can unlock the screen by placing your finger on the fingerprint sensor. Configuring Magazine Unlock Images You can configure Magazine unlock to customize your lock screen wallpapers.
Screen and Display Accessing tools from the lock screen Launch apps directly from the lock screen. 1 2 Swipe up from the bottom of the lock screen to display lock screen features and tools. Touch the shortcut icon on the bottom of the screen to launch the app you want to access. Recorder Calclator Scanner Flashlight Clock Swipe up on the camera icon on the lock screen to directly open the camera.
Screen and Display Opening the notification panel and status bar from the lock screen Turn on the screen and swipe down from the status bar to open the notification panel. Then you can switch on or off shortcut switches, or view notification messages. Opening the notification panel and status par when the screen is unlocked Swipe down from the status bar to open the notification panel. Then you can switch on or off shortcut switches, or view notification messages.
Screen and Display Connected to a VPN New voicemail Downloading data Uploading data Upcoming events Device memory full Synchronizing data Synchronization failed Login or synchronization issue More notifications Configuring notifications You can configure the notification settings for each app. 1 2 3 Settings. Open Touch Notification & status bar > Notifications management. Select the app that you want to configure and enable or disable notifications as desired.
Screen and Display 3 Touch a switch to enable the corresponding feature. If the switch supports touch and hold gestures, touch and hold the switch to access the settings for the corresponding feature. Some switches do not support touch and hold gestures. Themes About themes Themes help you to personalize your home screen by changing the wallpaper, app icons, and more. Changing the theme 1 2 Open Themes. You can: l Select a theme and follow the onscreen instructions to configure the settings.
Screen and Display Searching for content on your device Searching for contacts 1 2 Swipe down on the home screen to display the search bar. Touch the search bar and enter the contact name, initials, phone number, email address, or other information. Matching results will be displayed underneath. To improve the accuracy of search results, enter more than one keyword. Each keyword should be separated by a space (for example "John Smith New York").
Screen and Display Searching for settings 1 2 Swipe down on the home screen to display the search bar. Enter one or more keywords. Matching menu options from Settings will be displayed under the search bar. Screenshot Capturing the entire screen Taking a screenshot with the power and volume down buttons Press the Power button and Volume down button to take a full screenshot. Screenshot shortcut Open the notification panel, and then touch in the Shortcuts tab to take a full screenshot.
Screen and Display Using your knuckle to take a screenshot To take a screenshot of the whole screen, knock the screen twice with your knuckle. Capturing part of the screen This feature allows you to capture part of the screen and save it as an image. Knock the screen with your knuckle. Keep your knuckle on the screen and draw the area you want to capture. The area inside the blue line will be captured.
Screen and Display By default, screenshots are stored in Gallery, within the Screenshots folder. Touch to share a screenshot. Taking scrolling screenshots Use knuckle gestures or scrolling screenshots to capture content that does not fit on the screen. This is useful for sharing chat conversations, web pages, or large images. Using the shortcuts tab 1 Open the notification panel, and then touch 2 3 After taking the screenshot, touch to take a standard screenshot. to take a scrolling screenshot.
Screen and Display Ensure that you touch within 3 seconds of taking the screenshot. Using your knuckle Knock the screen with your knuckle and hold it down. Draw an "S" shape on the screen and lift your knuckle. The screen will scroll down automatically as your device captures a screenshot. Touch the screen to stop scrolling and capture the previous content.
Screen and Display Viewing screenshots 1 2 Open Gallery. On the Albums tab, touch Screenshots to view your screenshots. Editing a screenshot 1 2 Choose the desired options to edit the image. 3 Touch After taking a screenshot, touch . to save the changes. Sharing a screenshot 1 2 3 4 Open Gallery. On the Albums tab, touch Screenshots. Select the screenshot you want to share and touch . Choose how you want to share the screenshot and follow the onscreen instructions.
Screen and Display Screen recording About screen recordings Use the screen recording feature to record footage and share it with friends. Screen recorder Using the screen recorder shortcut switch To start a screen recording, open the notification panel and touch . Pressing buttons to record Press the Volume up button and Power button simultaneously.
Screen and Display Using knuckle gestures to record To start a screen recording, knock the screen twice with two knuckles. l Audio will also be recorded, so make sure that you are in a quiet environment. l Recording will stop automatically when you make or receive a call. l When making a screen recording, you will not be able to use the recording feature in other applications.
Screen and Display l Press the volume up and power buttons simultaneously. l Touch the screen recording icon in the upper left corner of the status bar. Viewing, sharing, and deleting screen recordings Viewing screen recordings Open Gallery and go to Screenshots or Screen recordings to view your screen recordings. Sharing screen recordings 1 2 3 4 Open Gallery. On the Albums tab, touch Screenshots or Screen recordings. Select the screen recording you want to share and touch .
Screen and Display Using your knuckle to enable split screen mode Open an app that supports split-screen mode and knock the screen with one knuckle. Hold down your knuckle and draw a line across the screen. If the screen is in portrait view, draw a horizontal line; if the screen is in landscape view, draw a vertical line. Using swipe gestures to enable split screen mode Open an app that supports split screen mode, and then swipe up from the bottom of the screen with two fingers.
Screen and Display Split Screen Mode Switching to full screen mode In split screen mode, touch and hold and swipe up or down to switch to full screen mode. Swapping screens In split screen mode, touch , and then touch to switch the position of the screens.
Screen and Display Changing the screen orientation Swipe down from the status bar to open the notification panel. Touch to enable automatic screen rotation in split screen mode. Accessing the home screen In split screen mode, touch enabled, touch and hold to access the home screen. If navigation with one button is to access the home screen.
Screen and Display Exiting split-screen mode To exit split-screen mode, touch and select . Using motion gestures Motion gestures make it easier to control your device. Open Settings. Touch Smart assistance > Motion control and select the motions you want to enable. l Flip: Mute sounds and disable vibrations for incoming calls, alarms, and timers. l Pick up: Pick up your phone to reduce the ringtone volume for incoming calls, alarms, and timers.
Screen and Display l Raise to ear: Hold the phone to your ear to answer an incoming call. When viewing call log details or contact details, hold the phone to your ear to call that contact. When calling in handsfree mode or with a Bluetooth headset, raise the phone to your ear to switch to earpiece mode. Eye comfort mode Eye comfort mode decreases the amount of blue light emitted from the screen to reduce eye strain. Eye comfort mode 1 2 Open Settings.
Screen and Display Configuring the timer Configure the timer to enable eye comfort mode automatically at a preset time, such as when you finish work or before you go to bed. 1 2 3 Open Settings. Touch Display > Eye comfort. Switch on Schedule and configure the Start time and End time. Display settings Changing the font size 1 2 Open Settings. Touch Display > Font size and choose a font size.
Screen and Display Adjusting the screen brightness Adjust the screen brightness to suit your needs. 1 2 Open Settings. Touch Display > Brightness and switch on Automatic brightness. When automatic screen brightness is enabled, the brightness of the screen will automatically adjust based on the light conditions. Adjust the screen brightness quickly: Swipe down from the status bar. Touch Auto. Enable or disable automatic screen brightness.
Network and Sharing Mobile Internet Using mobile data Enabling mobile data Before enabling mobile data, ensure that you have activated mobile data services with your carrier. 1 2 3 Open Settings. Touch More > Mobile network. Switch on Mobile data to enable mobile data. Disable mobile data when not required so as to save battery power and reduce data usage. Enabling 4G Before enabling 4G, ensure that you have activated 4G services with your carrier and that you are using a 4G SIM card.
Network and Sharing Sharing your Network with Other Devices Sharing networks over a Wi-Fi hotspot 1 2 3 4 Open Settings. Touch More > Tethering & portable hotspot. Touch Portable Wi-Fi hotspot and enable the Hotspot. Touch Configure Wi-Fi hotspot and set the name, security level and password for the Wi-Fi hotspot, then touch Save. How can I limit the amount of data other devices can use through my hotspot? From the Settings interface, touch Data limit and set the data limit.
Network and Sharing Sharing mobile data over Bluetooth Pair and connect the devices over Bluetooth before setting up mobile data sharing. For details on how to pair devices, see Connecting to other devices using Bluetooth. 1 2 3 Open 4 From the Bluetooth interface, touch Settings. Touch More > Tethering & portable hotspot. Enable Bluetooth tethering to share your mobile data. in the area next to the name of the paired device, and enable Internet access to set up the Internet access connection.
Network and Sharing Connecting to a Wi-Fi network using Wi-Fi Protected Setup (WPS) WPS allows your device to connect to a WPS-enabled router without entering a password. 1 2 Go to 3 Touch Settings. Touch Wi-Fi and switch on Wi-Fi. > Advanced Wi-Fi settings. There are two options: l Touch WPS connection and press the router's WPS button. l Touch WPS PIN connection to generate a PIN, and then enter the PIN on the router.
Network and Sharing Enabling or disabling Wi-Fi Direct 1 Go to 2 3 Touch Wi-Fi. Turn on the Wi-Fi switch and then touch Settings. . Your device will list available Wi-Fi Direct devices. Select the device you want to share files with and then follow the onscreen instructions to connect. To disconnect from the receiving device, touch and go to the Wi-Fi direct screen. Select the receiving device and touch OK.
Network and Sharing 1 Select the file(s) you want to share and touch Share > Bluetooth. Your device will search for available Bluetooth devices. 2 3 Select the receiving device. On the receiving device, select Accept from the popup dialog to accept the file transfer request. Open the notification panel to view the file transfer progress. By default, received files are saved to the Bluetooth folder in Files.
Network and Sharing NFC About NFC NFC (Near Field Communication) lets you make fast, secure payments with your device and also allows convenient file sharing with other devices. NFC-enabled devices support the following three modes: l Card emulation: Emulate contactless smart cards. l Read/write: Scan NFC tags (in order to top up your transport card for example). l Peer-to-peer: Transfer files between two NFC-enabled devices. Enabling NFC 1 2 3 Open Settings.
Network and Sharing Using NFC to transfer files Place two NFC-enabled devices back-to-back for rapid file sharing. Check that the screen is unlocked on both devices and ensure that NFC and Huawei Beam are both enabled. 1 On the sending device, select the content that you want to beam (such as web pages, contacts, images, or videos). Touch Share > Huawei Beam. 2 Hold both devices back-to-back so that the NFC sensors on each device touch each other.
Network and Sharing To use multi-screen, your display device must support Miracast. If your display device does not support the above, you can buy an Android set-top box and connect it to your display device. Mirroring your screen to a display device Mirror your screen to a larger display device when playing games or sharing content with others. Ensure that your device is connected to the same Wi-Fi network as your display device or set-top box. 1 2 Go to Settings.
Network and Sharing Connecting to a VPN Use a virtual private network (VPN) for secure, remote access to company data and other network resources. Contact your VPN administrator to obtain the server information. 1 2 3 Open Settings. Touch More > VPN. Touch Add VPN network. When prompted, enter the server name, select the server type, and then enter the server address. Touch Save to save the server settings.
Network and Sharing 1 When you use a USB cable to connect your phone to a computer or another device, Allow access to device data? will be displayed in a popup dialog. 2 3 Touch No, charge only. Swipe down from the status bar to open the notification panel, and then touch Charging via USB. You can choose from the following USB connection modes: l Charge only: Charge your phone only. l Reverse charging: Use your phone to charge another device with a USB Type-C cable.
Network and Sharing Transferring data between your phone and a USB storage device USB OTG is designed to transfer data directly between two USB devices (such as phones, tablets, digital cameras, and printers) without the need for a computer. Use a USB On-The-Go (OTG) cable to connect your phone to a USB storage device and back up your files.
Security and Backup Fingerprint recognition Adding a fingerprint for the first time You can use a fingerprint to unlock your screen, access locked apps and the safe, and make secure payments. To better protect your privacy, you can only use the fingerprint screen unlock feature when the unlock method is set to PIN or Password. 1 2 Touch Settings. Touch Fingerprint ID > PIN or Password, and set an unlock password by following the onscreen instructions.
Security and Backup 4 Touch Access safe, and then follow the onscreen instructions to enter your Safe password and enable fingerprint recognition. Once you have completed the settings, touch Files > Safe. You can now use your fingerprint to access your Safe. Accessing App Lock with your fingerprint Use your fingerprint for quick access to apps in your App Lock. You do not need to enter the App Lock password. 1 2 3 4 Open Settings. Touch Fingerprint ID. Enter the screen lock password and touch Next.
Security and Backup Multi-user accounts About multi-user accounts Create multiple user accounts to prevent others from viewing your confidential information, or to keep your work and personal life separate. There are four different user types: l Owner: Only the owner can log in to this account. As the owner, you can control all user permissions. For example, you can add or delete users and guests, or authorize other users calling and messaging permissions.
Security and Backup l Open Settings > Advanced settings > Users. Select the user that you want to delete and touch Delete user > Delete. Switching between user accounts Quickly switch between user accounts. To switch to another user account, swipe down from the status bar, touch , and then select a profile picture or username. Open Settings > Advanced settings > Users. Select the user that you want to switch to and touch Switch user.
Security and Backup Log in as the owner. You can authorize a user or guest to make calls and access your contacts in two ways: l Swipe down from the status bar and touch > More settings. Select a user, and then touch Allow calls, messages, and sharing of communication history. l Open Settings > Advanced settings > Users, select a user, and then touch Allow calls, messages, and sharing of communication history.
Security and Backup To change your SIM card PIN, touch Change SIM PIN and follow onscreen instructions. l You will need to enter the PUK code if you exceed the maximum number of incorrect PIN attempts. The SIM card will be permanently locked if you enter the PUK code incorrectly too many times. l For details about these limits, contact your carrier. Encrypting files stored on the microSD card Encrypt files on your microSD card to make them inaccessible on other devices.
Camera and Gallery Camera options Open Camera to display the viewfinder. Switch Flash mode Toggle Wide-aperture mode Toggle rear and front camera Toggle Moving picture mode Toggle Portrait mode View photos and videos Switch to video mode Take a photo Swipe right on the viewfinder to display the list of shooting modes. Swipe left on the viewfinder to access the camera settings.
Camera and Gallery Zooming in and out Spread two fingers apart to zoom in, or pinch them together to zoom out. The image quality may be affected if you continue to zoom in after the maximum optical zoom has been reached. You can also zoom in or out by adjusting the slider that appears in the viewfinder after you perform the zoom in or zoom out functions with your two fingers. Adjusting the exposure The camera automatically adjusts the exposure according to the ambient brightness.
Camera and Gallery 1 2 3 Open Camera. Swipe left and touch Ultra snapshot > Open camera and take quick snapshot. When the screen is off, point the camera at the desired object and press the volume down button twice in quick succession to take a photo. The camera will automatically take a photo and display the capture time. Disable Ultra Snapshot: Touch Ultra snapshot > Off in the camera settings.
Camera and Gallery 3 4 Touch Audio control and switch on Audio control. You can then: l Say Cheese to take photos: Set the camera, so that it will take a photo when you issue a voice command. The camera will only take photos when default voice command Cheese is detected. You cannot configure custom voice commands. l Take photos when your voice reaches a certain decibel level: Set the camera to take a photo when the surrounding noise reaches a certain decibel level.
Camera and Gallery Pro mode help Select metering mode Adjust ISO Adjust shutter speed Adjust exposure compensation Set white balance Change focus mode Locked symbol Pro camera settings Selecting the metering mode Touch to select the metering mode. The metering mode affects how your camera determines the exposure. You can select matrix metering, center-weighted metering, or spot metering. Adjusting the ISO The ISO determines the camera's sensitivity to light.
Camera and Gallery Setting the white balance Touch AWB to select a white balance according to the ambient light conditions. You can choose from daylight, tungsten bulb, fluorescent lamp, and more. You can also adjust the color temperature. Touch and hold AWB to lock the white balance. Using the spirit level Enable the spirit level to ensure that the camera is level. In the Pro camera viewfinder, swipe left and switch on Horizontal level.
Camera and Gallery Portrait mode Use portrait mode for stunning selfies and smoother-looking skin. 1 Open 2 Touch on the top of the screen. 3 Touch in the viewfinder and drag the slider left or right to adjust the beauty setting. Touch 4 Touch Camera. to darken the area around the viewfinder and make your subject stand out. to take a photo. Perfect Selfie mode Use Perfect Selfie mode to automatically apply customized beauty settings to your face. 1 Open 2 3 4 Touch Camera.
Camera and Gallery Time-lapse mode Time-lapse mode allows you to capture and speed up subtle changes in the natural world. For example, you can record the opening of a flower or the movement of clouds. 1 Open 2 Place your device on a stable surface or use a tripod. Touch Camera. Swipe right and touch Time-lapse. to start a video recording. The camera will automatically select a suitable frame rate according to the length of the recording. The zoom cannot be adjusted during recording.
Camera and Gallery Photos with audio notes are indicated by the icon in Gallery. When viewing a photo with an audio note, touch to play the audio note. Managing shooting modes Rearranging the shooting mode list Move your favorite shooting modes to the top of the list to make them easier to find. 1 2 Open 3 Touch 4 Drag mode icons to the desired position. Touch Camera. Swipe right to display the list of shooting modes. . to save the settings.
Camera and Gallery Open Camera. Swipe left and touch Resolution to change the resolution. Configuring the default storage location for photos and videos Not all devices support microSD cards. Open Camera. Swipe left and switch on Priority save in SD card to change the default storage location to the microSD card. This option is only available when the device supports microSD card and a microSD card is inserted. If the microSD card is full, photos will be saved to your device's internal storage.
Camera and Gallery Viewing photos and videos Viewing photos in full screen mode Open Gallery and touch a photo to view it in full screen. Touch the screen to show or hide the menu. When viewing photos in full-screen mode, you can: l Zoom in or out: Spread two fingers apart to zoom in, or pinch two fingers together to zoom out. l View image details: Touch to view the image details, such as the ISO, exposure compensation, and resolution.
Camera and Gallery Organizing albums Adding photos or videos to a new album 1 Open 2 On the Albums tab, touch 3 4 Select the images or videos that you want to add to the new album and touch Gallery. . Enter the album name and touch OK. . Touch Copy or Move to add selected files to the new album. If you copy the files to a new album, the original files will be saved. If you move the files to a new album, the original files will be deleted.
Camera and Gallery l To share or move an album, touch and hold any photo in the album and follow the onscreen instructions. Moving albums De-clutter your photo collection by moving and merging less important albums into one album. l The Camera, Camera videos, and Screenshots albums cannot be moved to Others. l Moving an album created by a third-party app to Others will not prevent the app from functioning. 1 2 Open Gallery.
Camera and Gallery 2 Touch an image to view it in full-screen mode. In full-screen view, touch to open the photo editor and edit your photo using the available tools. l Rotate an image: Touch and swipe the screen to adjust the angle of rotation. Portion of image to preserve after rotation Swipe screen to rotate image Undo changes Rotate vertically Mirror image l Crop an image : Touch to select the crop ratio . Drag the dotted edges to crop the image to the desired size.
Camera and Gallery l Blur an image: Touch . Drag the slider to adjust the amount of blur. Drag the circle to the part of the image that you do not want to blur. l Adjust image parameters: Touch . You can adjust the brightness, contrast, saturation, and more to make your image look more vivid. l Apply facial enhancement effects: Touch to apply facial enhancement effects to people in an image. You can choose from various skin and eye enhancement effects.
Camera and Gallery Play/pause key Resolution settings Trimmed video Length of trimmed video Video trim slider Save changes Abandon changes 1 Open 2 3 Select the video that you want to edit and touch Gallery. . On the video editing screen, drag the sliders to select the portion of the video that you want to keep. You can touch 4 Touch to preview the video. to crop and save the video. To change the resolution, select a resolution on the video editing screen.
Camera and Gallery 1 Open 2 3 Touch Gallery. > Settings. You can configure the following two settings: l Switch on Show location. When viewing a geotagged photo, the photo's location will be displayed. l Switch on Show time. When viewing a photo, the date and time at which the photo was taken will be displayed.
Calls and Contacts Making calls Smart dialing Enter the name, initials, or number of a contact in the dialer. Your device will display matching contacts. 1 2 Open Dialer. Enter the name, initials, or number of a contact in the dialer (for example, John Smith or JS). Your device will search your contacts and call log and list the results above the dialer. Hide dialer 3 Backspace Select the contact you want to call from the list. If your device has dual SIM support, touch 1 or 2 to make a call.
Calls and Contacts 3 Touch the contact number. If your device has dual SIM support, touch 1 2 or to make a call. Making a call from the call log 1 2 Open Dialer. Slide the list up and down to view all calls. Touch the name or number of the person that you want to call. If your device has dual SIM support, touch 1 or 2 to make a call. Calling contacts when the screen is off Call people when the screen is switched off. 1 Open 2 Touch Dialer.
Calls and Contacts Answering calls Answering or rejecting a call When a call comes in, press the volume button to mute the ringtone. If the screen is locked: l Drag right to answer the call. l Drag left to reject the call. l Touch to reject the call and send an SMS. l Touch to configure a callback reminder. If the screen is unlocked: l Touch to answer the call. l Touch to reject the call. l Touch to reject the call and send an SMS. l Touch to configure a callback reminder.
Calls and Contacts 1 If you receive an incoming call when in another call, touch . You can then answer the incoming call and hold the other line. 2 To switch between the two calls, touch or select the call that is on hold. Making a conference call Set up a conference call using the multi-party call feature. Call one contact's number (or receive a call), and then call another number to add it to the conference call. Conference calling must be supported by your carrier.
Calls and Contacts 6 Touch to end the conference call. In-call options Do not cover the microphone during a call. During a call, your device will display an in-call menu. View your calendar Place the current call on hold Start a three-way call Mute the call View your notes Display your contacts Show/hide dialer Enable hands-free mode End call l Start a three-way call: Contact your carrier to find out how to use this feature.
Calls and Contacts Managing call logs Viewing missed calls 1 2 Open Dialer. To display all missed calls, touch the Missed tab and swipe down in the call log. You can also view missed calls in the All tab. Missed calls are marked in red. 3 Touch next to a call log to return the call, send a message, and more. Managing unknown numbers in the call log 1 2 Open 3 Select a number and touch Dialer. Touch Unknown. l .
Calls and Contacts 3 4 Select Call log and touch Back up. Follow the onscreen instructions to configure a password. Call settings Enabling call forwarding If you are unavailable to take a call, you can configure your device to forward calls to another number. 1 Open 2 3 Touch Dialer. > Settings. Touch Call forwarding. If your device has dual SIM support, touch SIM 1 or SIM 2, and then touch Call forwarding. 4 Select a method of forwarding the call. Enter the destination number and touch Enable.
Calls and Contacts Enabling pocket mode Enable pocket mode to make sure you don't miss calls when your device is in your pocket. The ringtone volume will gradually increase when you receive a call. 1 Open 2 3 Touch Dialer. > Settings. Switch on Pocket mode. When pocket mode is enabled, the ringtone volume will gradually increase when you receive a call and your device is in your pocket or bag.
Calls and Contacts You can also configure the harassment filter settings and the blacklist in Phone Manager > Blocked > . Configuring the call ringtone Choose from a selection of system ringtones or pick a song from your music library. Features may vary depending on your carrier. 1 Open Dialer. 2 Go to > Settings > Phone ringtone. Choose a system ringtone or select a song from your music library.
Calls and Contacts Share your contact card: Touch . Select the card format and sharing method, and then follow the onscreen instructions. Creating a new contact Creating a contact 1 Open 2 3 Touch Contacts. . If you are creating a contact for the first time, touch Create a new contact. In the options menu, select a location to save the contact. The number of contacts you can store on your device depends on the size of your device's internal storage.
Calls and Contacts l Take a photo of multiple cards: Switch to Burst mode and follow the onscreen instructions. After you have finished scanning or taking photos, contact information will automatically be saved to Business cards. Sharing your QR code Share your QR code with your friends so that they can add you to their contacts quickly. On the contact details screen, touch the QR code at the top of the screen to display your personal QR code.
Calls and Contacts 3 Select one or more .vcf files, and then touch OK. Exporting contacts to a storage device 1 Open 2 3 Touch Contacts. > Import/Export > Export to storage > Export. Choose where you want to export the contacts from and touch OK. By default, the exported .vcf file is saved to the root directory of your device's internal storage. Open Files to view the exported file. Importing contacts from a SIM card 1 Open 2 Touch Contacts. > Import/Export > Import from SIM.
Calls and Contacts Add multiple numbers for one contact: Select a contact from the contact list and touch Edit > Add phone number. Merging duplicate contacts When you add contacts to your device from different sources, you may end up with duplicate entries. These duplicate entries can be merged into one to help keep your contacts organized. 1 Open 2 Touch 3 Select the contacts you want to merge and touch Contacts. > Organize contacts > Merge duplicate contacts. .
Calls and Contacts 2 3 Touch > Organize contacts > Contacts with incomplete info. Your device will display a list of contacts with incomplete information. You can then choose to add missing information or delete unwanted contacts. Searching for contacts Search contacts stored on the device, SIM card, or linked to an online account. Finding contacts 1 Open Contacts. For more complete search results, ensure that Contacts is configured to display all of your contacts.
Calls and Contacts 2 3 Touch Select the contacts you want to share, or touch "Select all" to select all contacts, and then touch 4 > Import/Export > Share contacts. . Choose your sharing method and follow the onscreen instructions. Share a contact's QR code 1 2 3 Open Contacts Select the contact you want to share. Touch the QR code and select Share. Choose your sharing method and follow the onscreen instructions.
Calls and Contacts Viewing call records for individual contacts 1 2 3 Open Contacts. Select the desired contact and touch Call log. Swipe up on the list to view all entries. You can: l Touch an entry to call the contact. l Touch l Touch and hold an entry to delete it or edit it before calling. > Delete to delete all entries. Assigning a ringtone to a contact Assign a unique ringtone to frequently used contacts so that you can easily tell who is contacting you.
Calls and Contacts 2 Touch Groups and select the group you want to edit. 3 Touch and add new members to the group. 4 Touch . There are three options: l Touch Remove members to remove members from the group. l Touch Delete group to delete the group. l Touch Rename to edit the group name. Sending a group text message or email 1 2 Touch Groups and select which group you want to send a message or email to. 3 Touch Open Contacts. to send a message or to send an email.
Messaging and Email Sending a message You can add a range of different content to messages, such as emoticons, images, and recordings. 1 Open 2 3 In the list of message threads, touch Messaging. . Select the recipient box and enter the contact name or phone number. You can also touch to open your contact list and choose a contact or contact group. 4 Select the text field to begin composing your message. If you enter more than two lines of to switch to full screen mode.
Messaging and Email Searching for messages There are two ways to search for messages: l In the list of message threads, touch the search bar at the top of the screen and enter one or more keywords. The results will be displayed beneath the search bar. l Swipe down on the home screen to display the search bar. Touch the search bar and enter one or more keywords. The results will be displayed beneath the search bar. Deleting message threads Delete unwanted or old threads to tidy up your message list.
Messaging and Email Pinning messages to the top of the list Pin important messages to the top of your message list so that you can access them quickly. 1 2 Open 3 Select the desired message and touch Messaging. In the list of message threads, touch and hold the message that you want to pin to the top. . Pinned messages will be displayed below text message alerts. Marking messages as read Mark unwanted messages as read to keep your inbox organized. Open Messaging.
Messaging and Email 2 3 In the list of message threads, touch > Settings > Ringtones and vibration. Touch Notification tone. If your device has dual SIM support, select SIM 1 notification tone or SIM 2 notification tone. You can then choose a system ringtone or music file. Adding an email account If you don't know your account settings, please consult your email service provider. Adding a personal email account 1 2 3 4 Open Email. Choose an email service provider or touch Others.
Messaging and Email Replying to emails 1 Open 2 Open the email you want to reply to and touch Email. . To reply to all recipients of the original email, touch 3 After drafting your message, touch Configuring fast responses: Touch . to send the email. > Settings. Select an account and touch Quick responses to create or edit a fast response. Managing emails Viewing emails You can check, reply, forward or delete your emails after you create a personal email account.
Messaging and Email Configuring Mail Configuring automatic replies Configure automatic replies when you are out of office. You must log in to your Exchange account to use this feature. 1 Open 2 3 4 5 Touch Email. > Settings. Choose the Exchange account you want to configure and switch Automatic replies on. Switch on Automatic replies to configure a message and set the start and end time. Touch Done. Configuring an email signature 1 2 3 > Settings.
Calendar and Notepad Changing the calendar view Search calendar Go to today Current day Today Event Show events for current day Toggle between month, week, and day view Add event To view your schedule for a specific day, touch > Go to, select a date, and then touch Done. Open Calendar and touch > Settings. You can: l Configure the weekend settings: Touch Customize weekend and configure the settings. l Configure the first day of the week: Touch Week starts on and configure the settings.
Calendar and Notepad Before using this feature, ensure that you have added birthday information to your contacts. For more information, see Creating a contact. 1 Open 2 Touch Calendar. and select Contacts' birthdays. Once you have enabled this feature, Calendar will automatically import birthday information from your contacts and send you birthday reminders. Creating an event Add events and set reminders to help you plan ahead. 1 Open Calendar. 2 3 Touch .
Calendar and Notepad Searching for events You can search for events in two ways: l In Calendar, touch . Enter one or more keywords in the search bar, such as the event name or location. l Swipe down on the home screen to display the search bar. Enter one or more keywords, such as the event name or location. Sending event invitations Send event invitations to your friends or colleagues to keep track of who is attending. Before using this feature, log in to your Exchange account. 1 Open Calendar.
Calendar and Notepad Managing notes Adding a note to favorites Open Notepad. You can add a note to your favorites in two ways: l In the list of notes, swipe left on a note and touch . l Touch the note that you want to add to your favorites and touch . Sharing a note In the list of notes, open the note that you want to share and touch . Choose your sharing method and follow the onscreen instructions.
Music and Video Listening to music You can choose to listen to your favorite local songs . 1 2 Open Music. You can then play music stored on your device, add a song to the personal song book, play a song in the personal playlist, or listen to recently played songs. 3 You can play, pause, or change songs during the process.
Music and Video Deleting songs Delete unwanted songs to free up storage space. 1 2 3 Open Music. Touch All songs. Go to the Songs tab. Touch and hold the list of songs and select the songs that you want to delete. 4 5 Touch > Delete. Touch Delete. Creating a playlist Organize your music by creating customized playlists that contain your favorite songs. 1 2 3 4 5 Open Music Touch Playlists > Create new playlist. Name the playlist and touch Save. Touch Add in the dialog box.
Phone Manager Optimizing performance Use Phone Manager to make your phone run faster and optimize performance. Open Phone Manager and touch OPTIMIZE. Your phone will automatically optimize performance, enhance security, and reduce power consumption. Enhancing speed Clear the app cache and delete residual files and system trash to optimize performance. 1 2 Open Phone Manager. Touch Cleanup to clear the app cache and system trash.
Phone Manager l Data usage ranking: View data usage for each app. l Networked apps: Manage Internet access permissions for each app. l Total monthly data available: Touch > Total monthly data available to configure your data plan settings and data usage reminders. Your phone will calculate your mobile data usage and remaining data allowance for the billing period you specify. When you have used up your monthly allowance, you will receive a reminder, or your phone will disable mobile data.
Phone Manager Configure filter rules Calls and messages from blacklisted numbers will be blocked Messages from strangers that contain blacklisted keywords will be blocked Calls and messages from whitelisted numbers will not be blocked Configure filter notifications Battery Management Viewing battery usage statistics My device's battery is draining very fast, which apps are draining my battery? How can I reduce my power consumption? Use Phone Manager to view detailed battery usage statistics for each app.
Phone Manager l Close power-intensive apps: Touch Power-intensive apps and select the apps that you want to close. A message will appear in the notification panel if power-intensive apps are running in the background. If you don't want to receive these notifications, touch and switch off Power-intensive prompt. l Reduce the screen resolution: Switch on Low resolution power saving to reduce the screen resolution and lower power consumption.
Phone Manager 3 Turn on the switch next to the apps that you want to encrypt. You will need to enter the PIN each time you open an encrypted app. On the App Lock screen, touch to change password or disable App Lock. Setting apps to close automatically when the screen is locked Choose which apps you want to close when the screen is locked to reduce power consumption and mobile data usage. 1 2 3 Open Phone Manager. Touch Lock screen cleanup. Turn on the switch next to the apps that you want to close.
Tools Logging in to two social media accounts at the same time Log in to two Whatsapp or Facebook accounts at the same time to keep your work and personal life separate. This feature only works with Facebook and WhatsApp. 1 2 Open Settings. Touch App twin. Turn on the Facebook or WhatsApp switches as desired. l When App twin is enabled for an app, two app icons will appear on the home screen, allowing you log in to two accounts at the same time.
Tools Enabling dual clocks By default, your device displays the network time. Enable dual clocks to display the time in your current time zone and your home time zone on the lock screen. 1 Open 2 3 Under World clock, touch Clock. > Date & time . Switch on Dual clocks. Touch Home city and select your home time zone from the list of cities. Home time zone Current network time zone Only one clock is displayed when the local time zone is the same as the home time zone.
Tools 1 2 3 Open Recorder. Select Recordings. Select a recording. On the playback screen, you can: l Select a tag: Swipe left on the playback screen to view recording tags, and then select a tag to start playback from the corresponding location. l Change the playback mode: Switch between Earpiece and Speaker. When the Recorder app is playing a recording in the background, use the controller in the notification panel to play, pause, or cancel the recording.
System Features and Settings Power on and off timer Use the power on and off timer to reduce power consumption and prevent disturbances when you're asleep. Open Settings, touch Smart assistance > Scheduled power on/off. Switch on Scheduled power off and Scheduled power on, and then configure the power on and off time and repeat settings. Your device will automatically turn on or off at the preset time. To disable the timer, switch off Scheduled power off and Scheduled power on.
System Features and Settings Input method settings Adding a keyboard 1 2 Open Settings. Touch Advanced settings > Language & input and select Virtual keyboard under Keyboard & input methods. 3 Touch Add virtual keyboard and switch on the keyboard that you want to add. After adding a keyboard, you can configure the keyboard settings to suit your needs. Selecting the default input method 1 2 Open Settings. Touch Advanced settings > Language & input.
System Features and Settings The pasted text will remain available in the clipboard until you cut or copy other content. l Sharing text: Select the text you want to share and touch Share. Choose how you want to share the text and follow the onscreen instructions. Airplane mode To avoid interference, please enable airplane mode when you are on board a plane. When enabled, call, mobile data, Bluetooth, and Wi-Fi will be disabled. You can enable Bluetooth and Wi-Fi manually.
System Features and Settings Enabling silent mode Enable silent mode to avoid disturbing others in quiet surroundings, such as when you are in a meeting. 1 2 Open Settings. Touch Sound and switch on Silent mode. Vibrate in silent mode: When Silent mode is enabled and Vibrate in silent mode is switched on, your device will vibrate when you receive an incoming call or message.
System Features and Settings l Use the shifting keyboard: Enable Shifting keyboard. The dialer, in-call menu, and lock screen dialpad will shrink to the corner of the screen for easier one-handed typing. Touch the arrow next to the keyboard to move the keyboard to the other side of the screen. Do not disturb mode Do not disturb mode allows you to work or relax in peace and quiet. Your device will only notify you about important calls or messages. 1 2 3 Open Settings.
System Features and Settings Viewing memory and storage information View storage and memory information, change the default storage location, and format the microSD card. Not all devices support microSD cards. 1 2 Open Settings. Touch Memory & storage to view storage information for your internal storage and microSD card. 3 From there, you can: l Format the microSD card: Touch SD card > Format > Erase & format to clear all data from the microSD card.
System Features and Settings l Use GPS, Wi-Fi, and mobile networks: Uses GPS and your device's Internet connection. Enable this option for highly accurate positioning. l Use Wi-Fi and mobile networks: Only uses your device's Internet connection. Enable this option for reduced power consumption and longer standby times. l Use GPS only: Does not require an Internet connection. Enable this option to reduce mobile data usage.
System Features and Settings l Using unauthorized third-party software to update your device may render your device unusable or put your personal information at risk. For optimum results, use the OTA update feature or take your device to your nearest Huawei service center. l Your personal data may be erased during a system update. Always back up important data before updating your device. l When updating, ensure that your device has at least 20% battery power remaining.
System Features and Settings Viewing your device's specifications View your device's specifications using a few simple steps. You can view information about your processor, memory, screen resolution, and more. 1 2 Open Settings. Touch About phone. Swipe up or down on the screen to view information about the processor, RAM, internal storage, screen resolution, and more. Accessibility features Enabling TalkBack TalkBack provides audible prompts and captions to help visually impaired users.
System Features and Settings Select an item: Touch an item with one finger to select it (it will not open). Your device will read out the content of the selected item. Open an item: Double touch any part of the screen using one finger to confirm your selection from the previous step. For example, if you want to open Settings, touch the Settings icon once using one finger, and then touch twice on any part of the screen.
System Features and Settings Text To Speech (TTS) output This feature converts text into speech for visually impaired users. Text To Speech (TTS) output requires TalkBack to be enabled. 1 2 Open Settings. Touch Advanced settings > Accessibility. Switch on Text-to-speech output, and then select the desired speech synthesis engine and voice speed. Color correction Color correction mode adjusts colors to make it easier for color vision impaired users to distinguish between different parts of the screen.
Obtaining help Read the Quick Start Guide included with your phone. Touch Settings > About phone > Legal information to read the legal information. Visit http://consumer.huawei.com/en/ for more information.
Personal Information and Data Security The use of some functions or third-party applications on your device could result in your personal information and data being lost or becoming accessible to others. Use the following measures to help you protect your personal information: l Put your device in a safe place to prevent unauthorized use. l Set your device screen to lock and set a password or unlock pattern.
List of safety features Huawei phones come with a number of security features to keep your data secure. Lock screen style and Set a screen lock password to prevent unauthorized access to your password phone. For more information, see Changing the lock screen style. Use a fingerprint to unlock your screen, open encrypted files, unlock Fingerprint recognition apps, and make secure payments. For more information, see Fingerprint recognition.
Legal Notice Copyright © Huawei Technologies Co., Ltd. 2017. All rights reserved. No part of this manual may be reproduced or transmitted in any form or by any means without prior written consent of Huawei Technologies Co., Ltd. and its affiliates ("Huawei"). The product described in this manual may include copyrighted software of Huawei and possible licensors.
Legal Notice Huawei shall not compensate or be liable for services provided by third-party service providers, or the interruption or termination of third-party contents or services. Huawei shall not be responsible for the legality, quality, or any other aspects of any software installed on this product, or for any uploaded or downloaded third-party works in any form, including but not limited to texts, images, videos, or software etc.
This guide is for reference only. The actual product, including but not limited to the color, size, and screen layout, may vary. All statements, information, and recommendations in this guide do not constitute a warranty of any kind, express or implied. Please visit http://consumer.huawei.com/en/support/hotline for recent updated hotline and email address in your country or region.