
Assembly Instructions

2/2
location.
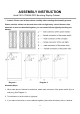
4. Leave male connector of the can light (C) and female connector of power switch (B) for the first
cabinet (#1) as it is. Keep male connector of the can light (C) and female connector of power
switch (B) off for the rest cabinets (#2, #3, and so on). (See Diagram 2)
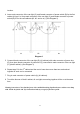
5. Connect female connector of the can light (D) (#1 cabinet) with male connector of power wire
(E), then have female connector of power wire (F) connected to male connector of the can light
(C) (the #2 cabinet). (See Diagram 3)
!!!!!!!!!
6. Repeat step 5 for the 3
rd
cabinet and the rest of ones when more than two are bunched
together till each one is connected.
7. Plug in male connector of power switch (A) (#1 cabinet).
8. Touch the dimmer of the #1 cabinet, all can lights connecting together will be on at the same
time.
Cleaning instruction: Clean finished parts with a mild dishwashing liquid and water solution on a damp
cloth. Polish the finish with soft cloth and an industry recognized furniture polish.
Diagram 3