
Operating Instructions and Installation Instructions

28
ENGLISH
For the operator
Manual draining for machines with drainage pump
For machines tted with a drainage pump it is possible
to empty the tank by carrying out the manual draining cycle,
during which only the drainage pump remains active.
IMPORTANT
This cycle can only be carried out by leaving the ma-
chine SWITCHED ON with the tank full of water and the
door OPEN.
Having released the overow, press and hold the
START (S3) button until the LED LC2 and CHECK
together) begins to FLASH, and then release the
START (S3) button;
The DRAINAGE CYCLE will begin.
IMPORTANT
By pressing the START (S3) button or switching
the power switch (Q1) to OFF, you can interrupt the
drainage cycle before the preset time is up;
to restart the interrupted cycle, press START (S3)
again.
When the LC2 LED (blue) lights up CONSTANTLY,
the drainage cycle is nished.
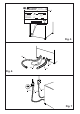
At the end of the cycle, restore the lters (22/23) and the
overow (21) to their respective positions.
2.1.f Switching off at the end of the day
At the end of the working day SWITCH OFF the ma-
chine by pressing the power switch (Q1) into the
OFF position.
Switch off the mains switch feeding the machine and
close the water supply taps.
For any repairs, contact only assistance centres au-
thorised by the manufacturer.
Warnings during the operation
1) Ensure that the washing temperature remains at
approx. 55-60°C;
2) Avoid immersing bare hands in the detergent-lled
water; if this should happen, rinse immediately and
thoroughly with running water;
3) Use only anti-foaming detergents, specics for use in
industrial machines;
4) Deactivate the machine in case of break-down or mal-
function.
For any repairs, contact only assistance centres autho-
rised by the manufacturer, and insist on the use of
original parts.
5) In no case should you change the the original formu-
lations without rst consulting an authorised assis-
tance centre;
6) When the machine is operating, do not open the door
too rapidly.
7) Wash tank water should be changed at least twice a
day or according to daily wash requirements.
Failure to follow the above warnings may compromise
the safety of the washing machine.
Any unsatisfactory results from washing can be seen
when traces of dirt are left on dishes or other items; any
water marks may be caused by insufcient rinsing.
In this case, ensure that the rinsing nozzles (24) ar
clean and that there is pressure in the water system.
If there are traces of waste, ensure that:
- The lters (22) (23) are clean;
- the water temperature is around 60°C;
- items are correctly positioned in the basket;
- the washing/rinsing nozzles are clean;
- the arms (24) (25) rotate freely.
2.1.g RESIN REGENERATION OPERATION
( for model C D-SP D only)
We recommend that you carry out regeneration when all
work is nished.
First of all, ensure that there is coarse cooking salt in the
salt container, and proceed as follows:
1. unscrew the salt container plug (28) and pour in 1 Kg of
coarse cooking salt.
2. Screw the plug (28) down tight, to ensure that the con-
tainer is completely sealed.
On reaching the set number of cycles,
The CHECK LED will ash;
this indicates that it is time to carry out regeneration.
The signal that the set number of cycles has been reached
can only be deactivated by starting the regeneration cycle
(regenerate button
(S4))
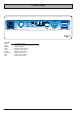
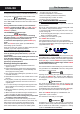
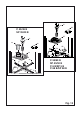
REGENERATION OPERATIONS
With the machine SWITCHED ON (the power switch (Q1)
in the ON position), and the tank EMPTY (release the over-
ow) and the door CLOSED, press and hold the regenerate
button (S4) Fig. 1 ,until the CHECK LED (blue) FLASHES.
The REGENERATION CYCLE will begin, and the CHECK
LED will ash continuously.
The machine will now automatically carry out all the neces-
sary operations for a MAXIMUM of 20 mins, during which
the machine cannot be used.
ATTENTION
Opening the door during the cycle will stop the regenera-
tion cycle; the CHECK LED will start to ash RAPIDLY;
on closing the door the cycle will resume from where it
was stopped.
IMPORTANT
The cycle can be stopped at any time by pressing and
holding the regenerate button (S4) until the CHECK LED
(blue) LIGHTS UP CONSTANTLY.
To restart the cycle, press the regenerate button (S4) again;
(the cycle will resume from where it was stopped).
When the CHECK LED lights up CONSTANTLY, the
regeneration cycle is nished.
The machine is now ready for use again.
ATTENTION
Programming of cycles for the start-up of regeneration
should be carried out by authorised technicians only (see
Part 3: Reserved for technicians, paragraph 3.2 Setting
cycles for REGENERATION PROMPT).
CHECK
C