HOOVER, AS 110, AS 115, AS 116 AS 120, AS 125, AS 126 AS 130, AS 135, AS 136 Safety reminders 2 Quality,safety,environment 2 Installation 3-7 Step-by-step guide 8-11 Programs 12 Cleaning the machine 13 | Calling for service 13 | Power failure 14 Emergency door opening 14 Guarantee Back Cover PLEASE READ THESE INSTRUCTIONS THOROUGHLY To get the best from your new appliance it must be operated in accordance with these instructions.
W This appliance should ail be used for its tenderfoot purpose us described in these instructions. W Do not use the worktop of His machine for storage. W Interlock prevents the door being opened when there is water in the drum of the dean is wing, Force open the o W Garments treated wilt cheeseparing or * Valuable cleaning sprays or liquids, such as pool, must ot be put in this machine.
Installation For your safety, this machine mus be correctly installed. If there Is any doubt about installation, call Hoover Service on 08705 400 600. Electrical Requirements WARNING! ELECTRICITY CAN BE EXTREMELY DANGEROUS. THIS APPLIANCE MUST BE EARTHED. “This Hoover appliance s fitted with 2 molded-on non-rewire able plug with a 13 Amp fuse, approved by PASTA 10 B3]362, The plug should be accessible for disconnection after the appliance has been installed.
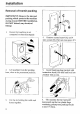
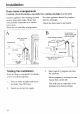
Installation Removal of transit packing IMPORTANT: Remove the internal packing which protects the machine during transit BEFORE installation. DO NOT disturb any electrical fittings. . Ensure that machine is not connected to electricity supply. 2. Lift machine from the packing bus, close to its permanent position, 3. Cul the tie holding the cable and hoses together. 4. Remove central screw (A) and 4 side screws (B).
Installation Water supply requirements Fit stop taps $o water supplies can be turned off easily. ’ Cold water supply Pressure: bar Temperature: 25°C max. Hot water supply Pressure: bar Temperature: 60°C max Open owlet gas or ek heaters must not be used. ¢ water Multi point water heaters or combination boilers may be suitable if they are designed to supply washing machines, ‘Water pressures If hot water supply is unsuitable connect both hoses to the cold wale supply sing a suitable adapter.
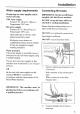
Installation Drain hose arrangements Carefully check dimensions, especially if an existing standpipe is to be vised, Connect appliance into drainage system . No other appliance should be plumbed used by household sinks. Water Bye into the standpipe. Jaw pmlnbn connection o a surface Check the drain hose is not kinked, B Failure ABOVE OVERFLOW OUTLET OF SINK HOSE SUPPORT HOSE SUPPORT GROK CROTCH DRAIN HOSE 1 12-15cm VT 32w ATTACH HOSE SEGUE) WASTE OUTLET Testing the installation 3.
Installation 4. Check cold fill: Select Rinse' program and start machine. Allow tumble action to continue until water is pumped out. Check that drain outlet is not leaking or overflowing. 5. Switch the machine off before it starts 1o spin. 6. Check hot fill: Select ‘Cottons' program and start machine. Allow wash action to continue for one minute, then switch off. Alternatively, connect both inlets to cold water supply using a suitable adapter. 7.
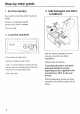
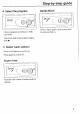
Step-by-step guide 1 Sort the laundry 3 Add detergent and fabric conditioner Sort articles according to the wash care fables. Remove everything from the pockets and folds of clothes. Close all zips 2 Load the machine Phil out drawer and put in correct amount of dor and fabric Press button to open door. 10t of powder . conditioners. Put the laundry into the ruin, s Y Gently close the drawer. Refer W the ‘Progeny’ section and do nut put into the machine more than the maximum recommended goad.
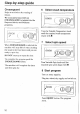
Step-by-step guide 4 Select the program Gentle Wash super g for delicate fabrics. Choose program according to wash care label. Turn book until wash program aligns with # 5 Select wash options Press in the button to switch on. Press again to switch off. Super rinse Increases the volume of water used for rinsing.
Step-by-step guide Crease guard Helps to minimize the creasing of fabrics. ‘We recommend you switch on CREASE GUARD fo include it in the Easy care fabrics and Delicate programs, 6 Select wash temperature G00o LOCO When CREASE GUARD is selected the machine will stop full of water, holding the wash in the final rinse until you are ready 1o spin dry. DO NOT attempt 1o open the door. To complete the program push the CREASE GUARD button. The machine will complete the rinse and then spin diy.
Step-by-step guide 9 Removing load’ ‘When wash program ends press button to open door, 10 Switching off Turn off the water supplies, Push the ON/OFF button and remove the plug from the electricity supply. These ave safety measures to ensure that no harm can scour electrically or by water leakage.
Cleaning the machine IMPORTANT: Always switch otf and remove plug from electricity supply before cleaning this appliance. Wipe inside of drum, window and folds in door gasket. Leave door open to dry. Wipe cabinet and glass window with o soft cloth. DO NOT use abrasive pads or cleaning ‘agents. Soap drawer removal and cleaning 1. Pull out drawer as far as the stops. 2. Gently but firmly pull over the stops and remove complete drawer. 3. Pull out the fabric conditioner insert. 4.
Power failure 1f there is a power cul the wash cycle wil be interrupted, the wash program and Functions will be suspended. When power is restored, the wash program and functions will re-start from the same point and complete the programming. ‘The Pad can be removed during a power cut as follows: If there is no water fu the dram, simply pre However, it thees is water in the dom the door CANNOT be opened. DO NOT attempt to fore open the door. ‘T'he water must be drained as follows: 1.
Guarantee HOOVER spares Always use genuine Hoover spares, available divest from Bias Service on 01204 55611 1. HOOVER Service For service and repairs call your local engineer on our national amber 08705 400 600 (Hire-018301 666). Hoover Spares Bias Service Hoover Service Repairs and General Inquiries Hoover care “To maintain your HOOVER product in peak condition you may lase wish to take ot & Hoover cars policy, which for an annual payment provides a comprehensive maintenance and repair scheme.