EN User instructions ® DDY 062 DISHWASHER
CONTENTS Safety advice Setting up, installation Water softener unit Loading the salt Adjusting the upper basket Loading the dishes Loading the detergent Types of detergent Loading the rinse aid Cleaning the filters Some practical hints Routine cleaning and maintenance Description of the control panel Technical data Programme selection and special functions Programme guide Identifying minor faults pag. pag. pag. pag. pag. pag. pag. pag. pag. pag. pag. pag. pag. pag. pag. pag. pag.
■ The door should not be left in the open position since this could present a potential hazard ( es. tripping ). SAFETY INSTRUCTIONS There are certain basic safety rules which are valid for any domestic appliance. ■ Leaning or sitting on the open door of the dishwasher could cause it to tip over. WARNING ! Knives and other utensils with sharp points must be loaded in the basket with their points down or placed in a horizontal position.
■ Cutlery is washed best if it is placed in the basket with the handles downwards. Disposal ■ If the appliance breaks down or stops working properly, switch it off, turn off the water supply and do not tamper with it. Repair work should only be carried out by an approved service agent and only genuine spare parts should be fitted. Any failure to follow the above advice may have serious consequences for the safety of the appliance.
Water connection IMPORTANT The appliance must be connected to the water mains using new hose-sets. The old hose-sets should not be reused. 1 ■ The inlet and drain hoses can be directed to left or right. IMPORTANT The dishwasher can be connected to either cold or hot water, as long as it is no hotter than 60 °C. 2 ■ Water pressure must be between 80 kPa and 800 kPa. If the pressure is below the minimum consult our service department for advice.
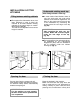
■ The hose can be hooked over the side of the sink, but it must not be immersed in water, in order to prevent water from being syphoned back to the machine when this is in operation (fig. 4Y). Connecting the outlet hose ■ The outlet hose should disharge into a standpipe, making sure that there are no kinks (fig. 4). ■ When installing the appliance under a worktop the hose pipe clamp must be attached to the wall in the highest possible position under the worktop (fig. 4Z).
INSTALLATION IN FITTED KITCHENS Underneath existing work top (when fitting beneath a work top) Fitting between existing cabinets ■ In most modern fitted kitchens there is only one single work top under which cabinets and electrical appliances are fitted. In this case remove the work top of the dishwasher by unscrewing the screws under the rear edge of the top (fig. 6a).
WATER SOFTENER UNIT * The water softener unit is set in the factory at level 3, as this is suitable for the majority of users. Depending on the source of the supply, water contains varying amounts of limestone and minerals which are deposited on the dishes leaving whitish stains and marks. The higher the level of these minerals present in the water, the harder the water is.
LOADING THE SALT IMPORTANT (Only for first start up) When the appliance is used for the first time, after completely filling the salt container, it is necessary to add water until the container overflows. ■ On the bottom of the machine there is a container for the salt for regenerating the softener. ■ It is important to use only a salt that is specifically designed for dishwasher.
ADJUSTMENT OF THE UPPER BASKET If 27 cm to 31 cm plates are normally used, load them onto the lower basket after the upper basket has been placed in its upper position and proceed as detailed below: A 1. Turn the front stops “A” outwards; 2. Take out the basket and remount it in the upper position; 3. Replace the blocks “A” in their original position.
A standard daily load is represented in figs. 1, 2 and 3. LOADING DISHES Upper basket (fig. 1) A = soup plates B = dinner plates C = dessert plates D = saucers E = cups F = glasses Using the upper basket ■ The upper basket is provided with mobile racks hooked to the sides of the basket, which can be regulated into two positions: upright and lowered. ■ In the lowered position the racks may be used for such items as: tea and coffee cups, kitchen knives and ladles.
A standard daily load is represented in figs. 4 and 5. Upper basket (fig. 3) A = glasses B = saucers C = cups D = small bowl E = medium bowl F = large bowl G = serving spoons Lower basket (fig.
Cutlery basket (fig. 6) 6 The cutlery basket is made with two detachable parts which will enable various loading options. The two parts can be detached by sliding the left section away from the right section. The top of cutlery basket can be removed, for enable various loading options.
LOADING THE DETERGENT The detergent IMPORTANT It is essential to use a detergent that is specifically designed for dishwashers either in powder, liquid or tablet form. B After pouring the detergent into the container, close the lid, firstly pushing (1) and then pressing on it (2) until you hear the click. Unsuitable detergents (like those for washing up by hand) do not contain the proper ingredients for use in a dishwasher, and stop the dishwasher from working correctly.
If when using this type of product, you don't get satisfactory washing results, please contact the detergent manufacturer. TYPES OF DETERGENT Detergent tablets Detergent tablets of different manufacturers dissolve at different speeds, for this reason, during short programmes, some detergent tablets may be not fully effective, because they are not completely dissolved. If these products are used, is recommended to choose longer programmes to guarantee the complete use of the detergent.
LOADING THE RINSE AID The rinse aid The rinse aid, which is automatically released during the last rinsing cycle, helps the dishes to dry quickly and prevents spots and stains forming. Filling the rinse aid container C The rinse aid container can be found to the left of the detergent container (fig. A "3"). To open the lid, push the reference mark and, in the same time, pull the tab of opening. It is always advisable to use rinse aid that is specifically designed for dishwasher.
CLEANING THE FILTERS The filter system (fig.A “4”) consists of: 1 a central container that traps the larger particles; a flat gauze that continuously filters the wash water; a micro filter, located beneath the gauze, that traps the tiniest particles ensuring a perfect rinse. ■ To achieve excellent results every time, the filters should be checked and cleaned after each wash. ■ To remove the filter unit, simply turn the handle anticlockwise (fig. 1).
PRATICAL HINTS How to make savings ■ If you want the dishwasher to give a complete wash, place the dishes in the dishwasher at the end of each meal and if necessary turn on the COLD RINSE cycle to soften the food remains and remove bigger particles of food from the new load of dishes. When the dishwasher is full start the complete wash cycle programme.
CLEANING AND MAINTENANCE 1 1b ■ To clean the dishwasher outside, do not use solvents (degreasing action) neither abrasives, but only a cloth soaked with water. ■ The dishwasher does not require special maintenance, because the tank is self-cleaning. ■ Regularly wipe the door gasket with a damp cloth to remove any food remains or rinse aid.
DESCRIPTION OF THE CONTROL PANEL A B C D E F G "ON/OFF" button "PROGRAMME SELECTION" button "DELAY START" button "START"/"RESET" button (start/cancelling programme) "SUPER ECO" option button "ALL in 1" option button H I L "PROGRAMME SELECTION" lights M N O "OPTION SELECTION" lights "SALT EMPTY" light "PROGRAMME STATUS" lights/ "DELAY START" time lights "ACTION PRO" lights Programme guide "ACTION PRO" button DIMENSIONS: Height Depth Width Depth with door open with working top without working top
PROGRAMME SELECTION AND SPECIAL FUNCTIONS ■ If you wish, press the "ACTION PRO" button. (Use in conjunction with programme guide) ■ If you wish to select an option, press the corresponding button (the indicator light will turn on). IMPORTANT The dishwasher has a very practical function: The option buttons can be selected or deselected WHITIN one minute of the programme commencing.
Option buttons Changing a running programme "SUPER ECO" button Proceed as follows to change or cancel a running program: This button provides an energy and time saving of 25% on average (according to the select cycle) reducing the wash water temperature and the drying time during the final rinse. This programme is recommended for light soil washes, and for slightly wet dishes that are not fully dry, & improved drying results.
2. Keep the "PROGRAMME SELECTION" button pressed for at least 15 seconds (during this time, 2 audible signals will sound). If a 9 hour delay is set, countdown will be displayed by the 6h indicator light after 3 hours and the 3h indicator light after 6 hours. 3. Release the button when the second audible signal sounds (3 "PROGRAMME SELECTION" indicator lights will come on).
PROGRAMME GUIDE Wash with prewash For wash programmes with prewash, it is advisable to add a second dose of detergent (max. 5 g) directly in the machine. Programme Description An antibacterial cycle, intended for washing and sterilising dishes (even heavily stained ones) babies’ bottles etc. Once a day - for heavily soiled pans and any other items that have been left all day for washing. Intended for rapid washing of heavily soiled crockery and cutlery.
(25 g) (5 g) (25 g) (0 g) (25 g) (0 g) (25 g) (0 g) (25 g) (0 g) (25 g) (5 g) (25 g) "ALL in 1" button “SUPER ECO” button "DELAY START" button With cold water (15°C) -Tolerance ± 10%- Hot rinse with rinse aid Second cold rinse First cold rinse Main wash 75°C 140 YES YES YES 75°C 135 YES YES YES 65°C 85 YES YES YES 70°C 125 YES YES YES 60°C 120 YES YES YES 55°C 80 YES YES YES 55°C 190 YES YES YES 45°C 170 YES YES YES 45°C 85 YES YES YES 65°C 59 YES YES YES 5
IDENTIFYING MINOR FAULTS Should the dishwasher fail to operate, before contacting the Service Centre, make the following checks: FAULT 1 - Machine completely dead 2 - Machine does not draw water 3 - Machine does not discharge water 4 - Machine discharges water continuously 5 - Spray arms are not heard to rotate 6 - On electronic appliances without a display: one or more LED flashing quickly.
FAULT CAUSE See causes for no.
The manufacturer declines all responsibility in the event of any printing mistakes in this booklet. The manufacturer also reserves the right to make appropriate modifications to its products without changing the essential characteristics.
This appliance is marked according to the European directive 2002/96/EC on Waste Electrical and Electronic Equipment (WEEE). By ensuring this product is disposed of correctly, you will help prevent potential negative consequences for the environment and human health, which could otherwise be caused by inappropriate waste handling of this product. The symbol on the product indicates that this product may not be treated as household waste.