® ® HD 96 M HD 96 M ALU English
1 2 3 9 8 4 10 Fig.
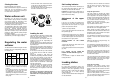
17 Q 18 C D N N M P I H B 19 C E F B D E M O L M G A 21 20 a I EN F H I L H G A 21/1 A B C D E F G b a b 22 R 24 23 A B C D E F G H I L On/off button “70°C” button Extra rinse button Half Load button “Time Saver” button Door handle Programme selector Mains indicator light Salt level indicator light Rinse aid indicator light Technical Data EN 50242 place load Capacity with pans and dishes Water supply pressure Fuse Power input Supply voltage 25/1 25/2 12 8 people Mi
PROGRAMME SELECTION • • • • • • • • • • • • • • Average duration in minutes “Time Saver” button Half load button Extra rinse button Special function buttons available “70°C” button With cold water (15°C) Hot rinse with rinse aid Main wash Hot pre-wash Cold pre-wash Programme contents Check salt container Clean filter Detergent for washing Description Detergent for soaking Programme Check rinse aid dispenser Check list COLD RINSE Short cold pre-wash for items that are stored in the dishw
Attention This dishwasher is equipped with an anti-overflow safety device which works even when power is switched off, and if the water level is too high, the supply will automatically be closed off. Important To ensure the correct operation of the anti-overflow safety device, it is recommended not to move or to tilt the dishwasher during operation. If it is necessary to move or to tilt the dishwasher, first make sure the washing cycle is finished and that no water is left in the tank.
INSTALLATION (Technical notes) Electrical connection Plug your dishwasher into the power socket. If the plug we supply does not fit • CUT IT OFF AND DESTROY IT! You can't use it on other appliances, and the exposed wires could be dangerous if anyone plugged it in. • Fit a suitable plug, as follows: After unpacking, adjust the height of the dishwasher. For the dishwasher to work correctly it must be level. Adjust the feet so that the machine does not tilt by more than 2 degrees.
- remove the lower rack. Unscrew and remove the cap from the salt dispenser located in the bottom of the tub (Fig. A “1”); - Turn the selector screw to the required position with a screwdriver or a knife. Closing the door Place the baskets in the machine. Make sure that both the spray arms are free to rotate and are not obstructed by cutlery, crockery or pans. Close the door, pressing on it to make sure it is firmly shut.
Cutlery basket (fig. 22) Place the side racks in the lower position and fill with 6 + 6 knives(R); in the spaces left insert cutlery with the handles down. Take care not to load more than two different types of cutlery in the same compartment. A standard daily load is represented in Figs. 13, 14 and 15. Upper basket (Fig. 13) A = soup plates B = dinner plates C = dessert plates D = saucers E = cups F = glasses Cutlery basket (fig.
the new load of dishes. When the dishwasher is full start the complete wash cycle programme. 2) If the dishes are not very dirty or if the baskets are not very full select an ECONOMY programme, following the instructions in the program list. Cleaning the filters The filter system (fig.A “4”) consists of: a central container that traps the larger particles.
FAULT Identifying minor faults Warning! Before removing any panel: 1. Turn the knob to STOP. 2. Pull the electric plug out. Should the dishwasher fail to operate, before contacting the Service Centre, make the following checks: FAULT 1 - Machine completely dead 2 - Machine does not draw water 3 - Machine does not discharge water 4 - Machine discharges water continuously 5 - Spray arms are not heard to rotate 6 - On electronic appliances without a display: “eco”indicator light and indicator light “No.
03.09 - 41008458.