
Operation Manual


!
8
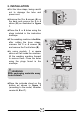
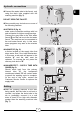
! Level the appliance using the feet as
illustrated in figure 8:
a. turn the nut clockwise to release the
screw;
b. rotate the foot to raise or lower it until it
adheres to the floor;
c. lock the foot, screwing in the nut, until it
adheres to the bottom of the washing
machine.
! Plug in the appliance.
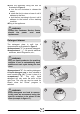
A
B
C
8
The detergent draw is split into 3
compartments as illustrated in figure 9:
! compartment "1": for prewash detergent;
! compartment “ ”: for special additives,
softeners, starch fragrances, etc.;
! compartment "2": for washing detergent.
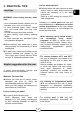
A liquid detergent cup is also included in
some models (fig. 10). To use it, place it in
compartment "2". This way, liquid
detergent will only enter the drum at the
right time. The cup can also be used for
bleach when the “Rinse” program is
selected.
9
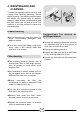
10
11
WARNING:
contact the Customer Service Centre
should the power cord need
replacement.
Detergent drawer
WARNING:
only use liquid products; the washing
machine is set to automatically dose
additives at each cycle during the last
rinse.
WARNING:
some detergents are hard to remove.
In this case we recommend using the
specific container to be placed in the
drum (example in figure 11).